
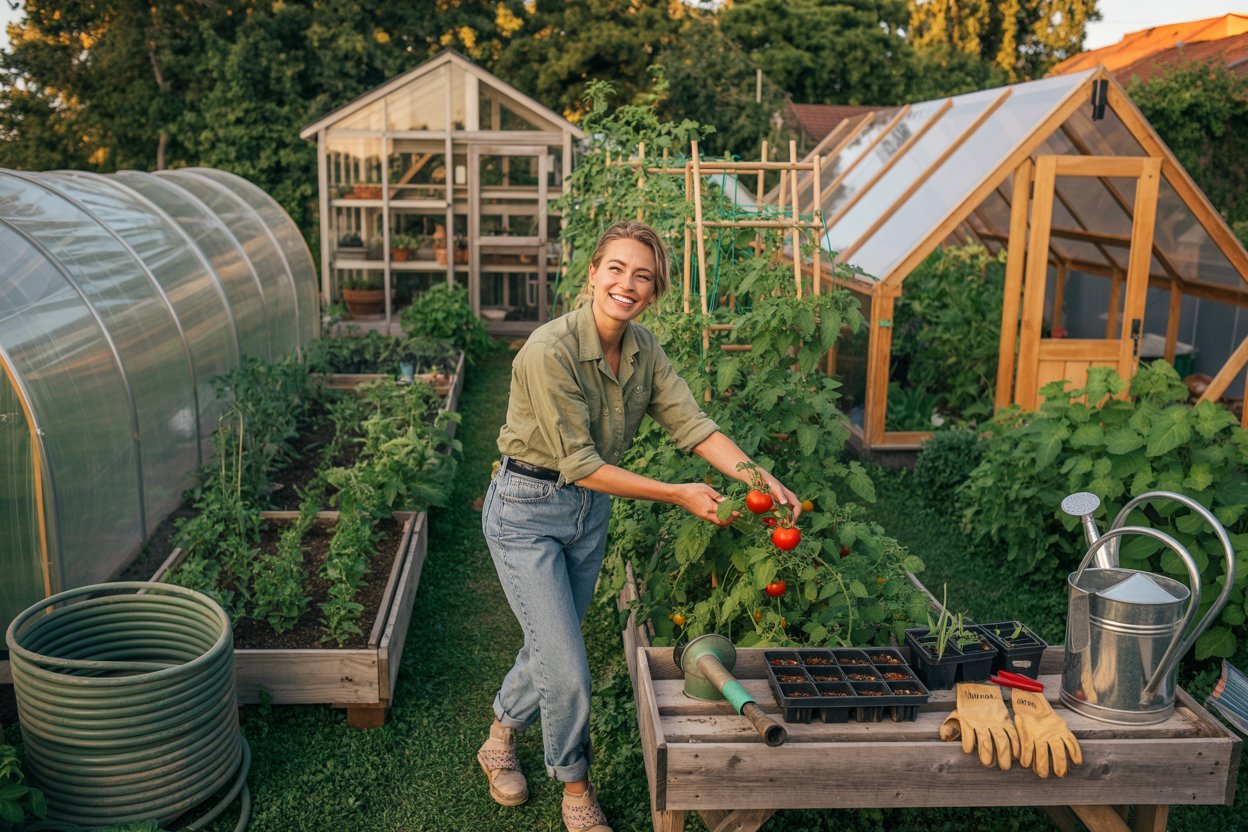
When I first fell in love with gardening, I believed one simple lie: “Plants will grow when they’re ready.”
What I didn’t realize back then was how much weather, temperature swings, pests, and timing were silently working against me.
My first few seasons were frustrating seedlings dying overnight, tomatoes refusing to ripen, herbs bolting before I could harvest them.
It wasn’t until I built my very first DIY greenhouse (a slightly crooked PVC hoop house, if I’m being honest) that everything changed.
That one structure extended my growing season, protected my plants, and gave me confidence.
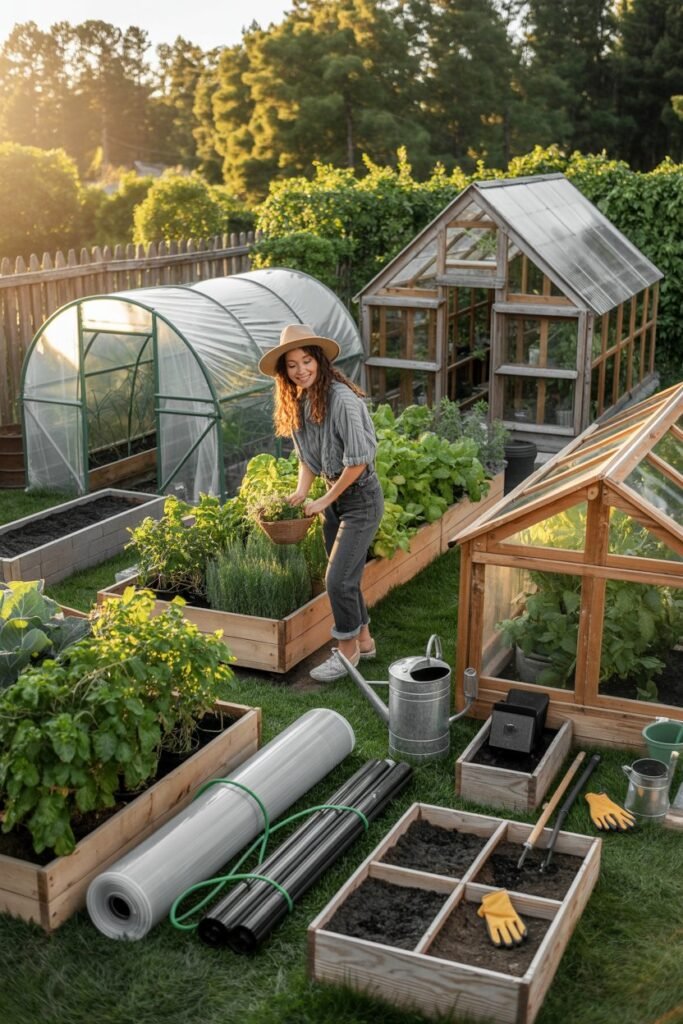
Since then, I’ve built, tested, and maintained many types of DIY greenhouses, each serving a different purpose depending on space, budget, and climate.
This guide isn’t just a list of ideas it’s a real gardener’s handbook to choosing, building, and maintaining a greenhouse that actually works.
Every plan here uses materials easily available on Amazon, and every recommendation comes from hands-on experience.
Why Every Gardener Eventually Needs a Greenhouse
Before we jump into the plans, let me explain why I believe greenhouses are one of the smartest garden investments you can make.
A greenhouse allows you to:
- Start seeds earlier (sometimes 6–8 weeks sooner)
- Grow crops longer into fall and winter
- Protect plants from heavy rain, wind, and pests
- Control temperature and humidity
- Improve germination rates
- Grow delicate or heat-loving plants successfully
Even a small, inexpensive greenhouse can dramatically improve your yields.
My Top Tools & Equipment (All Amazon-Friendly)
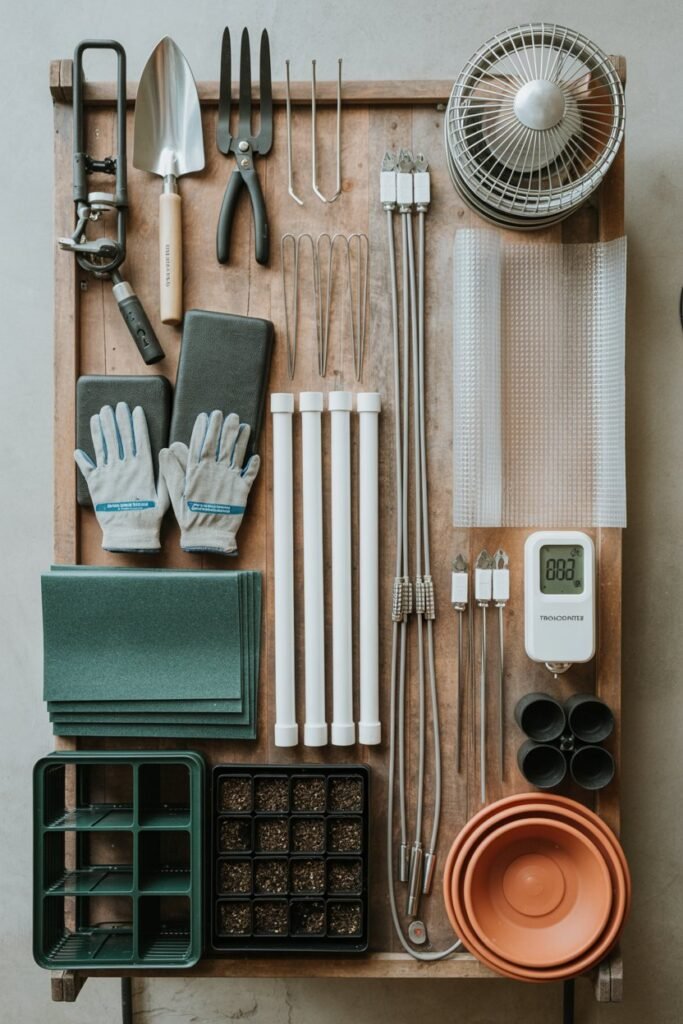
Here’s a garden toolkit I recommend everything I actually use and can be ordered quickly from Amazon:
Tools
- Garden trowel & hand fork set
- Pruning shears
- Garden gloves
- Garden kneeler
Greenhouse Essentials
- Heavy-duty greenhouse plastic
- Clear polycarbonate panels
- PVC pipes & connectors
- Row cover clips
- Ground stakes
Climate Control
- Solar powered vent fan
- Thermometer/hygrometer
- Shade cloth for summer
Watering
- Drip irrigation kit
- Soaker hoses
- Watering wand
Accessories
- Seed trays & labels
- Plant saucers
- Shelving units
1. PVC Hoop House Greenhouse
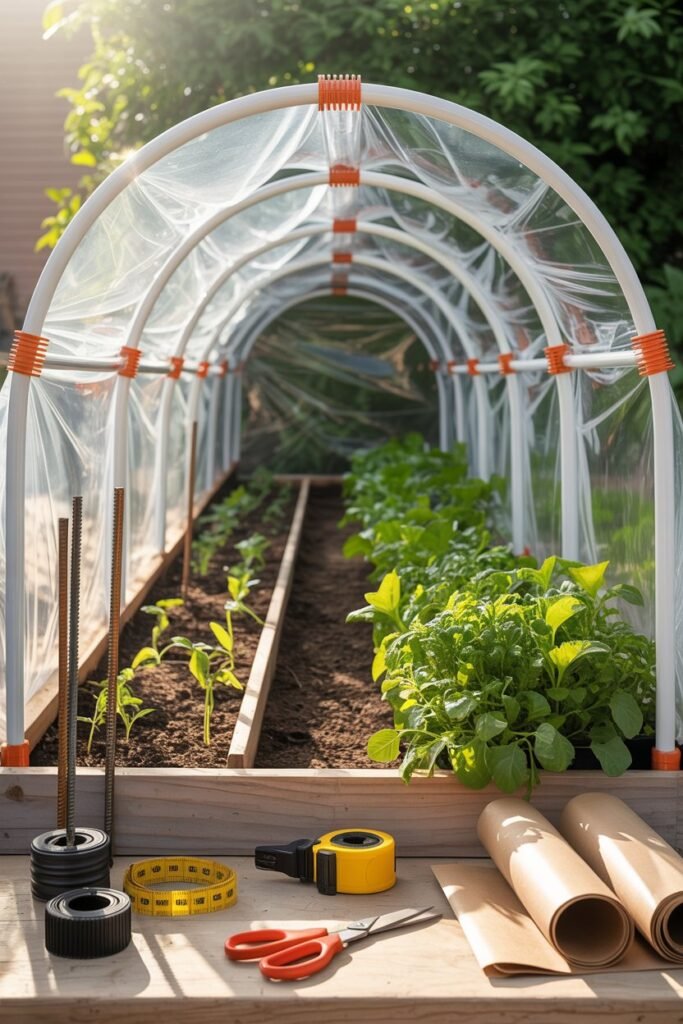
The easiest way I ever extended my growing season
Why I Recommend This Greenhouse
If I had to recommend one greenhouse for absolute beginners, this would be it — without hesitation. My very first greenhouse was a PVC hoop house, and it completely changed how I gardened.
What I love most about this design is that it’s:
- Affordable
- Forgiving if you make mistakes
- Easy to repair or adjust
- Perfect for learning greenhouse basics
You don’t need power tools, advanced carpentry skills, or a big budget. Just patience and a free afternoon.
What You Need to Achieve This (Amazon-Friendly Materials)
Everything listed below is widely available on Amazon:
- Schedule 40 PVC pipes (1–1.5 inch diameter)
- PVC elbow and T-connectors
- Heavy-duty greenhouse plastic (6 mil minimum)
- Rebar or heavy garden stakes
- Zip ties or greenhouse spring clamps
- Utility knife or scissors
- Measuring tape
- Optional: Shade cloth for summer
How to Achieve This (Step-by-Step)
- Choose your location
Pick a sunny spot that drains well. Avoid low areas where water pools. - Prepare the ground
Mark out your greenhouse footprint. Most beginners start with 6×10 feet. - Install ground anchors
Hammer rebar or stakes into the ground along both sides, spacing them evenly. - Create the hoops
Slide PVC pipes over the stakes and bend them to form arches. - Add stability
Use a long PVC pipe as a ridge pole along the top, attaching it with T-connectors. - Cover with plastic
Drape the greenhouse plastic over the frame and secure tightly with clamps or zip ties. - Seal the base
Bury the plastic edges in soil or weigh them down with bricks or wood.
Maintenance Tips (Learned From Experience)
- Always ventilate on sunny days — heat builds fast
- Replace plastic every 2–3 years
- Tighten zip ties after storms
- Add shade cloth in peak summer
Personal Tip:
My first mistake was leaving it closed on a warm day — I cooked my seedlings. Ventilation is not optional.
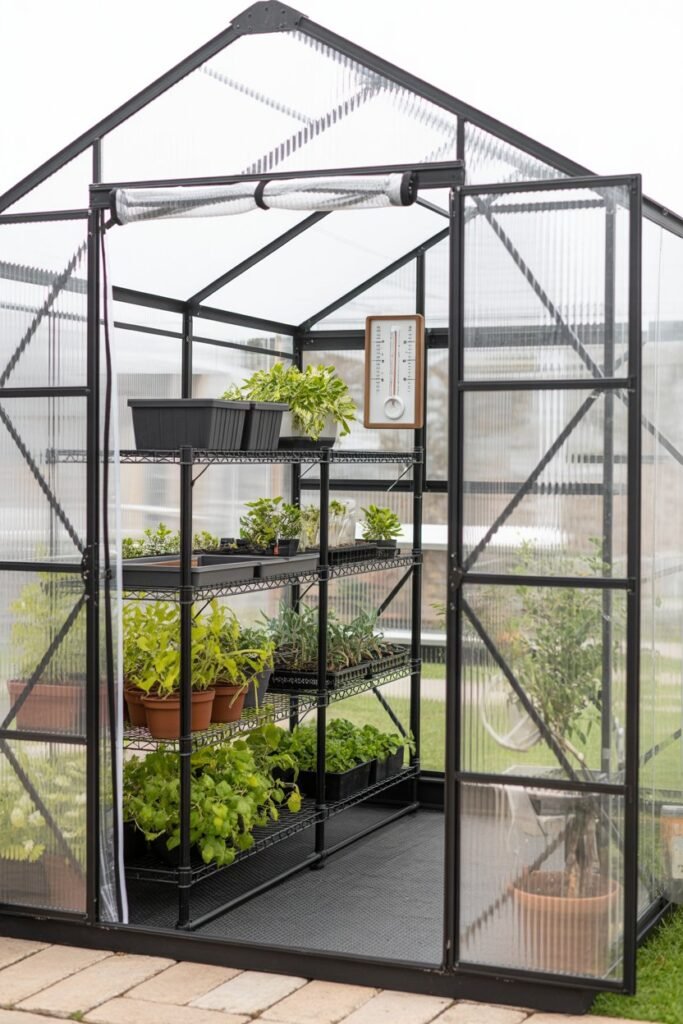
2. Wooden Frame Greenhouse with Polycarbonate Panels
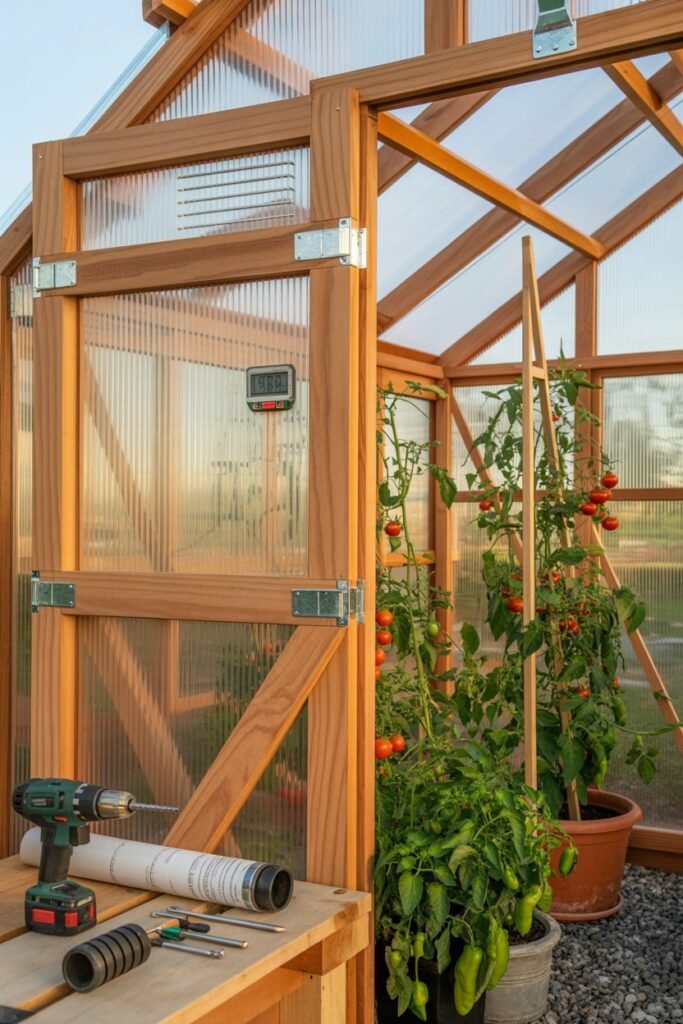
My favorite long-term greenhouse
Why I Recommend This Greenhouse
When I wanted something stronger, prettier, and more permanent, this was the design I chose. It costs more than PVC, but it pays you back in durability and insulation.
This greenhouse feels like a true garden structure — not temporary, not flimsy.
What You Need to Achieve This
(All easily sourced on Amazon or a hardware store)
- Pressure-treated lumber (2×4 or 2×6)
- Clear polycarbonate greenhouse panels
- Exterior-grade wood screws
- Drill and screwdriver bits
- Hinges for doors and vents
- Weather stripping
- Silicone sealant
How to Achieve This
- Build a solid base
Construct a rectangular base frame and secure it level on the ground. - Frame the walls
Build wall frames and attach them upright to the base. - Construct the roof
A sloped roof works best to shed rain and snow. - Install panels
Attach polycarbonate panels using screws with washers to prevent cracking. - Add doors and vents
At least one opening is essential for airflow. - Seal everything
Use weather stripping and sealant to keep warmth inside.
Maintenance Tips
- Clean panels twice a year for maximum sunlight
- Inspect wood annually for moisture damage
- Tighten screws seasonally
- Replace cracked panels promptly
Personal Insight:
This greenhouse allowed me to grow tomatoes two months longer than usual — and that alone made it worth every effort.
3. Recycled Window Greenhouse
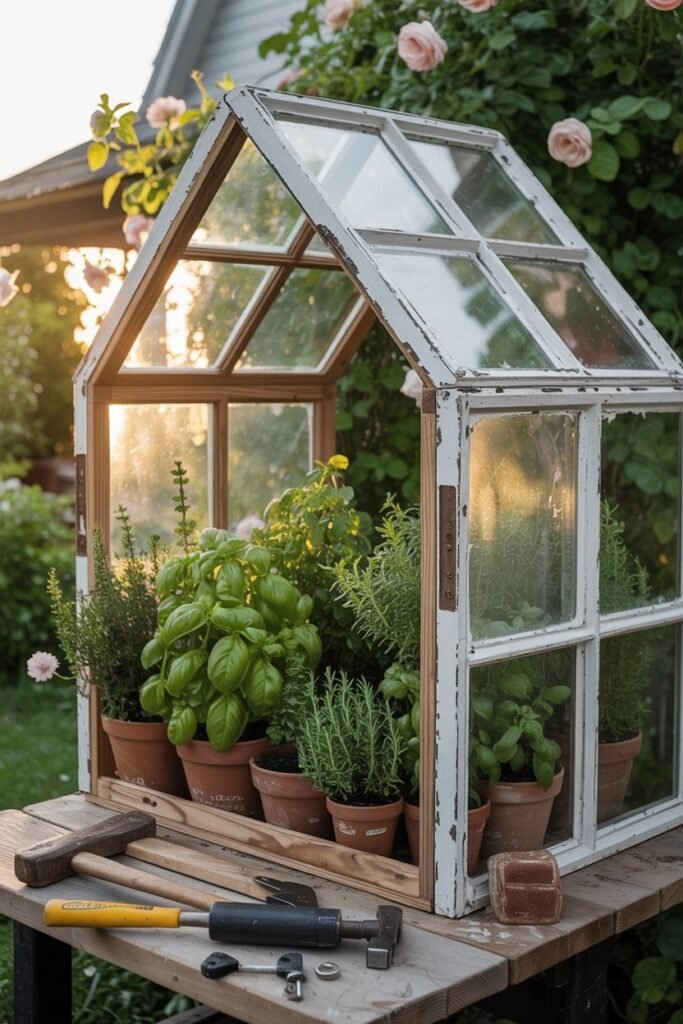
Where gardening meets creativity
Why I Recommend This Greenhouse
This is the greenhouse that made my garden feel like me. It’s charming, sustainable, and surprisingly effective when built carefully.
If you love DIY projects with personality, this one is deeply satisfying.
What You Need to Achieve This
- Old window frames (similar sizes work best)
- Lumber for framing
- Exterior screws and nails
- Hinges and latches
- Silicone sealant
- Caulking gun
How to Achieve This
- Plan around your windows
Lay them out before building — design follows window size. - Build the base frame
Make it sturdy and level. - Attach windows as walls
Secure them tightly to the frame. - Create a roof
Use angled windows or clear panels. - Seal gaps carefully
This is crucial for heat retention.
Maintenance Tips
- Replace broken glass immediately
- Reseal seams every year
- Monitor temperature closely on sunny days
Personal Note:
This greenhouse became my herb sanctuary — basil, rosemary, and thyme thrived like never before.
4. Lean-To Greenhouse
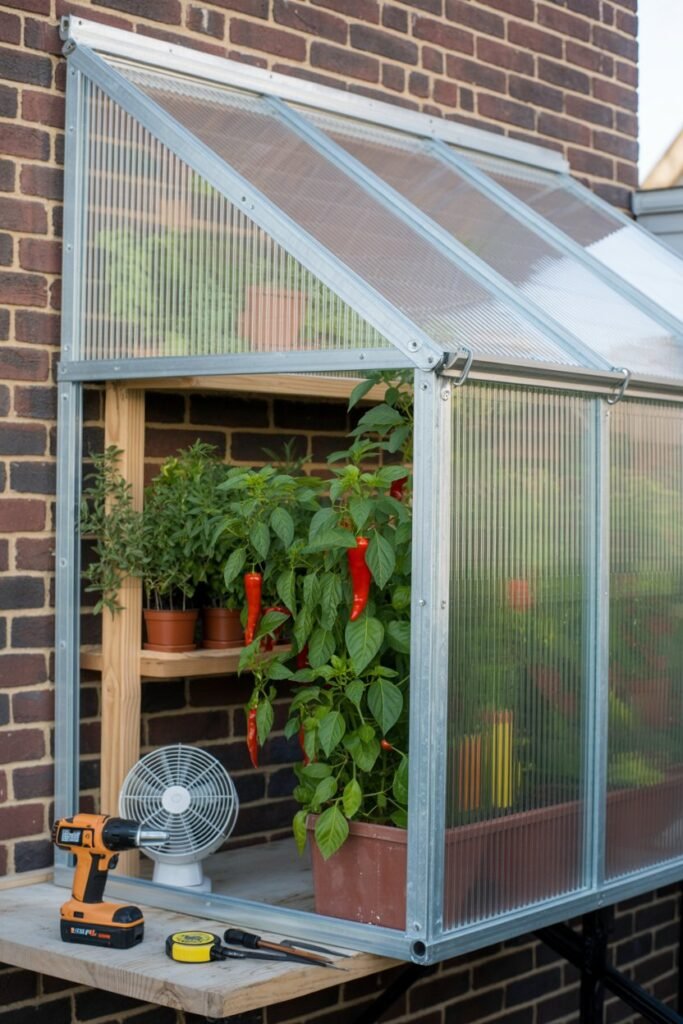
The smartest option when space is limited
Why I Recommend This Greenhouse
Using an existing wall saves materials, space, and heat. The wall absorbs warmth during the day and releases it at night — a natural advantage.
This was my solution when I didn’t have room for a freestanding structure.
What You Need to Achieve This
- Corrugated polycarbonate panels
- Lumber or metal framing
- Exterior screws and anchors
- Weatherproof sealant
- Hinges for vents or doors
How to Achieve This
- Choose a sunny wall
South-facing works best. - Build a slanted frame
One side higher for water runoff. - Attach panels
Secure tightly and seal seams. - Add ventilation
Roof vents or side openings prevent overheating.
Maintenance Tips
- Watch condensation levels
- Check seals yearly
- Add a small fan if airflow is limited
Personal Tip:
This greenhouse kept my peppers productive long after my neighbors’ plants had given up.
5. A-Frame Greenhouse
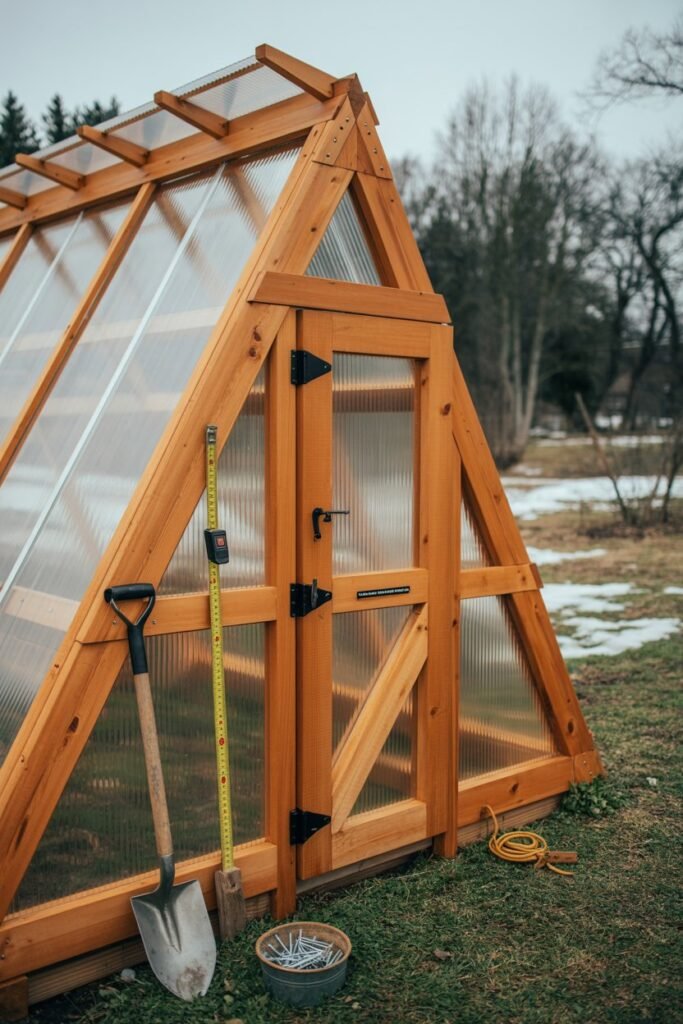
Built for strength and weather resistance
Why I Recommend This Greenhouse
The triangular shape is incredibly strong. If you live in a windy or cold region, this design holds up better than most.
It’s also easier to heat because warm air circulates naturally.
What You Need to Achieve This
- Lumber for framing
- Clear greenhouse plastic or panels
- Screws or nails
- Hinges and door hardware
- Measuring tools
How to Achieve This
- Build two triangular ends
These determine the entire structure. - Connect with horizontal beams
This adds rigidity. - Cover the frame
Use plastic or panels and secure tightly. - Install door and vents
Essential for airflow and access.
Maintenance Tips
- Reinforce joints yearly
- Replace plastic when it becomes cloudy
- Clear snow buildup promptly
Personal Insight:
This greenhouse saved my winter greens more than once — even during freezing nights.
6. Hoop Tunnel Greenhouse (Row Cover Style)
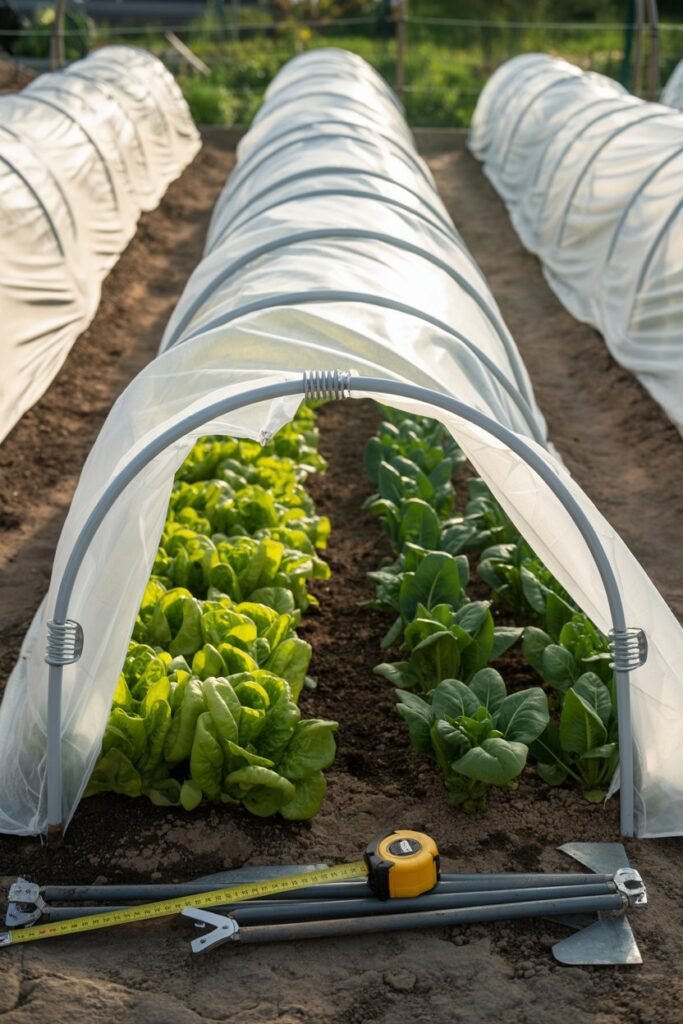
My go-to protection when the weather turns unpredictable
Why I Recommend This Greenhouse
This is the greenhouse I use when I don’t want to commit to a full structure but still need reliable protection. It’s simple, fast to set up, and incredibly effective against frost, wind, and pests.
When unexpected cold nights arrive, this design has saved my lettuce, spinach, and young carrots more times than I can count.
What You Need to Achieve This (Amazon-Friendly)
- Flexible PVC pipe or metal conduit
- Ground stakes or landscape staples
- Greenhouse row cover fabric or clear plastic
- Spring clamps or fabric clips
- Measuring tape
- Optional: Shade cloth for warmer months
How to Achieve This (Step-by-Step)
- Prepare your garden rows
Plant crops in straight rows for easier coverage. - Install ground anchors
Insert stakes evenly along both sides of the row. - Create the hoops
Bend PVC or conduit over the row and secure into the stakes. - Cover the hoops
Drape row cover fabric or plastic over the frame. - Secure tightly
Use clamps or staples to prevent flapping. - Seal ends
Gather and tie fabric at both ends to trap warmth.
Maintenance Tips
- Remove or vent covers on warm days
- Replace fabric when it thins or tears
- Check for trapped moisture after rain
Personal Tip:
I keep extra clamps in my garden shed — wind always finds loose edges first.
7. Mini Tabletop Greenhouse
The little greenhouse that made seed-starting joyful
Why I Recommend This Greenhouse
This is perfect if you garden in a small space or want to start seeds indoors without turning your home into a jungle.
I use mine every spring, and it never fails to improve germination rates.
It’s compact, tidy, and beginner-friendly.
What You Need to Achieve This
- Mini tabletop greenhouse with clear cover
- Seed trays and pots
- Seed-starting soil mix
- Spray bottle or gentle watering can
- Optional: LED grow light
How to Achieve This
- Set up the stand
Place your mini greenhouse in a bright location. - Fill trays with soil
Use a light seed-starting mix. - Plant seeds carefully
Follow seed depth instructions. - Cover with clear lid
This traps warmth and humidity. - Monitor daily
Open briefly to release excess moisture.
Maintenance Tips
- Remove lid once seedlings emerge
- Avoid overwatering
- Clean trays between uses
Personal Insight:
This greenhouse helped me stop overwatering — something I struggled with early on.
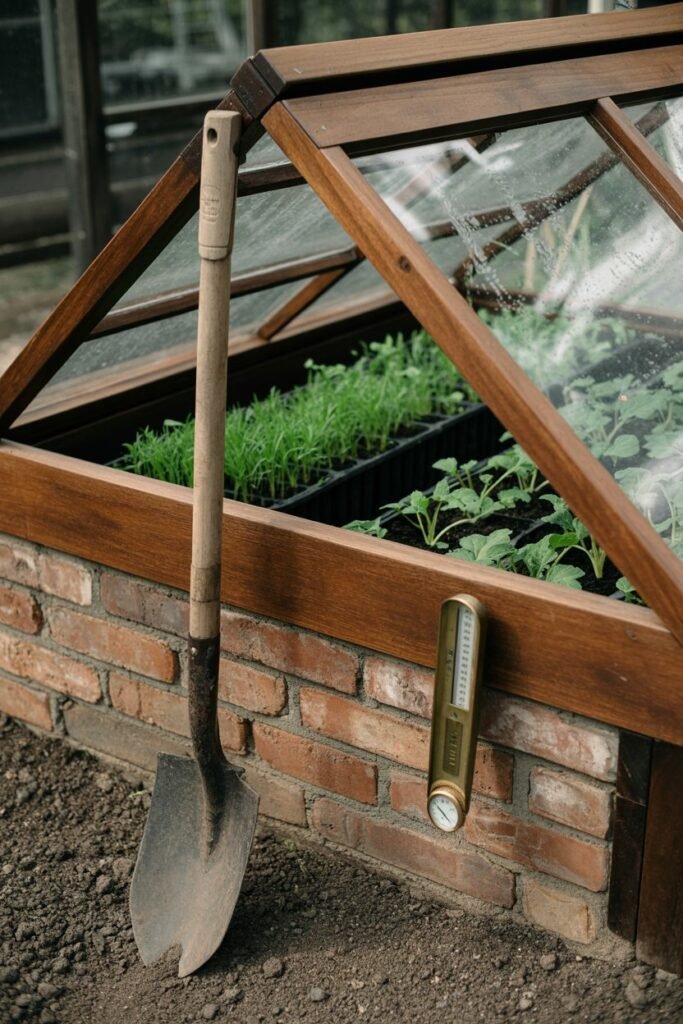
8. Cold Frame Greenhouse

My secret weapon for extending the seasons
Why I Recommend This Greenhouse
Cold frames are deceptively simple but incredibly powerful. I consider them a must-have, especially if you grow leafy greens or want to harden off seedlings gently.
What You Need to Achieve This
- Wooden boards or cold frame kit
- Old window or clear acrylic lid
- Hinges
- Screws
- Thermometer
How to Achieve This
- Build a low wooden box
Slightly slope the back higher than the front. - Attach the clear lid
Use hinges so it opens easily. - Place over garden bed
Position facing the sun. - Add soil or trays
Plant directly inside or use containers.
Maintenance Tips
- Vent daily when sunny
- Close at night during cold spells
- Secure lid against strong wind
Personal Tip:
I learned to check mine every afternoon — heat builds fast even in winter sun.
9. Pallet Greenhouse
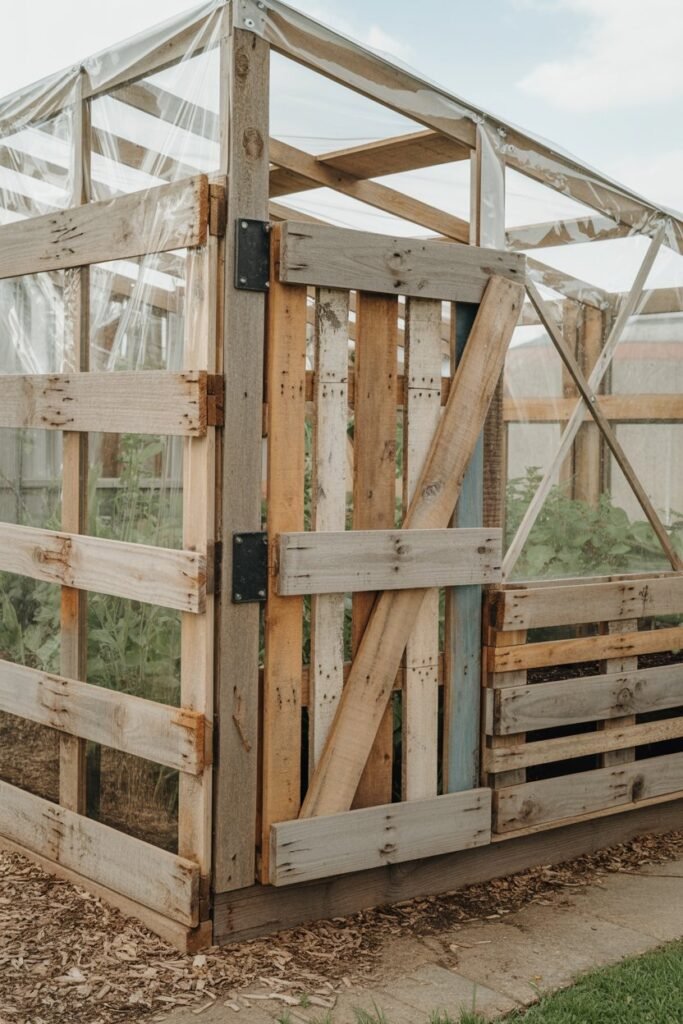
Affordable, rustic, and surprisingly sturdy
Why I Recommend This Greenhouse
If you’re working on a tight budget, pallets are an amazing resource. With a little effort, they can become a sturdy, functional greenhouse that doesn’t look cheap.
What You Need to Achieve This
- Wooden pallets (heat-treated)
- Clear greenhouse plastic
- Staples or screws
- Lumber for reinforcement
- Hinges for door
How to Achieve This
- Select solid pallets
Avoid broken or rotting wood. - Stand pallets upright
Form walls and secure them together. - Reinforce corners
Use lumber for strength. - Cover with plastic
Staple tightly and trim excess. - Add a door
Even a simple flap works.
Maintenance Tips
- Check wood for rot yearly
- Tighten fasteners after storms
- Replace plastic as needed
Personal Insight:
This greenhouse taught me that “budget” doesn’t mean “ineffective.”
10. PVC Greenhouse with Roll-Up Sides
The design that saved my plants during summer heat
Why I Recommend This Greenhouse
Heat buildup can destroy plants quickly. Roll-up sides give you control over temperature and airflow, making this greenhouse ideal for warmer climates.
What You Need to Achieve This
- PVC pipes and connectors
- Heavy-duty greenhouse plastic
- Roll-up side hardware kit
- Clips and fasteners
- Rope or crank system
How to Achieve This
- Build the PVC frame
Similar to a hoop house but taller. - Attach plastic cover
Leave sides loose at the bottom. - Install roll-up mechanism
Secure plastic to a pole or pipe. - Test movement
Roll sides up and down smoothly.
Maintenance Tips
- Keep rollers clean
- Roll down at night for warmth
- Replace worn ropes promptly
Personal Tip:
Once I added roll-up sides, my greenhouse stopped feeling like an oven.
11. Bamboo & Twine Greenhouse
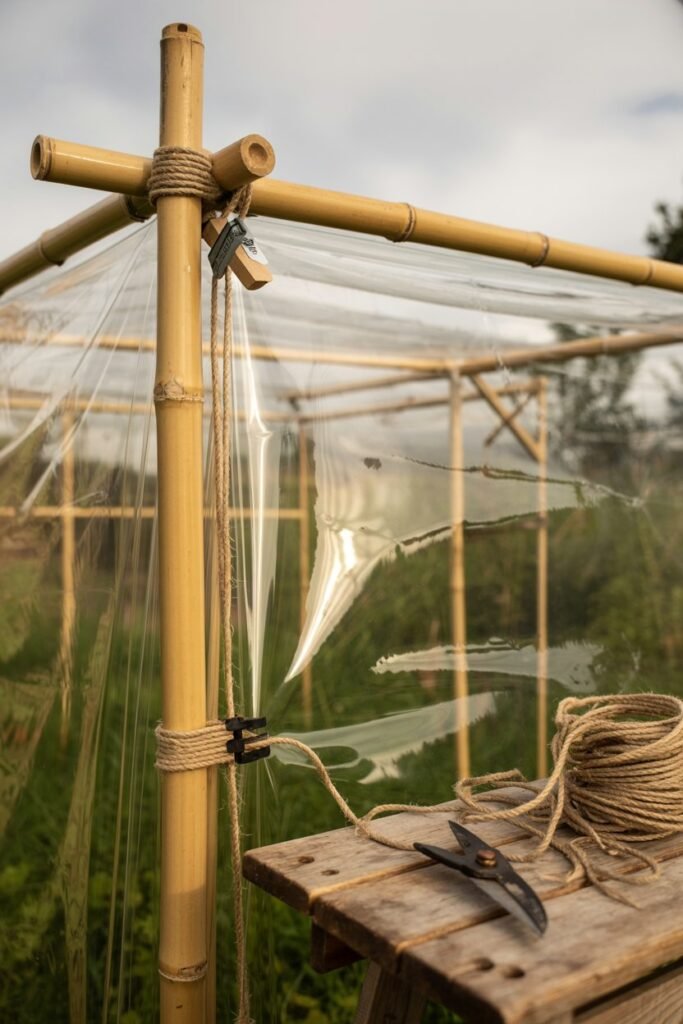
My favorite eco-friendly greenhouse experiment
Why I Recommend This Greenhouse
When I wanted something lightweight, natural, and environmentally friendly, bamboo became my answer. This greenhouse isn’t just functional — it blends beautifully into the garden and feels calming to work in.
It’s ideal if you prefer natural materials and want a structure that’s easy to modify or take down.
What You Need to Achieve This (Amazon-Friendly)
- Bamboo poles (similar lengths)
- Garden twine or heavy-duty jute rope
- Clear greenhouse plastic
- Ground stakes
- Scissors or pruning shears
- Optional: zip ties for added strength
How to Achieve This (Step-by-Step)
- Select a sunny, sheltered spot
Bamboo is lightweight, so avoid very windy areas. - Create the base structure
Insert bamboo poles into the soil or attach them to ground stakes. - Tie joints securely
Use tight square knots or zip ties at intersections. - Shape the roof
A gentle arch or A-frame works best. - Cover with plastic
Drape greenhouse plastic and secure it firmly. - Seal the base
Weigh down edges with soil or bricks.
Maintenance Tips
- Retighten twine as it loosens
- Replace bamboo poles if they crack
- Vent often to avoid humidity buildup
Personal Insight:
This greenhouse taught me that structures don’t have to be heavy to be effective — balance and airflow matter just as much.
12. Raised Bed Greenhouse Combo
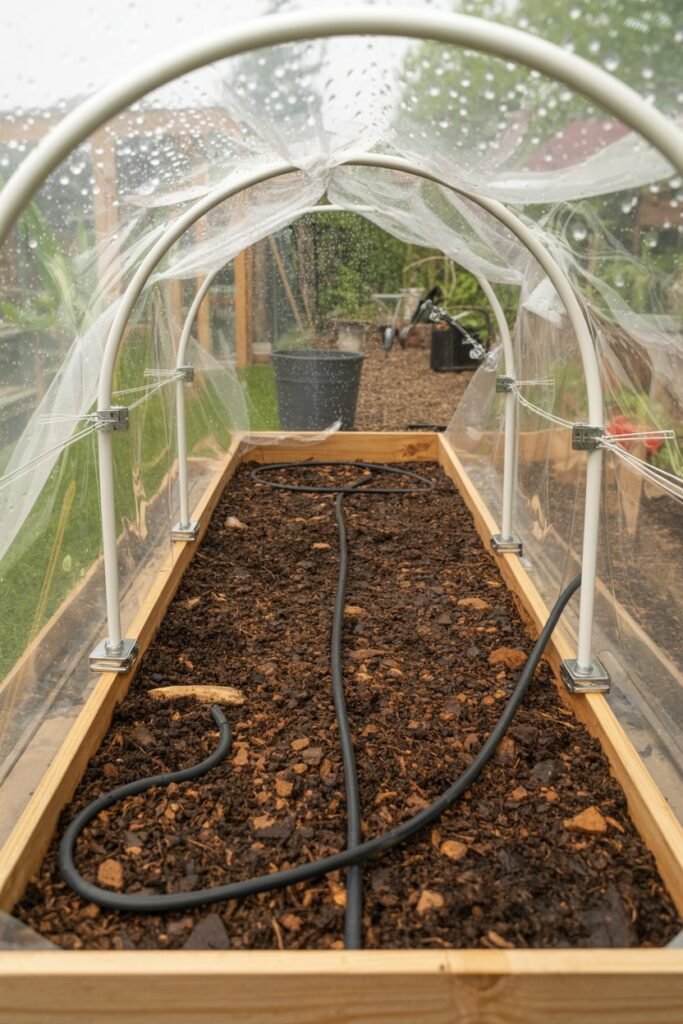
Where productivity and organization finally clicked
Why I Recommend This Greenhouse
Combining a raised bed with a greenhouse was a game changer for my back and my harvest. Everything stays organized, warm, and easy to access.
This design is especially helpful if your soil quality isn’t great or you struggle with drainage.
What You Need to Achieve This
- Raised garden bed kit or lumber
- Greenhouse hoops or frame kit
- Clear greenhouse cover
- Clamps or fasteners
- Soil mix and compost
How to Achieve This
- Assemble the raised bed
Place it on level ground. - Fill with quality soil
Good soil makes a noticeable difference. - Install greenhouse frame
Attach hoops or supports to the bed. - Add the cover
Secure tightly with clamps. - Create access points
Use zippered or flap openings.
Maintenance Tips
- Monitor soil moisture closely
- Vent daily in warm weather
- Refresh soil yearly
Personal Tip:
This setup helped me grow stronger seedlings because roots stayed warm and well-drained.
13. Portable Walk-In Greenhouse
The easiest “no-build” option I still use every year
Why I Recommend This Greenhouse
Sometimes you want results without construction. Portable walk-in greenhouses are incredibly convenient and perfect for renters or temporary setups.
I still rely on mine for seed starting and overwintering tender plants.
What You Need to Achieve This
- Walk-in greenhouse kit (frame + cover)
- Ground anchors or weights
- Shelving units
- Thermometer
How to Achieve This
- Assemble the frame
Follow manufacturer instructions. - Install the cover
Ensure zippers work smoothly. - Anchor securely
Weigh down or stake to prevent tipping. - Add shelving
Maximize vertical space.
Maintenance Tips
- Check anchors after storms
- Clean plastic regularly
- Repair small tears immediately
Personal Insight:
This greenhouse saved my citrus plants during winter — and required zero carpentry skills.
14. Greenhouse on Wheels
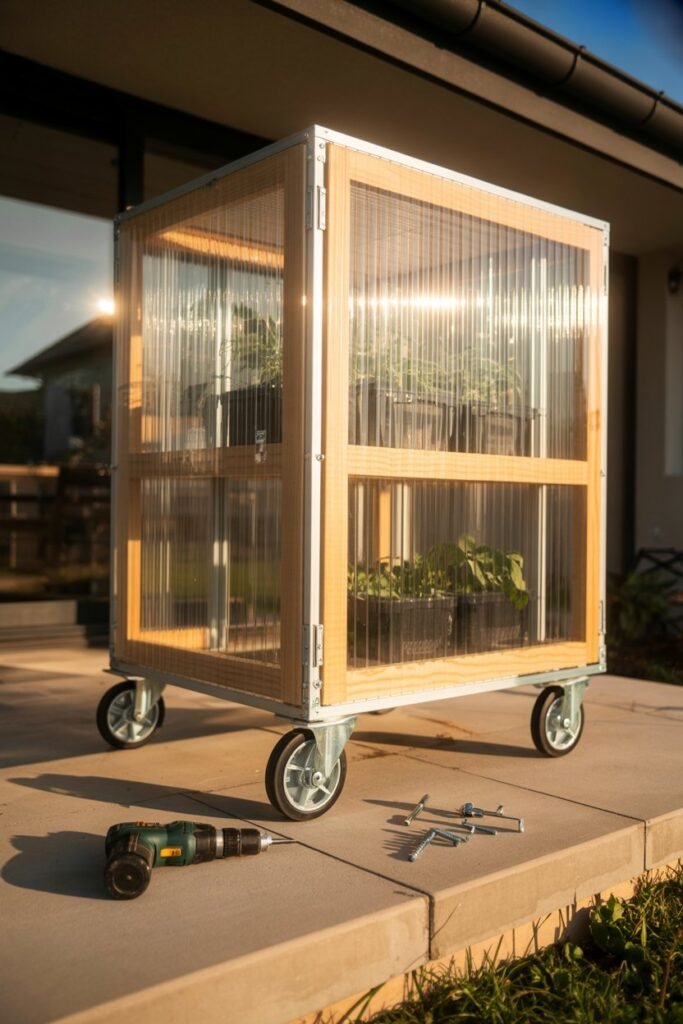
For chasing sunlight through the seasons
Why I Recommend This Greenhouse
Sun patterns change, and this greenhouse adapts. A mobile greenhouse lets you reposition plants for maximum light or shelter.
It’s especially useful in partially shaded yards.
What You Need to Achieve This
- Small greenhouse frame or cabinet
- Heavy-duty caster wheels
- Clear plastic or polycarbonate panels
- Screws and drill
- Brakes for wheels
How to Achieve This
- Build or assemble the frame
- Attach caster wheels securely
- Install greenhouse covering
- Test movement and stability
Maintenance Tips
- Lock wheels in place
- Inspect casters regularly
- Avoid moving during strong winds
Personal Tip:
Rolling this greenhouse closer to the house during cold nights made a noticeable temperature difference.
15. Old Door Greenhouse
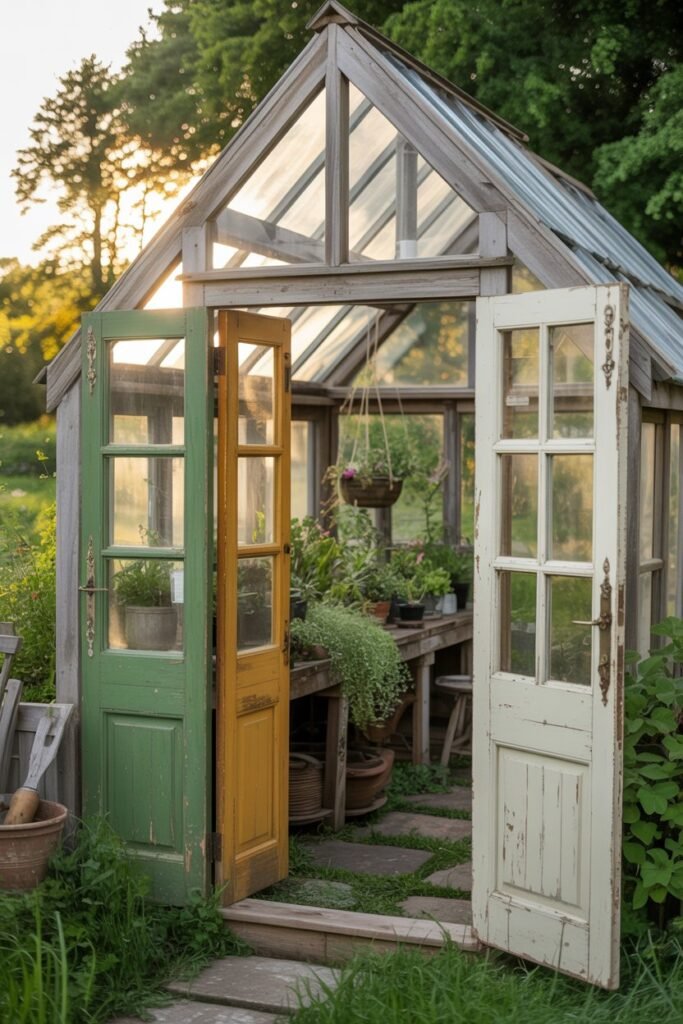
One of the most beautiful structures I’ve ever built
Why I Recommend This Greenhouse
Old doors add charm, height, and sturdiness. This greenhouse feels more like a garden room — perfect for long sessions of planting and pruning.
What You Need to Achieve This
- Old wooden or glass doors
- Lumber for framing
- Hinges and handles
- Screws and anchors
- Clear roof panels
How to Achieve This
- Design around the doors
Their size determines your structure. - Build a strong base frame
- Attach doors as walls
- Install a slanted roof
- Seal all gaps carefully
Maintenance Tips
- Reseal wood annually
- Replace cracked glass
- Monitor temperature closely
Personal Insight:
This greenhouse became my quiet retreat — a place where gardening felt peaceful, not rushed.
16. Geodesic Dome Greenhouse

The strongest greenhouse I’ve ever worked in
Why I Recommend This Greenhouse
The first time I stepped into a geodesic dome greenhouse, I immediately understood why people love them.
This design is incredibly strong, evenly distributes heat, and holds up beautifully against wind, rain, and even snow.
It does require more planning than simpler designs, but the payoff is worth it if you want durability and efficiency.
What You Need to Achieve This (Amazon-Friendly)
- PVC pipes or metal tubing
- Geodesic connector hubs
- Clear greenhouse plastic or polycarbonate panels
- Screws or heavy-duty fasteners
- Measuring tape and level
- Ground anchors
How to Achieve This (Step-by-Step)
- Choose a level location
Domes rely on even weight distribution. - Assemble the base ring
Secure it firmly to the ground. - Connect the frame using hubs
Follow the dome pattern carefully. - Install the covering
Attach plastic or panels securely. - Add door and vents
Proper airflow is essential.
Maintenance Tips
- Check connectors yearly
- Tighten anchors after storms
- Clean panels to maintain light penetration
Personal Insight:
This greenhouse stayed warm longer at night than any other design I’ve used — heat efficiency is outstanding.
17. Poly Tunnel Greenhouse with Irrigation
When automation became my gardening ally
Why I Recommend This Greenhouse
Once I added irrigation to a tunnel greenhouse, my gardening routine became much easier. This setup is ideal for larger growing areas and gardeners who want consistency.
What You Need to Achieve This
- Hoop tunnel frame kit
- Heavy-duty greenhouse plastic
- Drip irrigation system
- Water timer
- Clamps and stakes
How to Achieve This
- Build the tunnel frame
- Install irrigation lines
- Connect timer to water source
- Cover tunnel with plastic
- Test watering schedule
Maintenance Tips
- Flush irrigation lines regularly
- Adjust timer seasonally
- Inspect hoses for leaks
Personal Tip:
Automated watering saved my plants during weeks when life got busy.
18. Solar-Heated Greenhouse
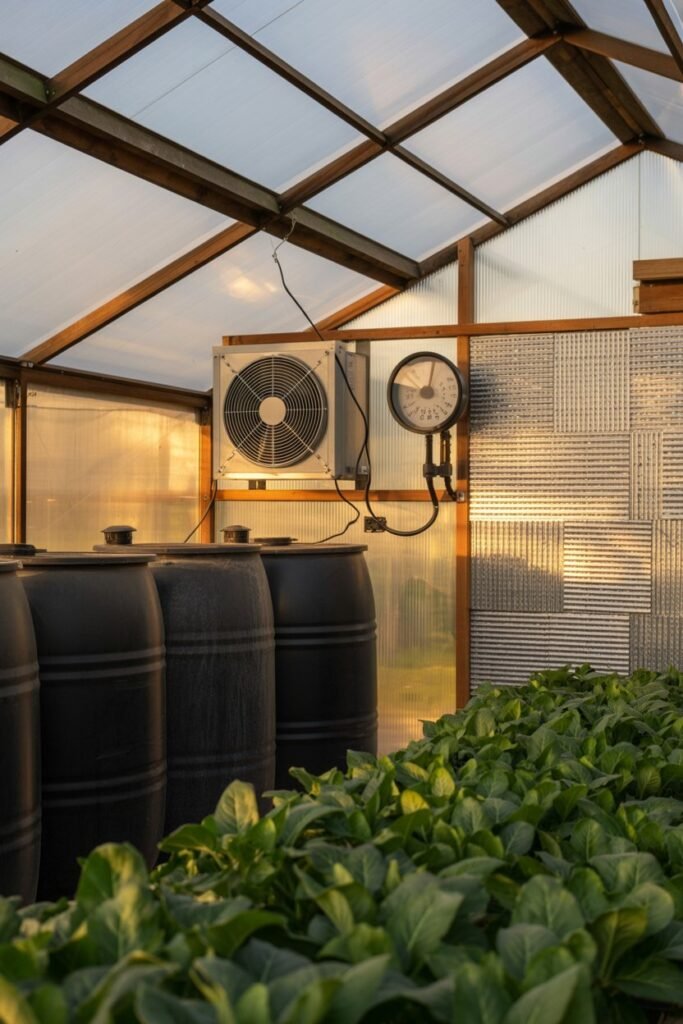
Using sunlight to work smarter, not harder
Why I Recommend This Greenhouse
A solar-heated greenhouse allows you to store warmth during the day and release it at night. It’s energy-efficient and surprisingly effective.
What You Need to Achieve This
- Black water barrels or thermal mass containers
- Clear greenhouse structure
- Solar-powered exhaust fan
- Thermometer
- Insulating materials
How to Achieve This
- Position barrels where sunlight hits
- Paint containers black
- Install solar fan for airflow
- Seal structure to retain heat
Maintenance Tips
- Monitor temperatures daily
- Adjust thermal mass placement
- Clean fan panels
Personal Insight:
This greenhouse stayed warm even during cold nights — without electricity.
19. Cold Pocket Greenhouse
Perfect for gardeners with limited space
Why I Recommend This Greenhouse
Cold pocket greenhouses use the earth’s natural insulation. They’re compact but extremely effective for early-season planting.
What You Need to Achieve This
- Shovel
- Lumber or bricks
- Clear plastic or acrylic cover
- Hinges
- Thermometer
How to Achieve This
- Dig a shallow trench
- Build a low wall
- Attach clear lid
- Plant directly inside
Maintenance Tips
- Watch moisture levels
- Vent on warm days
- Secure lid against wind
Personal Tip:
This design surprised me — small but powerful.
20. Balcony or Vertical Greenhouse
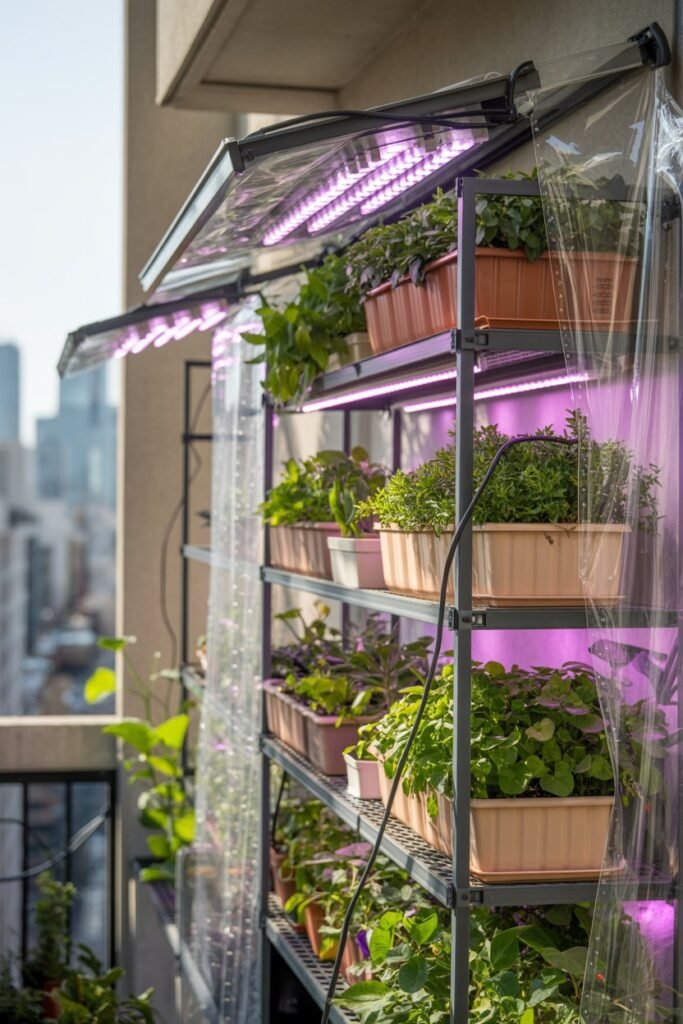
For gardeners without ground space
Why I Recommend This Greenhouse
Not having a yard shouldn’t stop anyone from gardening. Vertical and balcony greenhouses make growing possible even in tight spaces.
What You Need to Achieve This
- Vertical greenhouse shelving
- Clear plastic cover
- Grow lights (if needed)
- Lightweight containers
- Drip or self-watering system
How to Achieve This
- Assemble vertical shelves
- Install clear cover
- Position near sunlight
- Add containers and plants
Maintenance Tips
- Rotate plants for even light
- Avoid overcrowding
- Monitor humidity carefully
Personal Insight:
This greenhouse reminded me that gardening adapts — space doesn’t limit passion.
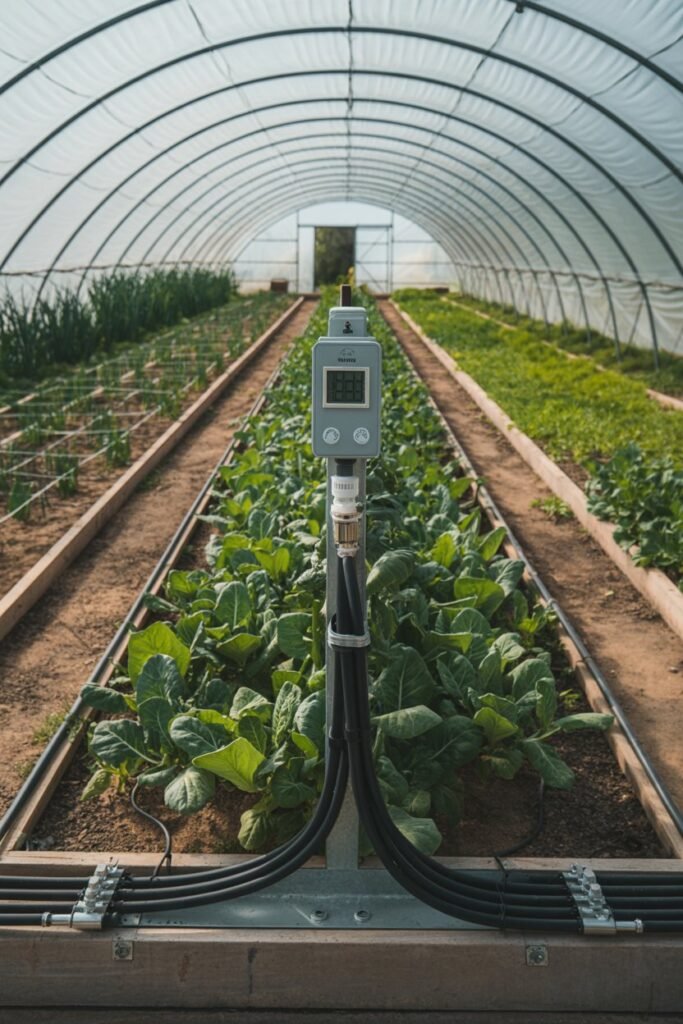
21. Greenhouse with Automated Watering System
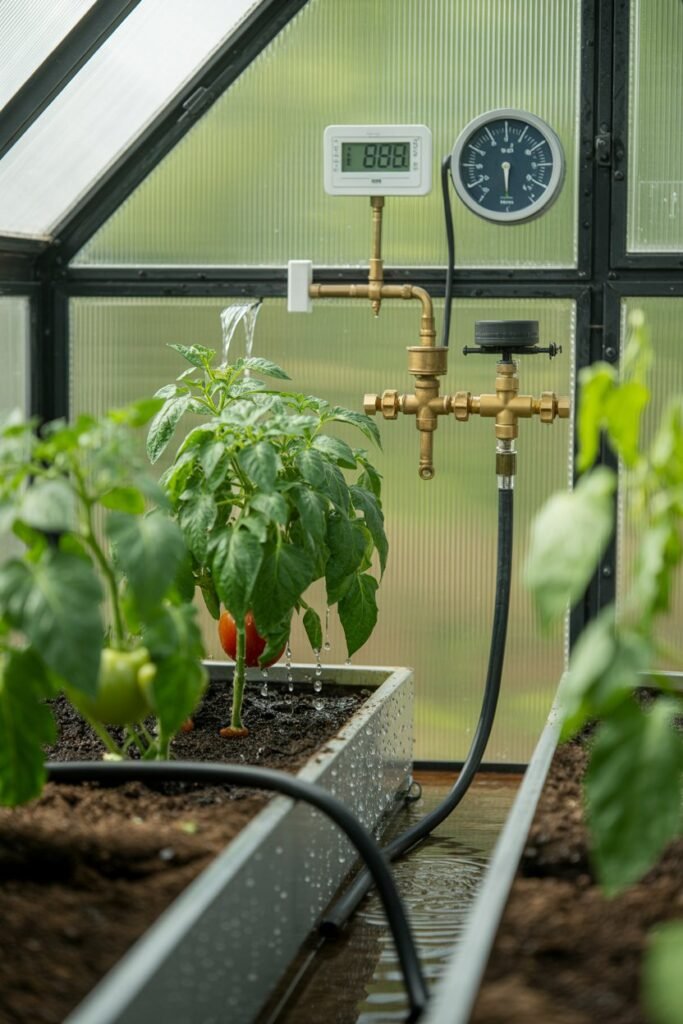
The moment gardening became less stressful and more joyful
Why I Recommend This Greenhouse
There was a season when life got busy, and my plants paid the price. Missed watering, uneven moisture, stressed seedlings — it was frustrating. Adding an automated watering system to my greenhouse completely changed that.
This setup doesn’t remove the joy of gardening — it removes the pressure.
What You Need to Achieve This (Amazon-Friendly)
- Drip irrigation kit (greenhouse-safe)
- Digital or mechanical water timer
- Garden hose splitter
- Pressure regulator
- Raised beds or containers
- Thermometer and hygrometer
How to Achieve This (Step-by-Step)
- Choose your greenhouse structure
This system works with hoop houses, tunnels, or permanent greenhouses. - Lay out drip lines
Position lines near plant roots for deep, efficient watering. - Connect timer and regulator
This prevents overwatering and controls flow. - Set watering schedule
Start small — adjust based on plant response. - Test the system
Run it for several cycles before relying on it fully.
Maintenance Tips
- Check emitters weekly for clogs
- Adjust watering schedules seasonally
- Drain lines before freezing weather
- Replace worn hoses promptly
Personal Insight:
This greenhouse taught me that consistency matters more than perfection — plants thrive when care is steady.
22. All-Season Insulated Greenhouse
The greenhouse that made me feel like a year-round gardener
Why I Recommend This Greenhouse
This is the greenhouse that truly changed how I see gardening. With insulation, proper sealing, and heat retention, I stopped thinking in “seasons” and started thinking in cycles.
It’s not the cheapest option — but it’s the most empowering.
What You Need to Achieve This
- Polycarbonate panels (double-wall preferred)
- Insulated base or raised foundation
- Weather stripping and sealant
- Thermal mass (water barrels or stone)
- Solar or electric heater (optional)
- Grow lights (for winter months)
How to Achieve This
- Build a solid, insulated frame
- Install double-wall panels
- Seal all gaps carefully
- Add thermal mass for heat storage
- Install supplemental lighting if needed
- Monitor temperature closely
Maintenance Tips
- Inspect seals every season
- Clean panels regularly
- Adjust insulation during extreme weather
- Maintain airflow even in winter
Personal Insight:
Harvesting greens in winter felt almost magical — this greenhouse made it possible.
Final Thoughts: What Building These Greenhouses Taught Me
When I look back at every greenhouse I’ve built from the crooked PVC hoops to the insulated all-season structure I realize something important:
Greenhouses don’t just protect plants. They protect gardeners.
They protect our time, our effort, our excitement, and our hope. They give us room to make mistakes, to learn, and to grow with confidence.
You don’t need to build the biggest or most expensive greenhouse.
You only need the one that fits your space, your climate, and your life.
Start simple if you need to. Improve as you go. Every greenhouse teaches you something new.
If there’s one piece of advice I’d leave you with, it’s this:
Your garden doesn’t need perfection it needs protection.
And a greenhouse, no matter the size, does exactly that.
Happy growing, season after season.
