
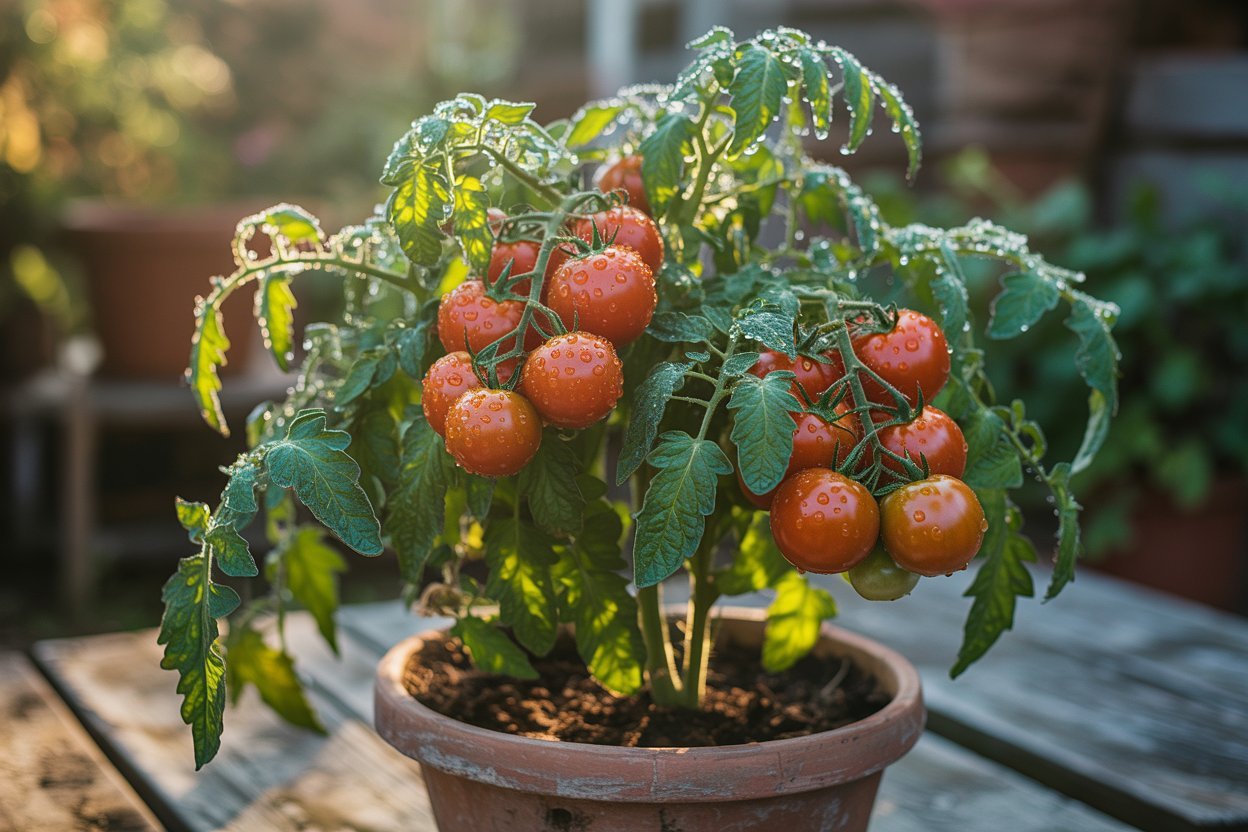
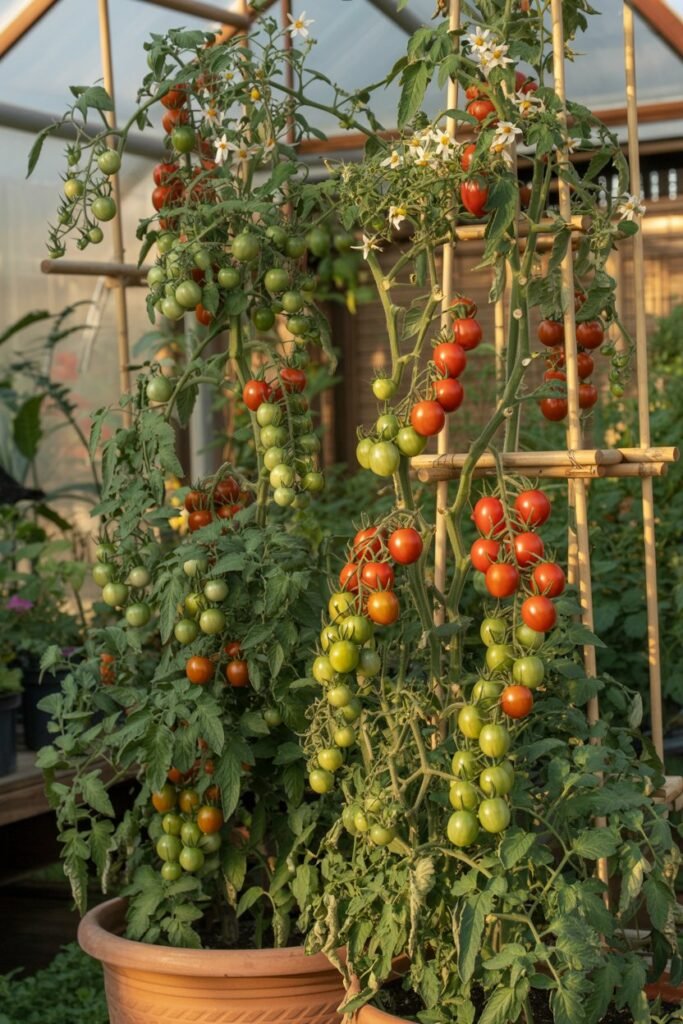
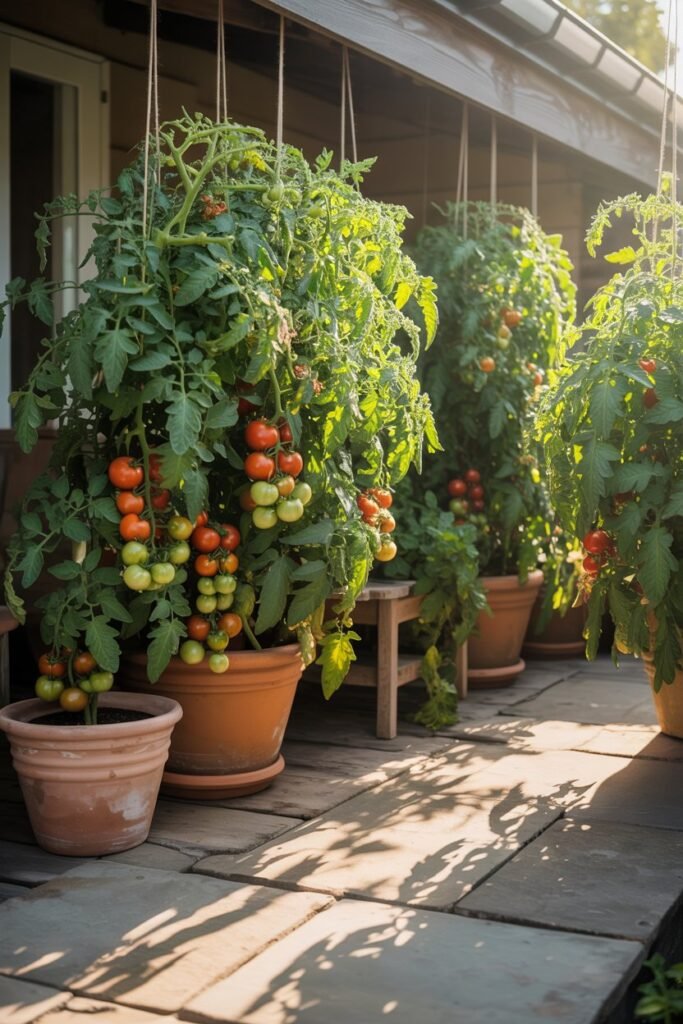
Tomatoes are the crown jewel of home gardening. Their flavor is unmatched, their growth is vigorous, and their versatility in the kitchen is endless.
But many gardeners especially beginners often assume that growing tomatoes requires large garden beds, sprawling backyard space, or the luxury of in-ground soil.
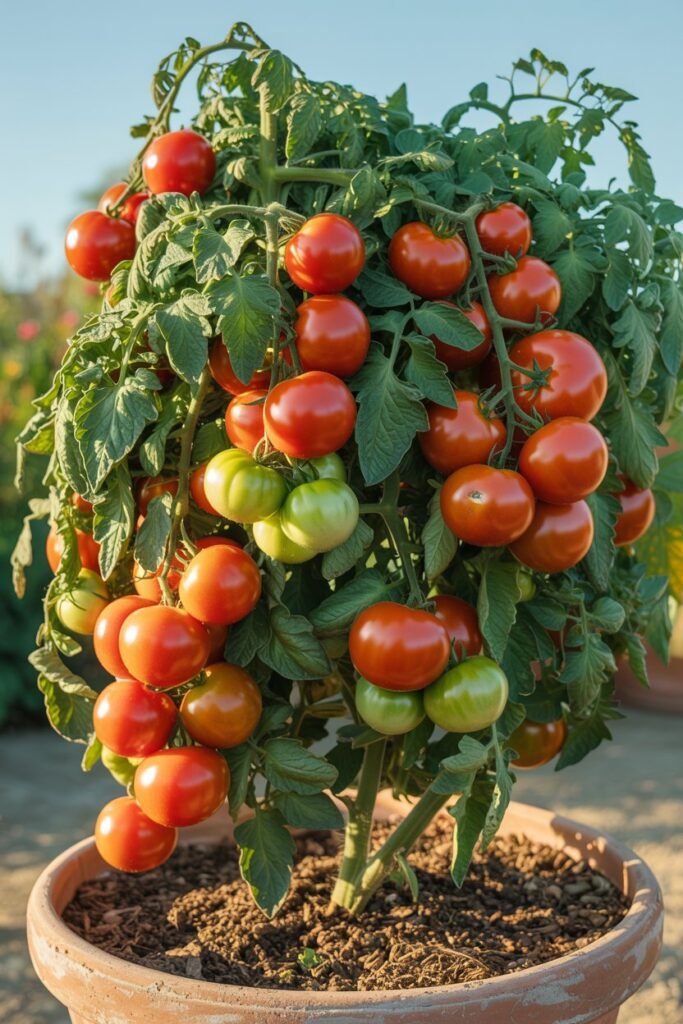
The truth is, you can grow thriving, high-yield tomato plants entirely in pots, and in many cases, container-grown tomatoes outperform in-ground tomatoes when the grower uses the right tactics.
Growing tomatoes in pots gives you a powerful advantage: total environmental control. You control the soil quality, the watering system, the exposure to sunlight, the feeding schedule, the airflow, and the pest prevention routine.
You can reposition your plant as needed, rotate it for even light distribution, and remove it from danger from storms, extreme heat, pests on the ground level, and even unexpected soil diseases in the landscape.
In fact, most modern cultivars are now bred to perform exceptionally well in containers, producing strong yields even in limited spaces.
Whether you’re gardening on a balcony, a small patio, the corner of a terrace, or even an apartment window with a grow light, tomatoes adapt as long as the grower applies the correct strategy.
But tomatoes also happen to be one of the hungriest, thirstiest, and most disease-prone crops grown in containers. They’re rewarding, but they demand a level of precision. They want:
- deep, rich, living soil
- consistent watering
- direct, powerful sunlight
- strong support systems
- regular feeding
- pruning discipline
- quick pest intervention
This is where most beginners struggle. They love tomatoes, but not the maintenance routine tomatoes require.
The power of this guide is that it equips you with nine expert-level tactics that simplify the entire process while maximizing your plant’s productivity.
Each tactic isn’t just a tip it’s a proven practice used by experienced container gardeners to get heavier harvests, sweeter fruit, fewer problems, and healthier plants all season long.
In this expanded version, we’ll break each tactic down in full detail, covering:
- the science behind the method
- expert-level reasoning
- real-world challenges container gardeners face
- step-by-step instructions
- advanced care techniques
- common mistakes people make with each tactic
- and how to avoid them
This combination of practical and scientific knowledge ensures you’re not just following instructions—you’re understanding why tomatoes behave the way they do and how your actions influence their performance.
Now let’s begin with the first two foundational tactics of successful container tomato production.
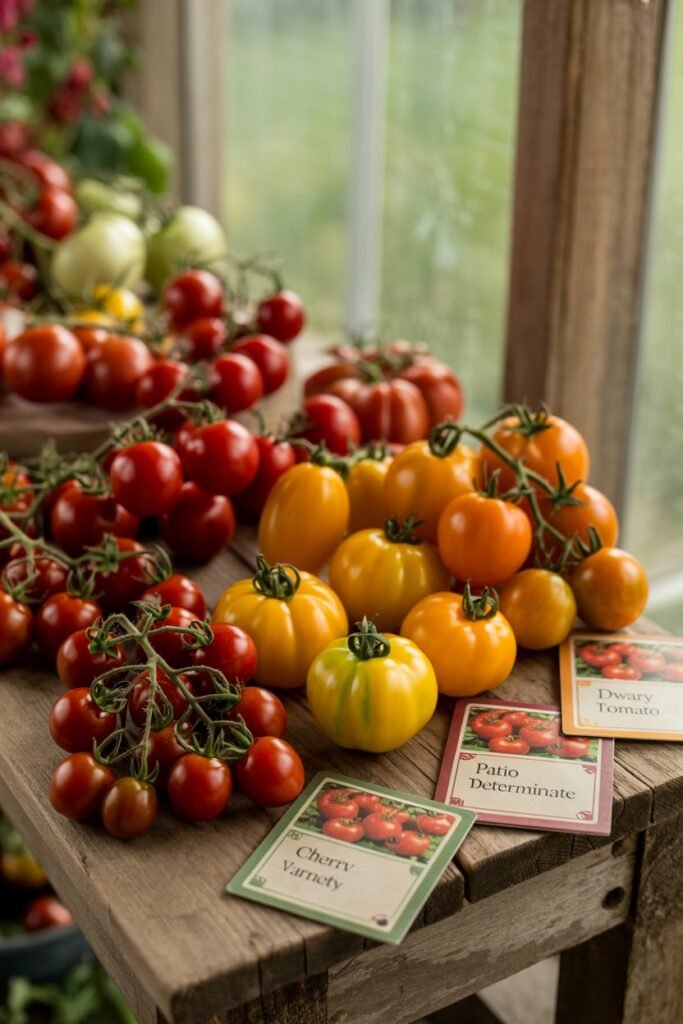
1: Choose the Right Tomato Variety (The Foundation of Your Success)
Choosing the right tomato variety isn’t a small decision it’s the single most important choice that determines how manageable, productive, and healthy your potted tomato plant will be.
Not all tomatoes are suited for container gardening. Some varieties grow like wild vines, stretching 6–10 feet and requiring aggressive pruning, large trellises, and nearly endless feeding. Others stay compact, predictable, and manageable perfect for small spaces and pot cultivation.
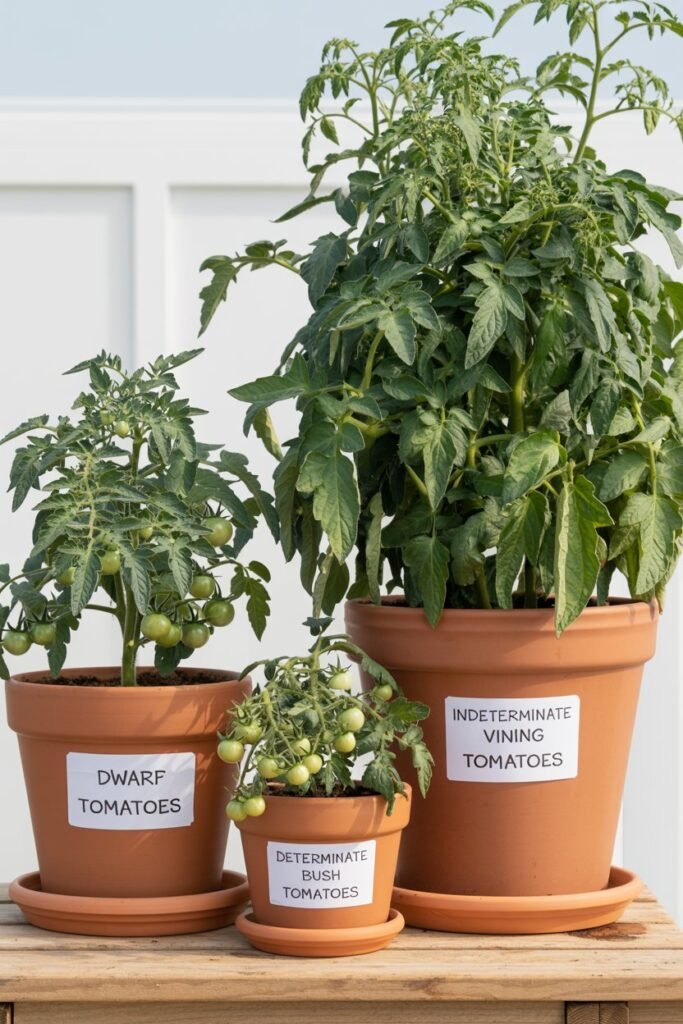
Understanding tomato growth habits is essential. There are three primary types:
1. Determinate Tomatoes (Bush Types)
Perfect for beginners and small pots.
Determinate tomatoes grow like a compact bush. They reach a certain size—usually about 3–4 feet—and then stop growing. All of their fruit ripens around the same time, making them great for people who want a predictable harvest.
Why they’re great for pots:
- They stay small and manageable
- They require less pruning
- They don’t need huge trellises
- Their bushy growth handles containers well
Best determinate varieties for pots:
- Roma (excellent for sauces)
- Patio Princess
- Bush Early Girl
- Better Bush
- Celebrity
These varieties have strong disease resistance, which is important because containers can become humid environments—and humidity breeds fungus.
2. Dwarf or Compact Varieties
Ideal for tiny spaces, balconies, and indoor growers.
These are specially bred for small containers, micro-gardens, or beginners who want low-maintenance plants.
Best dwarf varieties:
- Tiny Tim
- Micro Tom (the smallest tomato plant on earth!)
- Tumbling Tom (great for hanging baskets)
- Red Robin
These are perfect if you want tomatoes but don’t want the stress of managing a towering vine.
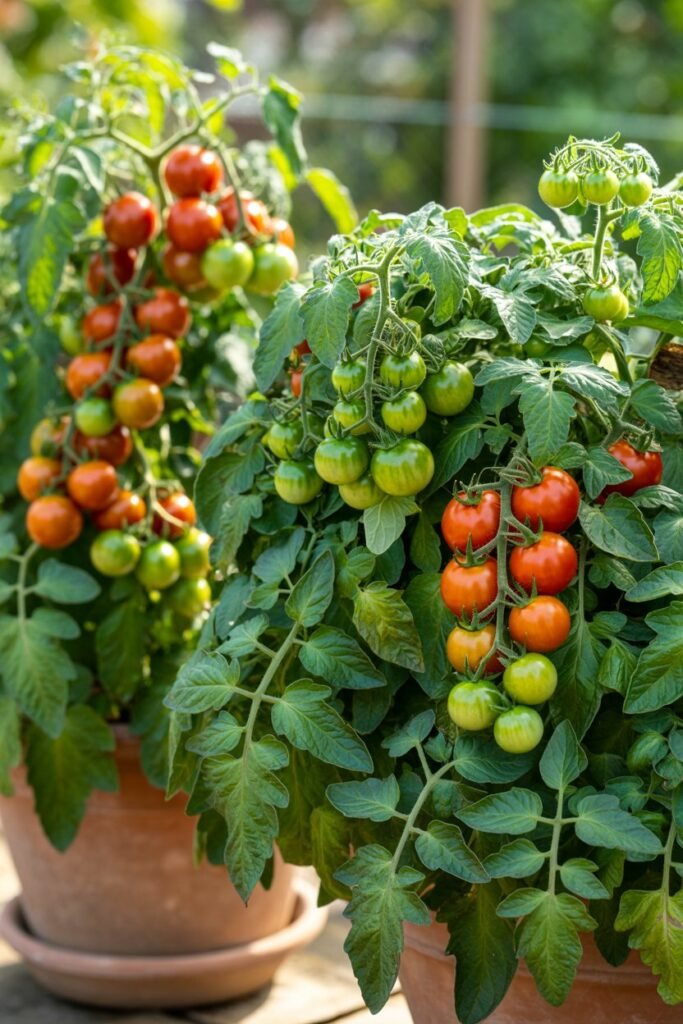
3. Indeterminate Tomatoes (Vining Types)
High-yield powerhouses—but only for large pots and experienced growers.
Indeterminate tomatoes don’t stop growing. They continue producing fruit until frost. They’re vigorous, tall, and demanding.
They need:
- A deep and large pot (minimum 15–20 gallons)
- A sturdy support structure
- Frequent feeding
- Regular pruning
Best indeterminate varieties for pots:
- Sun Gold (cherry tomato) — incredibly productive
- Sweet Million
- Black Cherry
- Yellow Pear
These varieties reward you with constant fruit—but only if you can manage their energy.
How to Choose the Right Variety for You
Ask yourself:
How much space do I have?
- Small balcony → Dwarf / determinate
- Medium patio → Determinate
- Large patio / yard → Indeterminate
How much time do I want to spend maintaining the plant?
- Low maintenance → Determinate or dwarf
- High maintenance but high reward → Indeterminate
Do I want steady harvests or one big flush?
- Steady → Indeterminate
- One flush (good for canning) → Determinate
Common Mistakes with Variety Selection
Avoid these common beginner errors:
Mistake 1: Choosing a giant beefsteak variety for a tiny pot
These plants will struggle, produce poorly, and often collapse.
Mistake 2: Planting multiple tomatoes in one container
Tomatoes are aggressive feeders and root competitors.
One plant per pot — always.
Mistake 3: Ignoring disease resistance
Early blight, wilt, and leaf spot spread fast in containers.
Look for varieties labeled VFN (Verticillium, Fusarium, Nematode resistant).
Why This Tactic Matters
Choosing the right variety determines:
- how large your pot needs to be
- how often you’ll have to prune
- how much fruit you’ll get
- how long the plant will survive
- how much support you’ll need
- how easy the plant will be to maintain
Start smart and your entire growing season becomes easier.
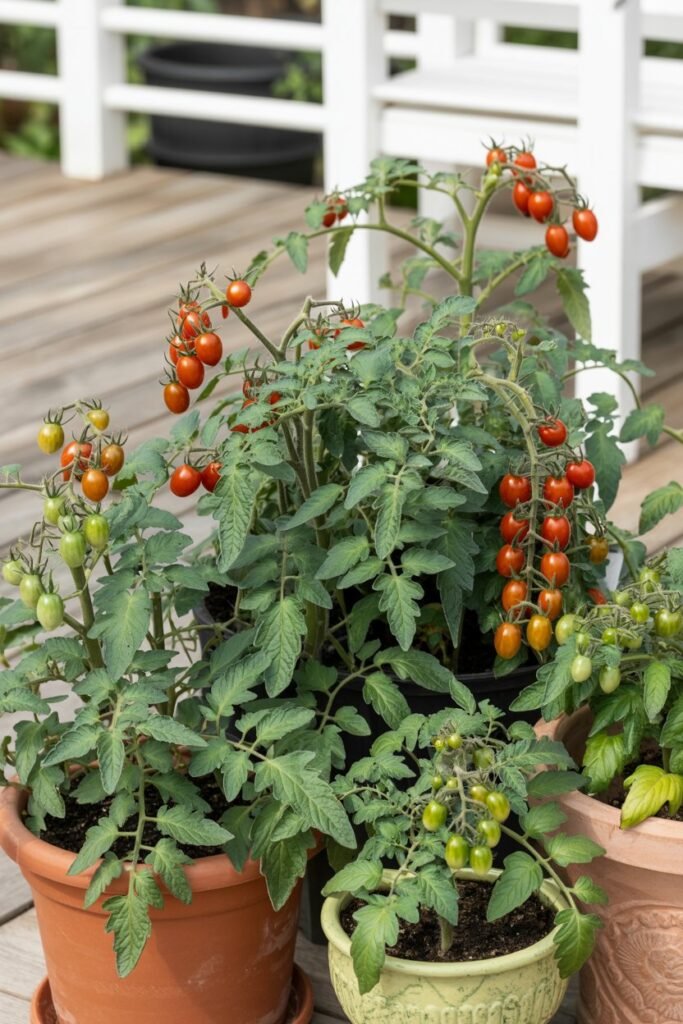
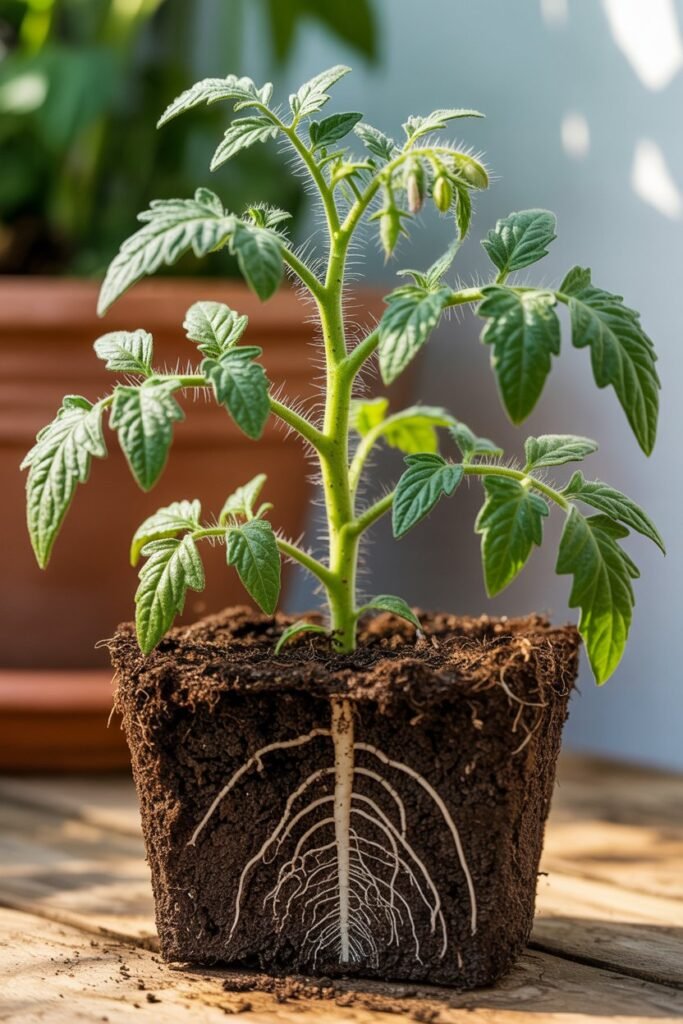
2: Use a Large, High-Quality Pot (The Container Determines the Crop)
When growing tomatoes in a pot, the container is not just a holder it becomes the plant’s entire world. The pot influences root development, nutrient storage, water retention, disease resistance, and the final size of your harvest.
Many gardeners fail with tomatoes in containers simply because the pot is too small.
1. Pot Size Requirements (Based on Tomato Type)
Dwarf Varieties
- Minimum: 2–3 gallons
- Best: 3–5 gallons
Determinate Varieties
- Minimum: 5 gallons
- Best: 7–10 gallons
Indeterminate Varieties
- Minimum: 15 gallons
- Best: 20–25 gallons
If you want continuous fruit production from indeterminate plants, bigger is always better.
2. Pot Depth
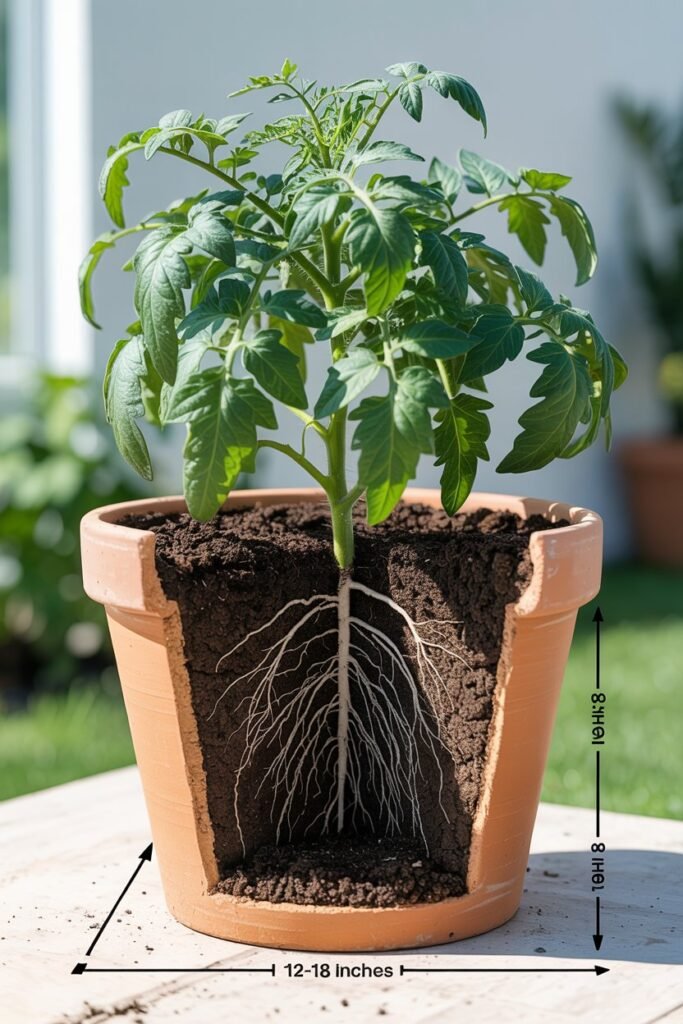
Tomatoes need depth to anchor their extensive root systems.
Ideal depth:
- 14 inches minimum
- 18–20 inches optimal
Deeper pots allow:
- larger root structure
- better nutrient storage
- more stable growth
- less frequent watering
3. Pot Materials: Which Is Best?
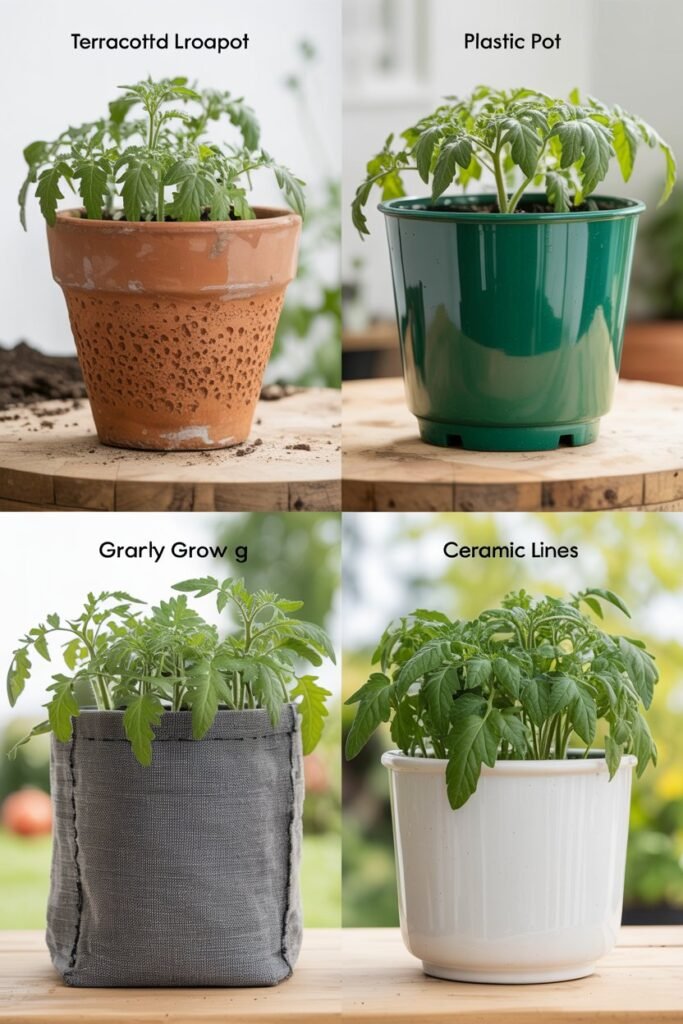
Fabric Grow Bags
- Excellent drainage
- Prevents root circling
- Promotes air pruning
- Lightweight and portable
Best for hot climates (roots stay cooler).
Plastic Pots
- Great moisture retention
- Affordable
- Long-lasting
- Lightweight
Best for dry climates where soil dries out quickly.
Terracotta (Clay) Pots
- Beautiful and classic
- Breathable
- Prevents overwatering
But beware:
Terracotta dries out very fast.
Not great for beginners or hot climates unless you water daily.
4. Drainage: The Non-Negotiable Element
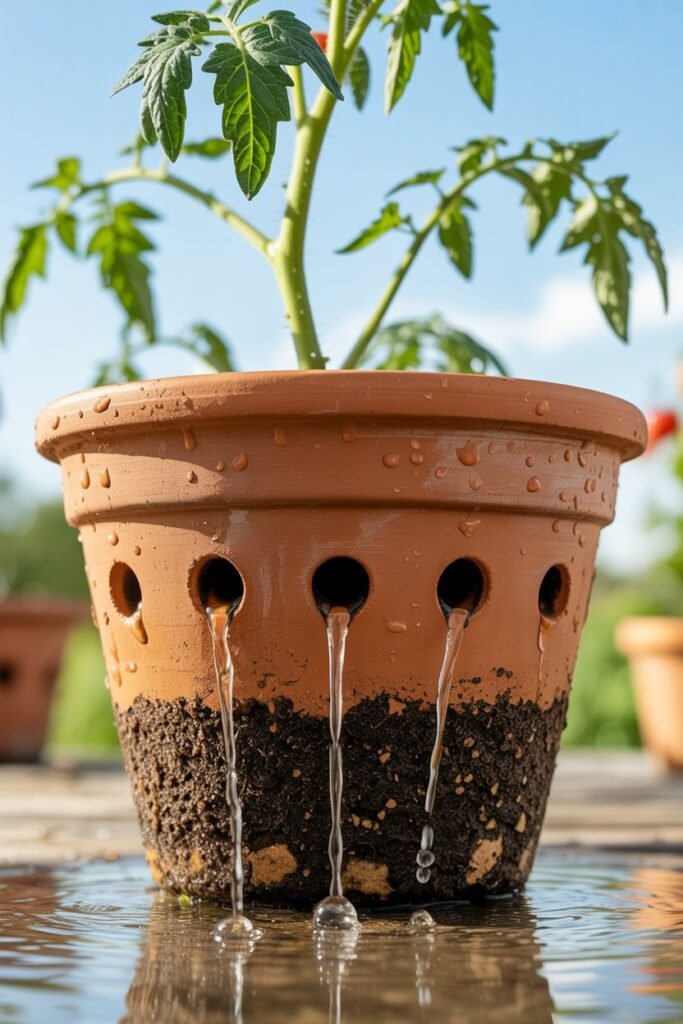
Tomatoes hate soggy soil. Excess water suffocates the roots and promotes fungal disease.
Your pot MUST have:
- Multiple drainage holes
- A way for excess water to escape
- A raised bottom or pot feet
Expert tip:
Soggy soil leads to root rot, yellow leaves, and blossom drop — all common container problems.
5. Elevate Your Pot
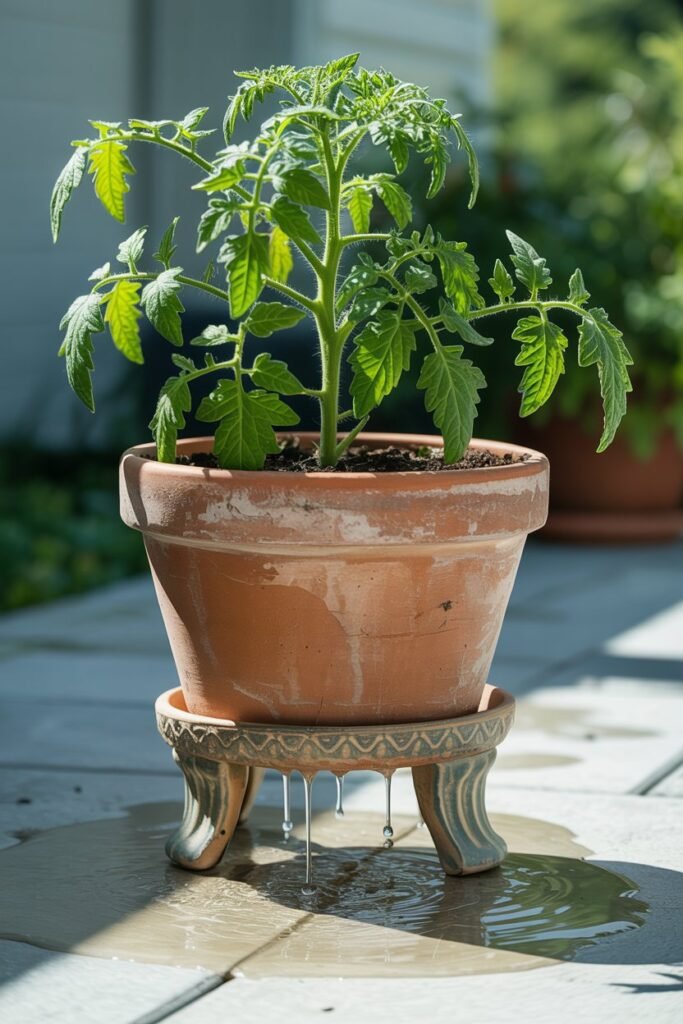
Placing your tomato pot directly on the ground traps moisture.
Use:
- pot risers
- bricks
- wooden slats
This promotes airflow and prevents fungal spread from the patio surface.
6. The Problem with Small Containers
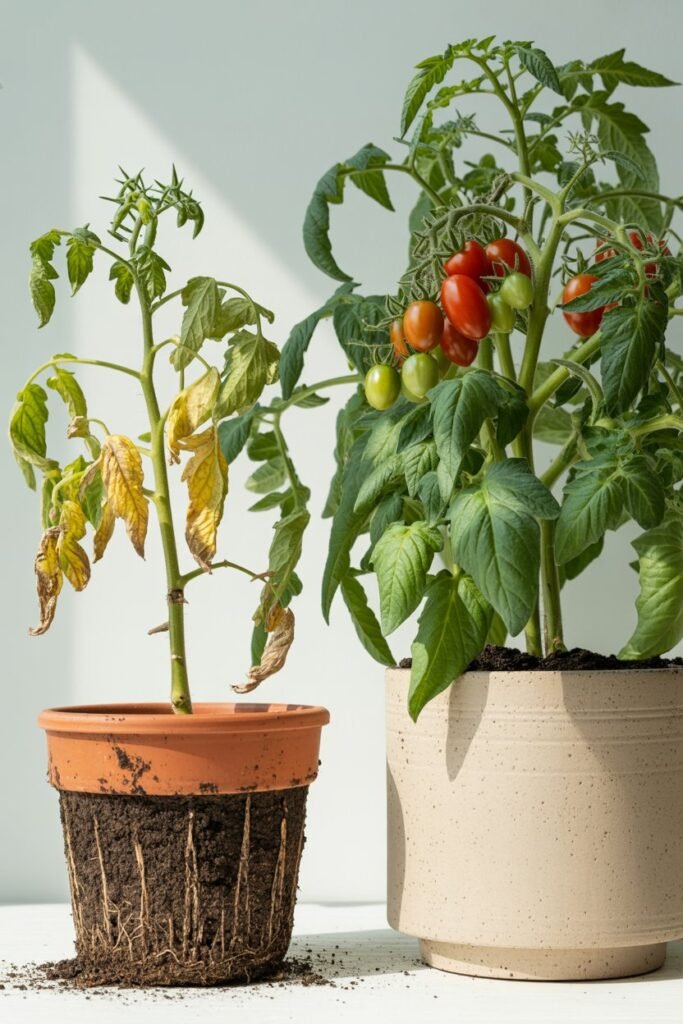
Small pots cause:
- overheating
- fast drying
- nutrient depletion
- weak roots
- limited fruiting
- stunted growth
Tomatoes are NOT like herbs—they need space.
Common Pot Mistakes to Avoid
Mistake 1: Using decorative pots without drainage
Pretty pots often equal dead plants.
Mistake 2: Using small pots because the plant looks small at first
Tomatoes grow fast—it will outgrow a small pot in weeks.
Mistake 3: Dark-colored pots in extreme heat
These pots overheat roots.
Use mulch or shade the pot itself.
Why This Tactic Matters
A tomato plant can only grow as big as its root system allows.
If the roots are restricted, the plant becomes:
- stressed
- nutrient deficient
- prone to blossom-end rot
- unable to support fruit
- more sensitive to heat
A high-quality pot sets the foundation for everything that follows.
3: Master Sunlight Positioning (Tomatoes Need Intensity, Not Just Hours)
Tomatoes are sun-lovers, but most new container gardeners misunderstand what “full sun” truly means.
It’s not simply about counting hours of light — it’s about intensity, direction, strength, and consistency of the sunlight that reaches your plant.
Container-grown tomatoes depend entirely on you for proper placement. In the ground, roots can chase nutrients. In pots, sunlight is the one resource you must deliver perfectly.
Let’s break this tactic into precise, actionable layers.
Why Sun Intensity Matters More Than Hours
Most guides say “6–8 hours of sunlight,” but tomatoes perform best under:
7–10 hours of strong, direct sunlight
Strong sun drives:
- Faster nutrient uptake
- Better flowering
- Higher fruit set
- Sweeter, richer tomatoes
- Resistance to mildew and fungal issues
Weak or indirect sun leads to:
- Tall, lanky stems
- Yellowing lower leaves
- Fewer blossoms
- Slow fruit ripening
In pots, because soil warms quickly, you actually get faster growth — but only if sunlight is strong enough to fuel that accelerated metabolism.
The Best Orientation for Tomatoes in Containers
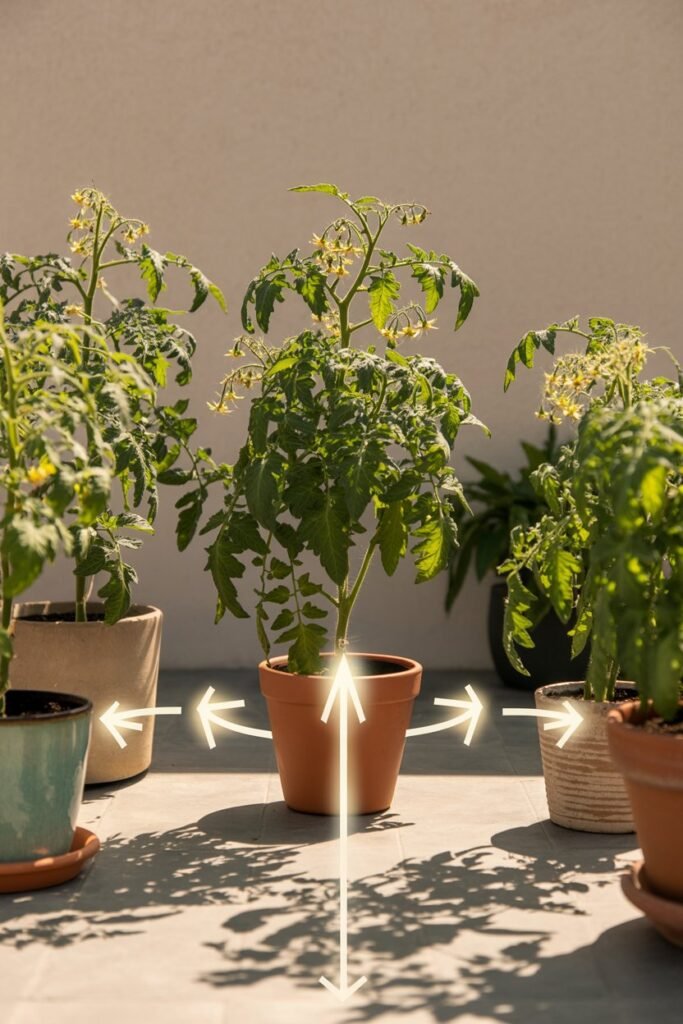
The direction your pot faces can make or break your harvest:
South-facing areas
- Best for all tomato varieties
- Delivers the longest, strongest light
- Ideal for balconies, patios, windowsills
West-facing areas
- Perfect for very hot climates
- Provides intense afternoon heat
- Great for fruit set
East-facing areas
- Good morning sun
- Suitable for preventing leaf burn in extreme heat zones
- Tomatoes will grow, but may produce slower without added afternoon light
North-facing areas
Not suitable, unless using supplemental grow lights.
Managing Heat: Sunlight vs. Heat Stress
Tomatoes love heat, but containers can overheat faster than garden soil.
Watch for:
- Leaf curling
- Dry pot edges
- Drooping even after watering
- Blossom drop during heat waves
If temps exceed 100°F (38°C):
Shade your pot only during peak afternoon hours:
- Use a sheer shade cloth (30%)
- Move pot slightly back under a pergola edge
- Use umbrella-style partial shade
Once temps cool, return the pot to full sun.
Daily Sunlight Checklist for Potted Tomatoes
- Ensure morning sun hits the plant by 8–10 AM
- Track how long direct sun stays on that exact spot
- Trim nearby overhanging branches
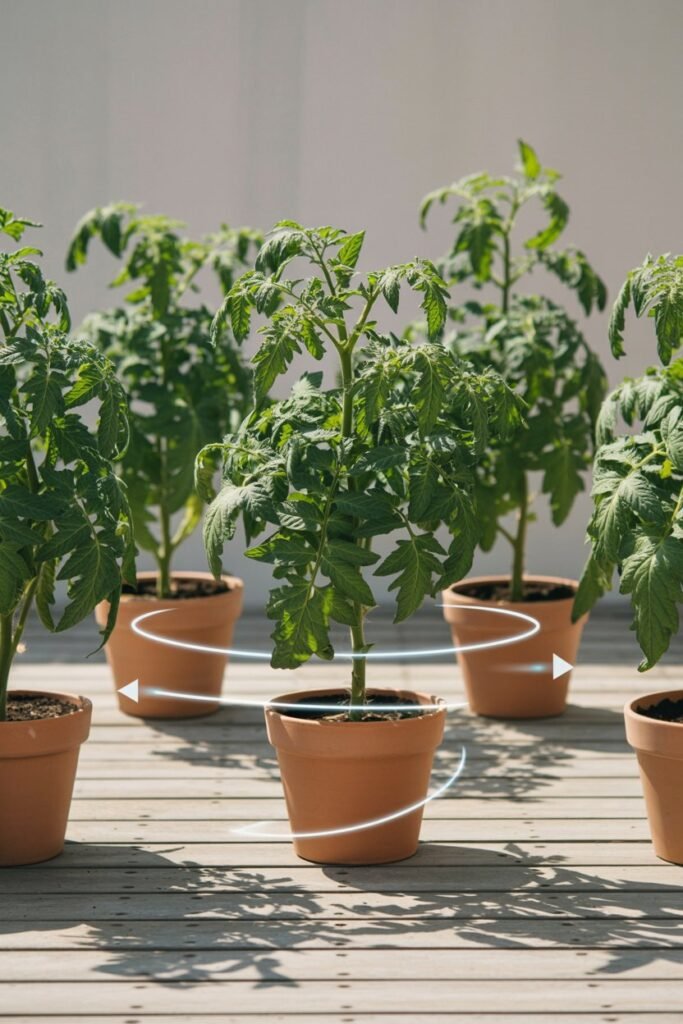
- Rotate the pot ¼ turn weekly for even growth
- Clean dusty leaves so they absorb more light
Signs Your Tomato Is Getting the Perfect Sun
- Dark green leaves
- Thick central stem
- Compact, bushy structure
- Continuous flowering
- Fast fruit swelling
Signs Sunlight Is Inadequate
- Pale green leaves
- Very tall, thin growth
- Flowers dropping before forming fruit
- Slow ripening
- Leaves tilting dramatically toward the light
Sun is one of your tomato’s most powerful “fertilizers” — and perfecting light exposure in containers gives your plant the energy to fruit consistently all season long.
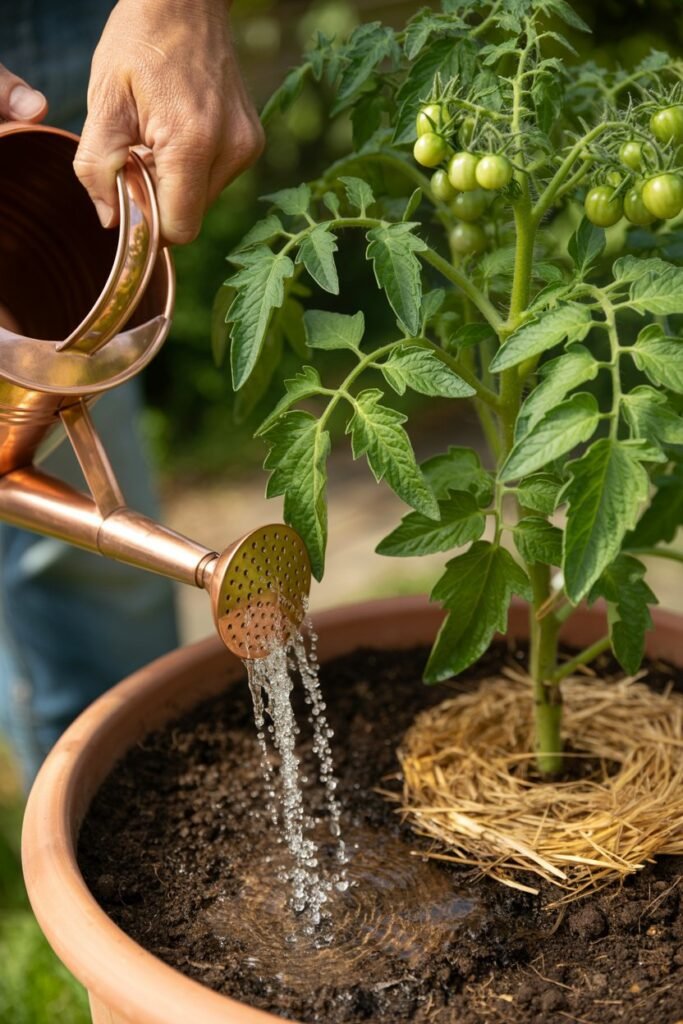
4: Watering Tomatoes the Right Way (Precision Over Quantity)
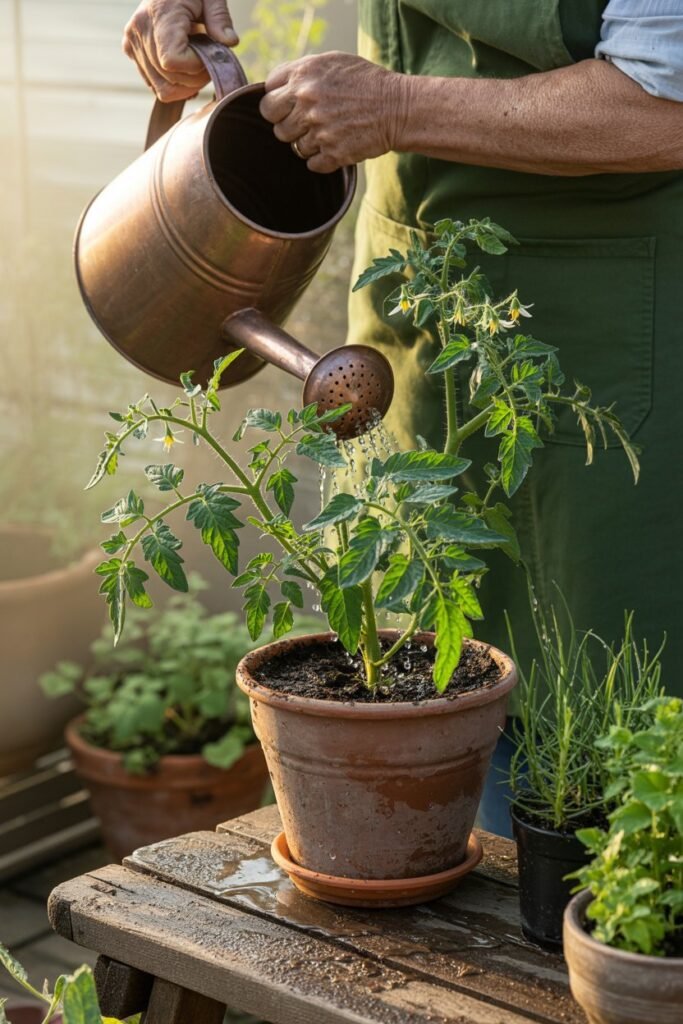
Watering tomatoes in pots is not the same as watering garden tomatoes.
In containers, water drains faster, evaporates faster, and affects nutrient absorption more dramatically.
This tactic teaches you how tomatoes want to be watered, how much, how often, and how to set a fail-proof schedule that prevents the two biggest killers:
- Underwatering
- Overwatering
Let’s get extremely detailed.
Understanding Tomato Roots in Containers
Tomatoes have deep, adventurous roots that normally travel 2–4 feet into the ground.
In pots, they can’t do that — so your watering must mimic a deep soak the roots would naturally find underground.
Overly shallow watering leads to:
- Weak root systems
- Plants dependent on constant watering
- Blossom end rot
- Small fruit
Overly frequent watering leads to:
- Root rot
- Fungal diseases
- Nutrient leaching
- Yellowing and leaf drop
The Perfect Watering Method: Deep, Slow, and Consistent
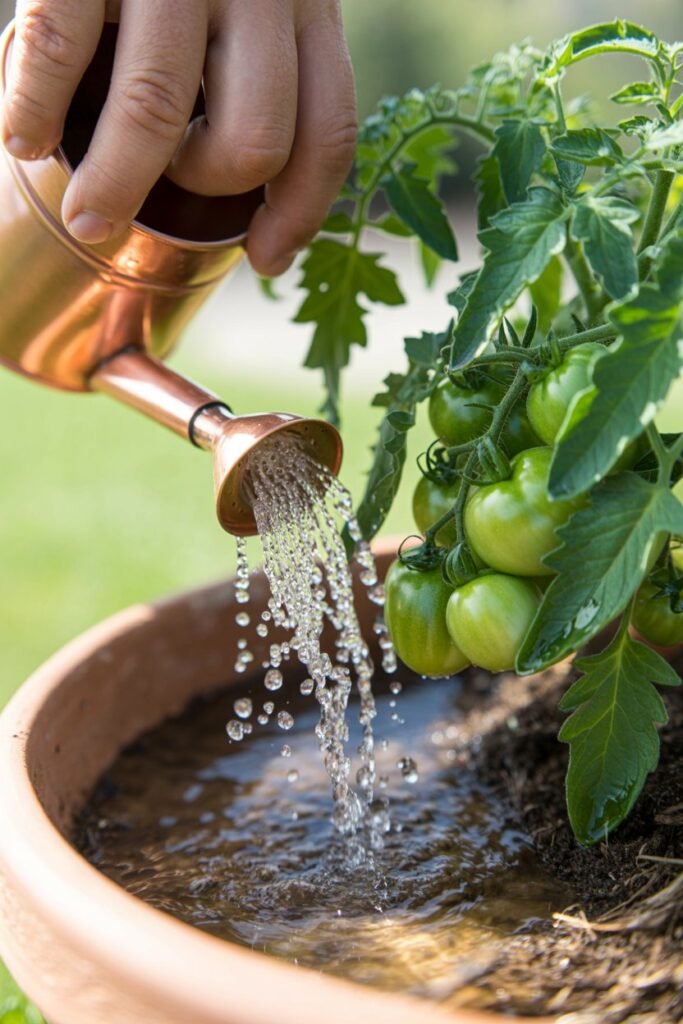
Instead of dumping water quickly on top, do this:
Step-by-step:
- Water slowly until the entire soil surface is moist.
- Continue watering until water drains out the bottom.
- Stop, wait 30 minutes.
- Water again lightly — this second soak reaches deeper pockets.
This creates a moisture zone that encourages roots to grow downward, not sideways.
Watering Schedule for Potted Tomatoes
Watering changes throughout the plant’s life cycle.
Seedlings (Weeks 1–3)
Frequency:
- Water lightly every 1–2 days
Goal:
Keep soil lightly moist, never soggy.
Vegetative Growth (Weeks 3–7)
Frequency:
- Water deeply every 2–3 days
Amount:
- ½ to 1 gallon per pot, depending on size and heat.
Tip:
Lift the pot — if it feels very light, it’s time to water.
Flowering & Early Fruit Set (Weeks 7–10)
This is the MOST sensitive watering stage.
Frequency:
- Water deeply every 2 days
Goal:
Prevent flower drop and encourage fruit formation.
Heavy Fruit Development & Ripening (Weeks 10+)
Frequency:
- Deep watering every 1–2 days in hot weather
- Every 2–3 days in moderate weather
Tip:
Tomatoes become extra thirsty when fruits start swelling.
Hot Climate Watering Adjustments
When temps exceed 95°F (35°C):
- Water early in the morning
- Add a thin mulch layer on top (straw or shredded leaves)
- Place the pot on a tray with pebbles (reduces evaporation)
- Move pot slightly away from walls that radiate heat
Rainy Climate Adjustments
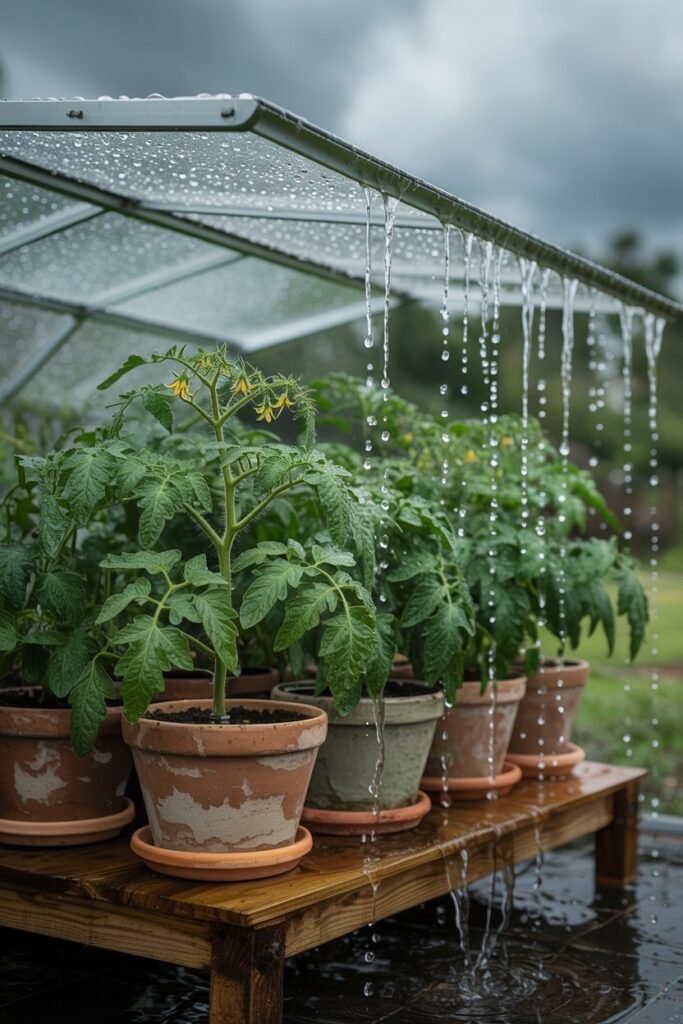
If you live somewhere that gets unexpected rain, you must protect your pot from:
- Waterlogging
- Nutrient leaching
- Fungal diseases
Tips:
- Move the pot under a covered patio
- Elevate pot feet to improve drainage
- Add perlite if soil stays wet for too long
How to Know When Your Tomato Needs Water (Simple Diagnostic)
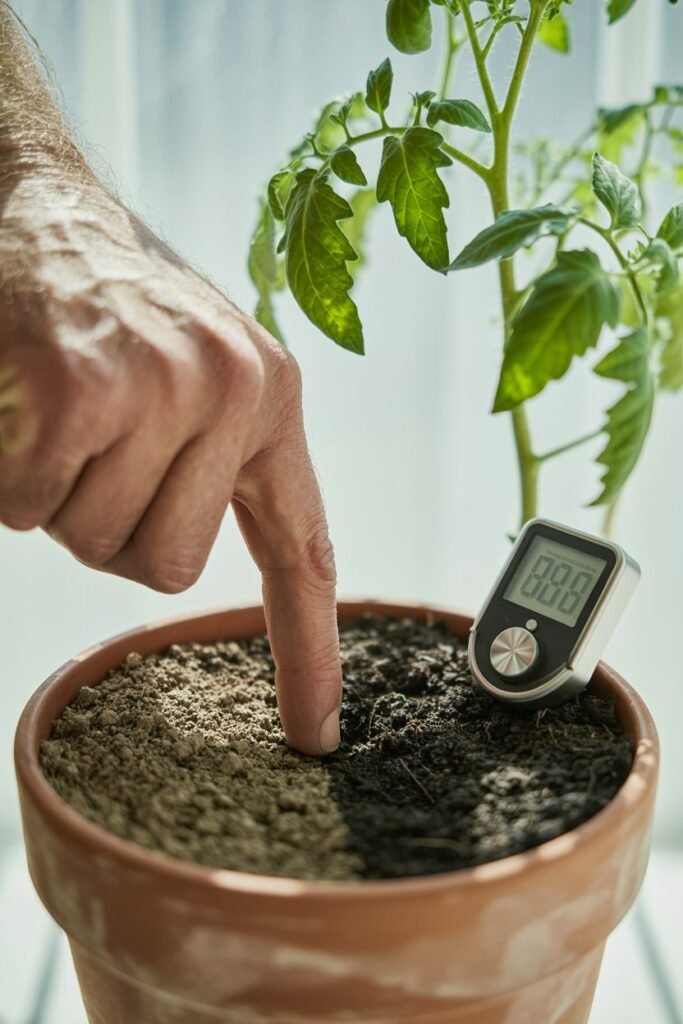
Put your finger two inches into the soil:
If soil feels:
- Dry → Water now
- Moist → Wait
- Wet → Reduce watering frequency
Another expert trick:
Stick a wooden chopstick into the soil. Pull it out after 5 minutes.
- Dark area = moisture present
- Dry stick = time to water
Common Watering Mistakes (and How to Avoid Them)
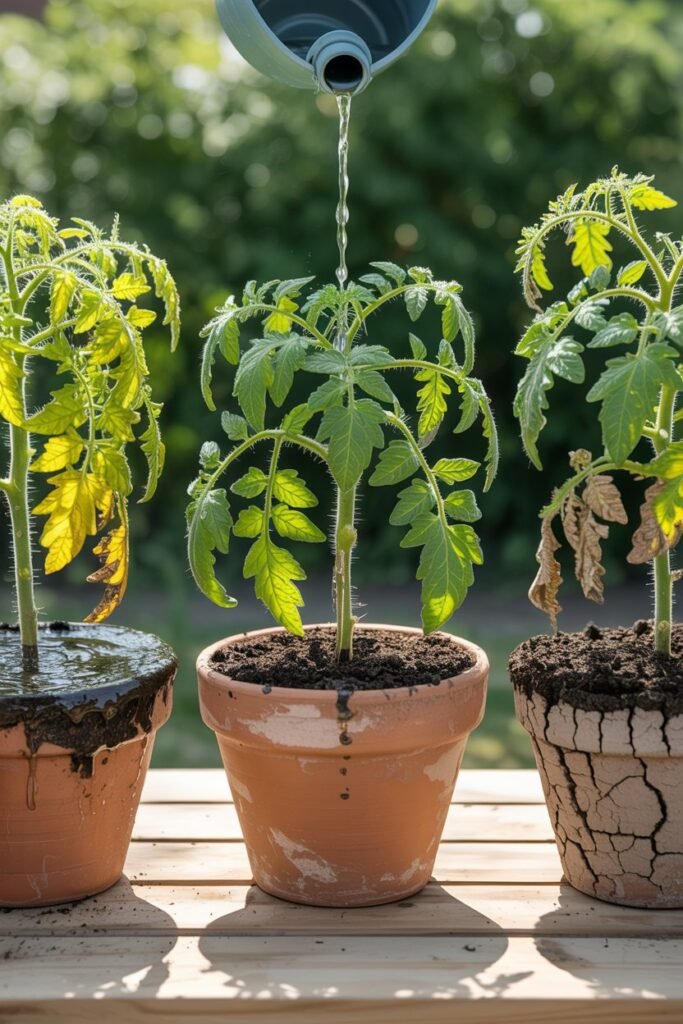
Mistake 1: Watering lightly every day
This creates shallow roots and weak plants.
- Fix: Water deeply but less often.
Mistake 2: Watering the leaves
This invites fungal problems like blight.
- Fix: Always water at the base.
Mistake 3: Letting soil dry out completely
This shocks the plant → blossom end rot.
- Fix: Maintain even moisture.
Mistake 4: Overwatering by guessing instead of checking
Containers differ in evaporation speed.
- Fix: Always check soil first.
Mistake 5: Using dark-colored pots in extreme heat
They dry out dramatically faster.
- Fix: Choose lighter pots or add insulation.
Signs of Underwatering
- Wilting, especially midday
- Crispy edges on leaves
- Slow fruit growth
- Pale leaves
Signs of Overwatering
- Yellowing leaves
- Mushy lower stems
- Fungus gnats
- Soil that smells sour
5: Feed Your Tomatoes Strategically (Nutrition That Matches Each Growth Stage)
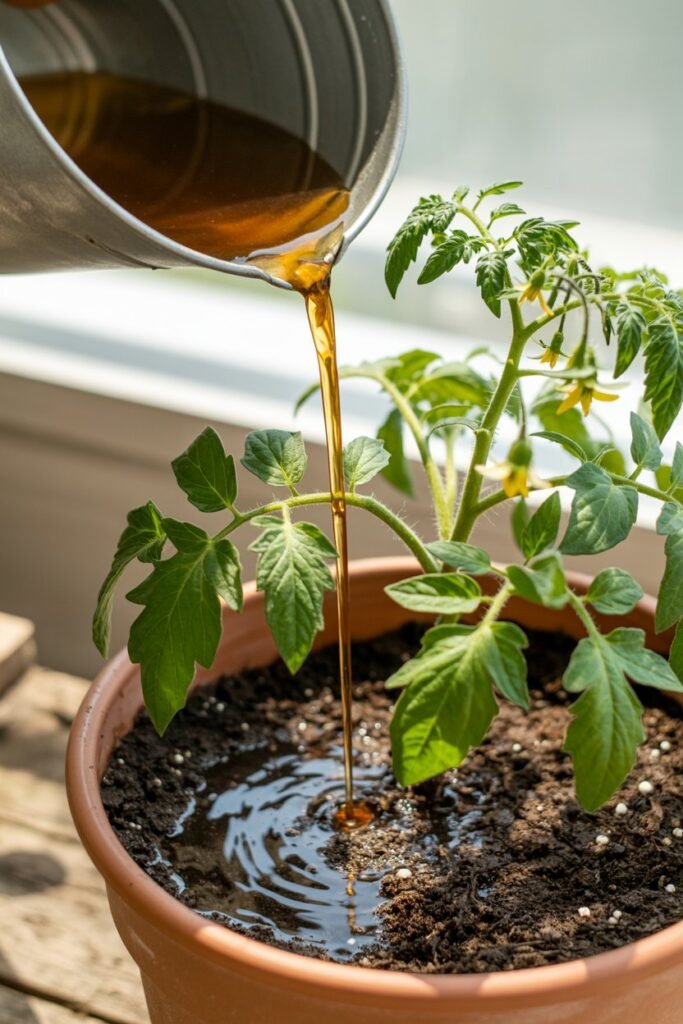
Tomatoes in the ground forage for nutrients naturally their roots explore several feet of soil, pulling in minerals over time.
But tomatoes grown in pots cannot do that. Their entire nutrition depends on what you provide.
This means feeding your tomato plant isn’t optional it’s the backbone of successful container growing.
This tactic teaches you exactly what to feed, when to feed it, and how to avoid nutrient imbalance, which is one of the most common reasons potted tomatoes fail.
Let’s break it down like a true expert gardener would.
Understanding Tomato Nutrition Needs (Each Stage Is Different)
Unlike many vegetables, tomatoes do not use equal nutrients throughout their life. Their needs shift drastically.
We can divide tomato nutrition into three phases:
Phase 1: Root & Leaf Growth (Vegetative Stage)
Needs: High nitrogen + moderate calcium + trace minerals
Goal: Build strong stems, healthy leaves, and thick roots.
Think of this stage as building infrastructure before fruiting begins.
Best fertilizers for this stage:
- Balanced formulas like 10-10-10 or 5-5-5
- Fish emulsion
- Worm castings
- Compost tea
Use these until the plant reaches about:
- 12–18 inches tall
- Or shows the first flower buds
After that, stop high-nitrogen fertilizers — otherwise, you’ll get a big leafy plant with almost no tomatoes.
Phase 2: Flowering & Fruiting (Reproductive Stage)
Needs: Low nitrogen, high phosphorus + potassium
Goal: Shift energy from leaf production to flowering and fruit set.
If you continue nitrogen-heavy feeding here, expect:
- Beautiful plants
- Zero fruits
Best fertilizers for fruiting:
- Tomato-specific fertilizer like 4-6-8, 3-4-6, or 5-10-10
- Bone meal for phosphorus
- Potassium sulfate or kelp meal
- Bloom boosters (organic preferred)
Feed every:
- 10–14 days for liquids
- 3–4 weeks for granules
Phase 3: Heavy Fruit Production (Peak Season)
Needs: Higher potassium, steady calcium, and micronutrients
Goal: Fuel sustained fruit development.
This keeps fruits:
- Larger
- Juicier
- More uniform
- Less prone to rot
Best additives at this stage:
- Liquid seaweed (potassium + trace minerals)
- Epsom salt only if deficient
- Crushed eggshell tea (slow-release calcium)
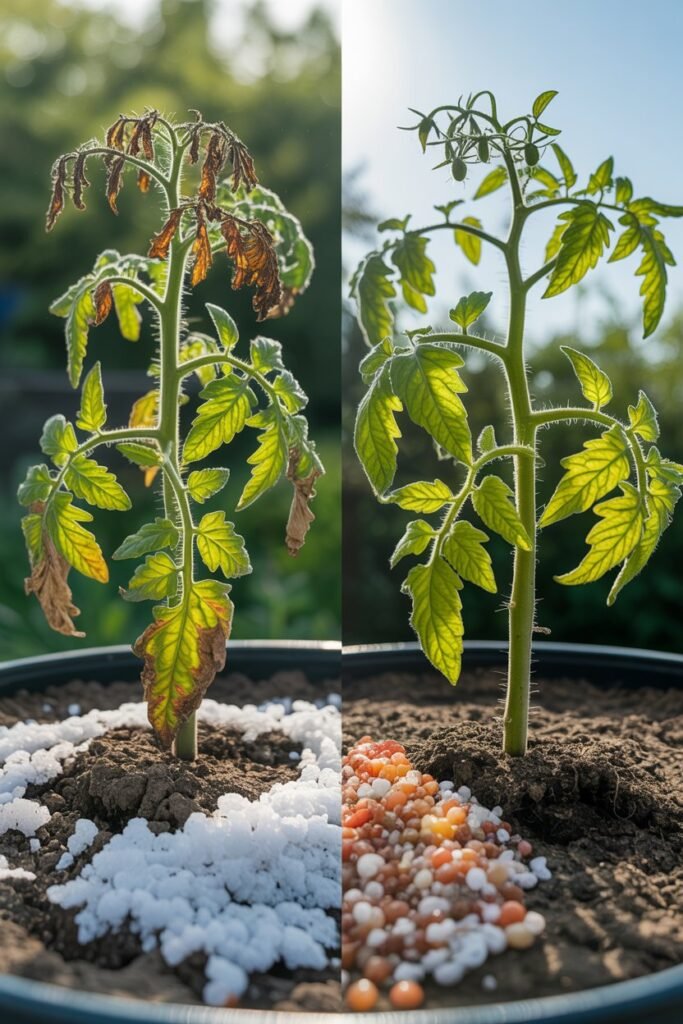
Essential Micronutrients Tomatoes Need
Tomatoes quickly show deficiencies in pots because nutrients wash out faster.
Watch for:
- Calcium deficiency: Blossom end rot
- Magnesium deficiency: Yellowing between leaf veins
- Iron deficiency: Yellow leaves with green veins (young leaves)
To avoid this:
- Add 1–2 cups of compost every 3 weeks
- Add 1 tablespoon of Epsom salt once per month (only if magnesium is low)
- Use a fertilizer with micronutrients
Fertilizing Schedule for Potted Tomatoes
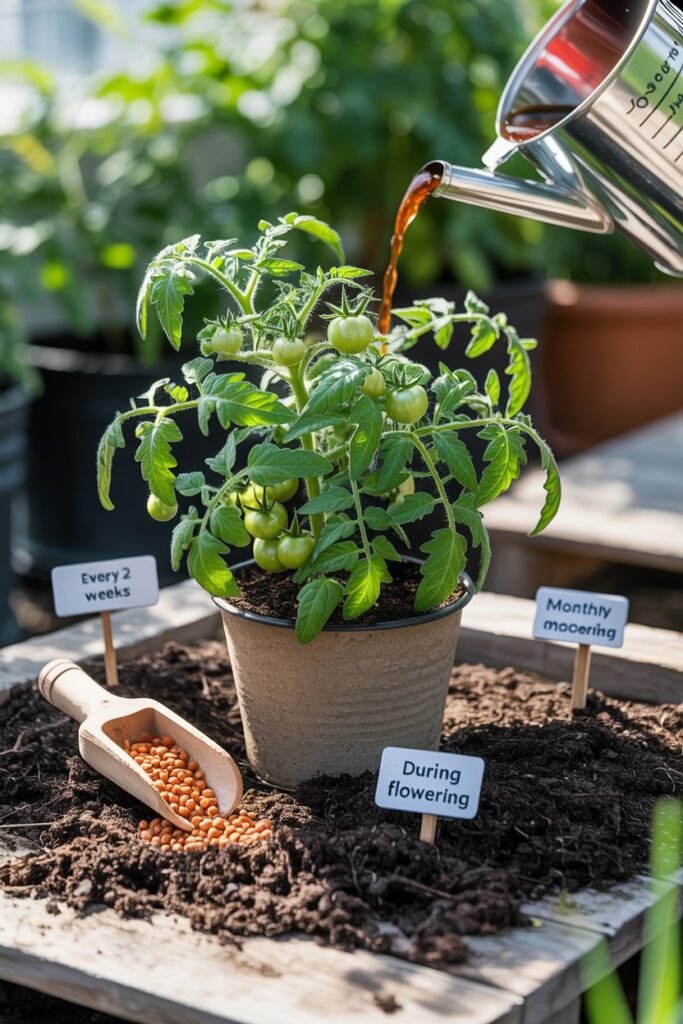
Here is a precise, expert-approved timeline:
Week 0 (Planting):
Mix fertilizer into soil + add compost + add bone meal.
Week 2:
Apply liquid fertilizer (balanced).
Week 4:
Switch to fruiting fertilizer.
Weeks 6–12:
Feed every 10–14 days with bloom/fruiting fertilizer.
Weeks 12+:
Add potassium-heavy feeds + liquid seaweed every 2 weeks.
Common Feeding Mistakes
Overfeeding nitrogen
Leads to big plants + few fruits.
Feeding too late in the evening
Invites slugs, fungal issues.
Using raw manure
Burns roots and introduces disease.
Not flushing salts from the soil
Mineral buildup causes leaf burn in pots.
Fix: Flush pot with clean water once every 4–6 weeks.
Expert Feeding Hack
Add slow-release fertilizer at planting + liquid feeding during growth.
This “dual feeding” keeps your tomato steadily nourished all season.
6: Prune & Support Your Plant (Structure Determines Productivity)
Tomato pruning is one of the most misunderstood gardening practices — and one of the most powerful. It acts like a traffic system inside your plant, telling it:
- Where to send energy
- How fast to grow
- How to balance leaves vs fruits
In pots, pruning is even more vital because space is limited and airflow is reduced.
This tactic covers:
1. What type of tomato needs pruning
2. How to prune without stressing the plant
3. Why support systems are essential
4. How pruning improves fruit size, disease resistance, and longevity
1: Identify Your Tomato Type Before Pruning
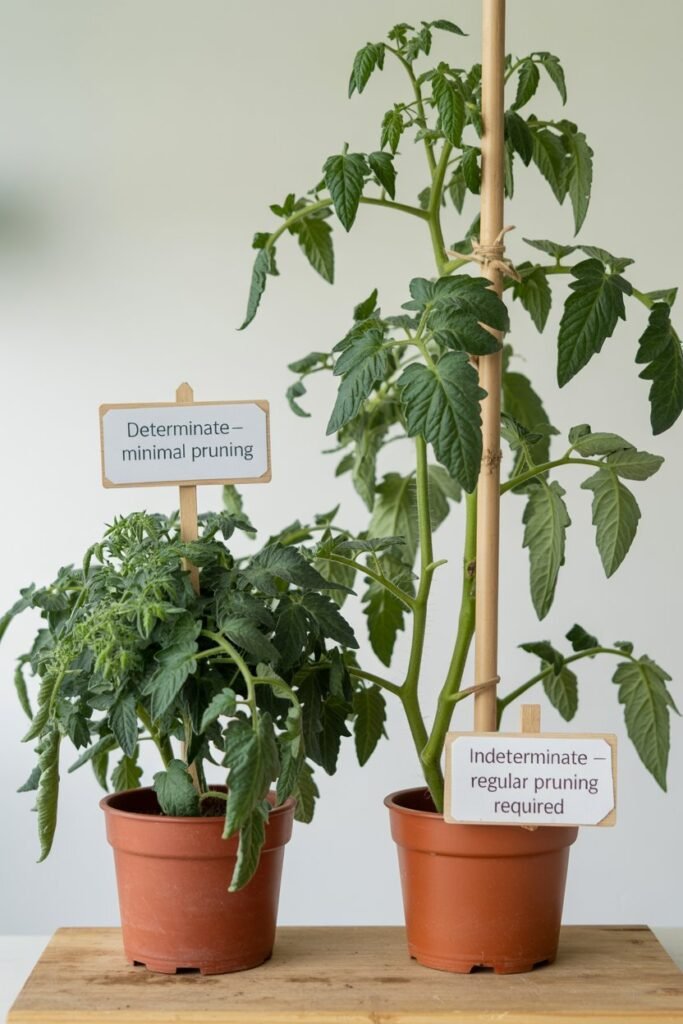
Tomatoes fall into two categories:
Determinate Tomatoes
(Bush types)
- Grow to a fixed height
- Produce all their fruit in one big flush
- Require minimal pruning
- Do great in smaller pots
Example varieties: Roma, Patio, Celebrity
Pruning rule:
Remove only the bottom leaves touching the soil + any diseased leaves.
Indeterminate Tomatoes
(Vining types)
- Grow continuously all season
- Can reach 6–12 feet
- Produce fruit non-stop
- Need regular pruning in containers
- Must have strong support
Example varieties: Beefsteak, Cherry, Sungold, Big Boy
Pruning rule:
Remove suckers and thin out dense growth weekly.
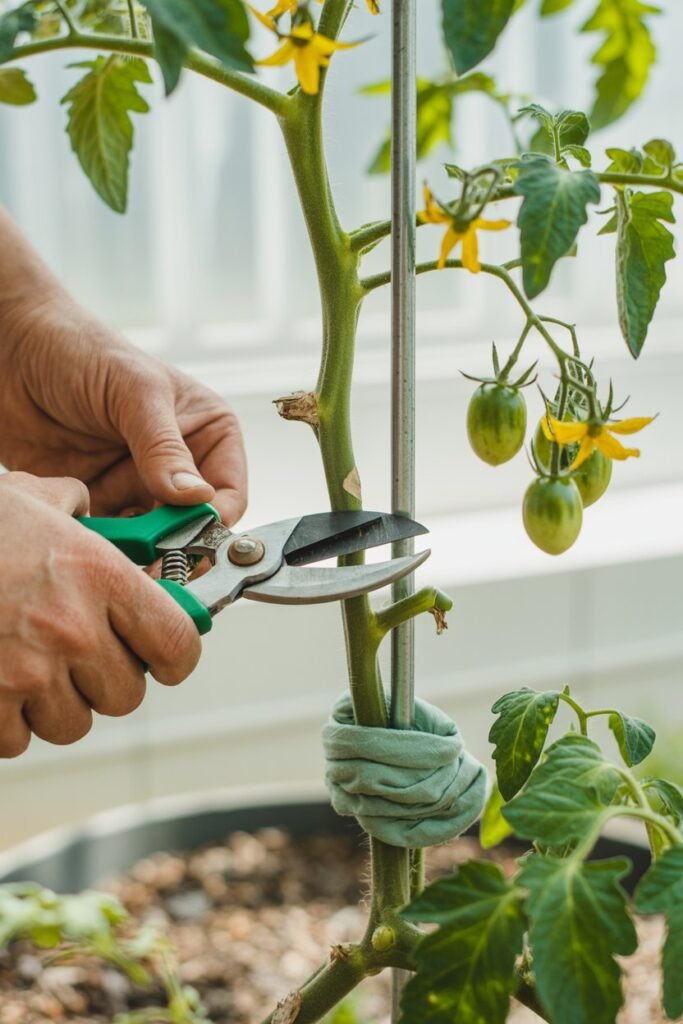
2: How to Prune Tomatoes Correctly
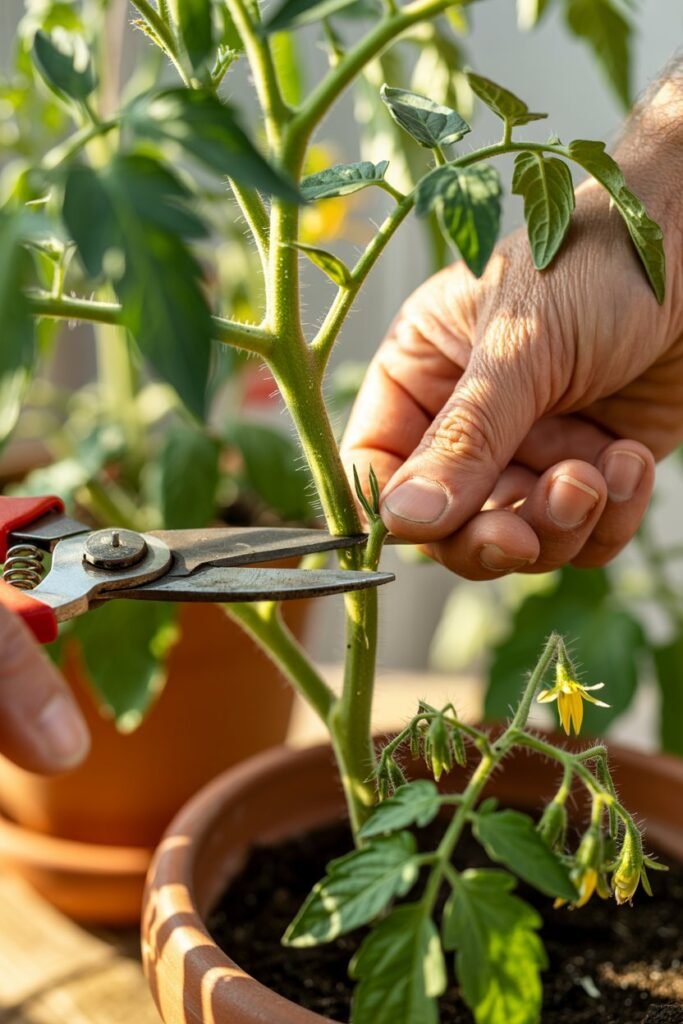
Remove Suckers (the small shoots)
Suckers grow between:
- The main stem
- A leaf branch
If left alone, they become full branches that overcrowd the plant in pots.
How to remove:
- Pinch small suckers with fingers
- Use clean shears for larger ones
Remove Bottom Leaves
Once your plant reaches 18–24 inches tall, remove the bottom 4–6 inches of leaves.
This:
- Prevents soil splash
- Improves airflow
- Reduces fungal disease
- Helps direct energy upward
Remove Yellow or Diseased Leaves Immediately
Signs of trouble:
- Speckled leaves
- Yellow edges
- Brown spots
- Curling vines
Cut them off as soon as you notice them.
Thin Dense Areas for Better Airflow
Tomatoes grown in pots need space between branches to reduce moisture buildup.
Remove:
- Very dense inner branches
- Overlapping vines
- Any heavy clusters weighing down the plant
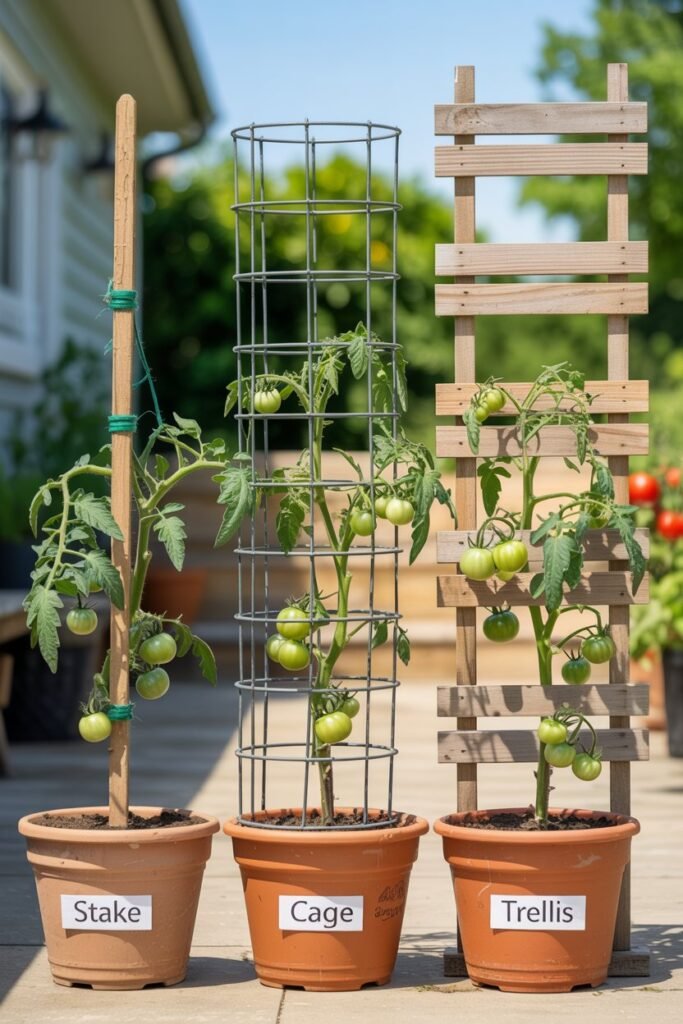
3: Supporting Your Plant (Stakes, Cages, Trellises)
Tomatoes become heavy fast — especially indeterminate types.
Supporting them early prevents:
- Stem snapping
- Weak growth
- Low fruit production
- Disease from foliage touching wet soil
Best Support Options for Potted Tomatoes
1. Tomato Cages
- Great for determinate & indeterminate varieties
- Easy to use
- Choose heavy-duty metal ones
2. Single Tall Stake
- Ideal for indeterminate vines
- Use 4–6ft bamboo or metal stakes
- Tie branches with soft garden ties
3. Trellis or A-frame
- Best for cherry tomatoes
- Provides maximum airflow
- Minimizes disease risk
When to Add Support
Always install support at planting time, not later.
Trying to place a cage or stake into a mature pot will damage roots.
Why Pruning + Support Boosts Yield
- directs energy to fruit
- increases airflow
- improves light penetration
- prevents disease
- makes harvesting easier
- produces larger, healthier tomatoes
Expert Tip
After heavy pruning, water and feed lightly to help the plant recover quickly.
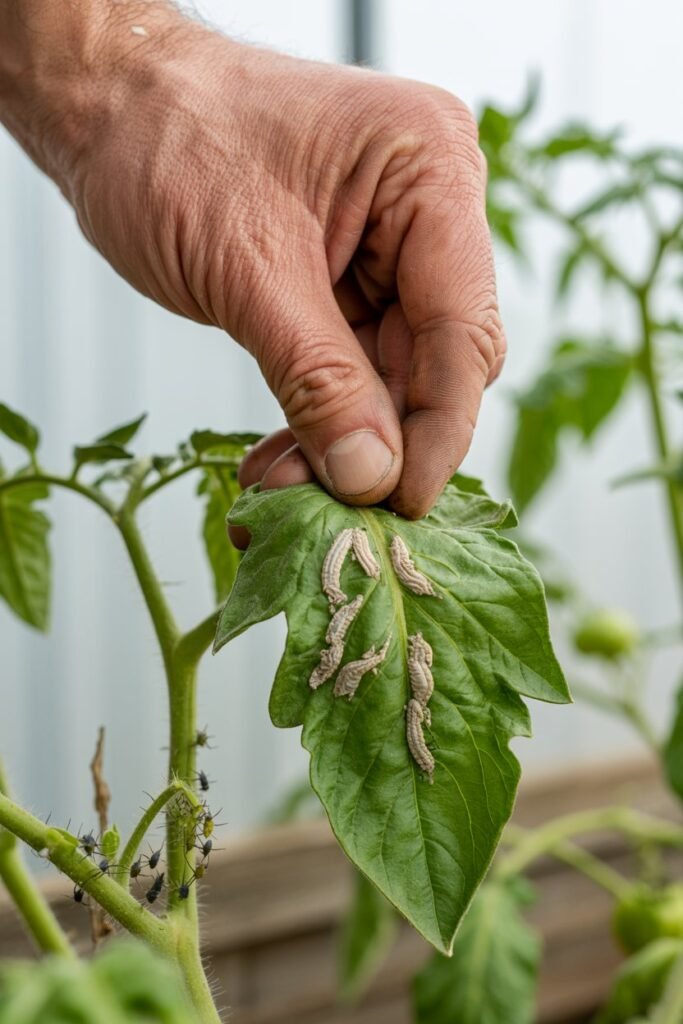
7: Prevent & Manage Pests Before They Start (Container Tomatoes Need Proactive Defense)
Tomatoes grown in pots have an advantage: they’re elevated, isolated, and easier to monitor.
But they’re not immune to pests.
Because the soil volume is limited, any pest outbreak spreads fast and causes severe damage much quicker than in-ground tomatoes.
This tactic equips you with an expert-level, preventative approach to pest control so your potted tomatoes never get overrun.
Know the Most Common Tomato Pests in Containers
These are the main pests you’re likely to face:
1. Aphids
- Tiny green, black, or white insects
- Cluster on new leaves and stems
- Cause curling and sticky residue
2. Whiteflies
- Tiny white flying insects
- Found under leaves
- Cause yellowing and weakened plants
3. Spider Mites
- Thrive in hot, dry conditions
- Cause speckled leaves and webbing
4. Tomato Hornworms
- Large green caterpillars
- Can strip leaves overnight
5. Fungus Gnats
- Tiny flying bugs from overwatered soil
Early Prevention Is Better Than Cure
To keep your container tomatoes safe, implement these expert strategies:
Strategy 1: Keep the Plant Clean
- Remove lower leaves touching soil
- Prune regularly for airflow
- Clean pots before planting
- Remove fallen leaves immediately
Good hygiene eliminates pest breeding zones.
Strategy 2: Strengthen the Plant’s Immunity
A stressed tomato attracts pests.
Strengthen it by:
- Proper watering
- Adequate sunlight
- Balanced fertilizing
- Removing diseased leaves early
Healthy plants resist pests naturally.
Strategy 3: Use Neem Oil Preventively
Spray once every 7–10 days:
- On top and bottom of leaves
- Light, even coating
- Early morning only
Neem repels aphids, mites, whiteflies, and fungal spores.
Strategy 4: Introduce Natural Helpers
You can bring beneficial insects into your garden:
- Ladybugs
- Lacewings
They devour aphids and mites.
Strategy 5: Use Sticky Traps
Small yellow sticky cards:
- Catch whiteflies and fungus gnats
- Reduce early population
If You Notice Pests: Act FAST
Because containers are small, pests spread quickly.
Use the 3-Step Emergency Response:
Step 1: Remove heavily infested leaves
Dispose of them away from the plant.
Step 2: Spray with neem or insecticidal soap
Coat both sides of leaves.
Step 3: Repeat every 3 days for 2 weeks
Break the pest life cycle.
Expert Backup Treatments
For stubborn pests:
- Use spinosad for caterpillars
- Use horticultural oil for mites
- Add sand to the topsoil to stop gnats
With proactive care, pests never become a major issue — and container tomatoes stay healthy, green, and vigorous all season long.
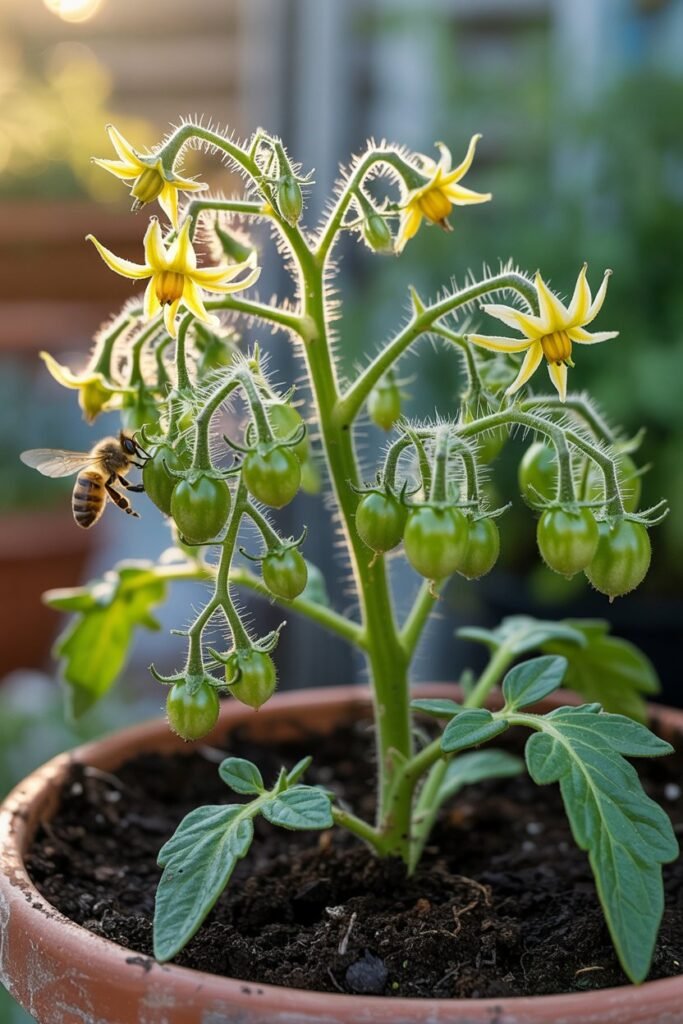
8: Ensure Proper Pollination for Maximum Fruit Set
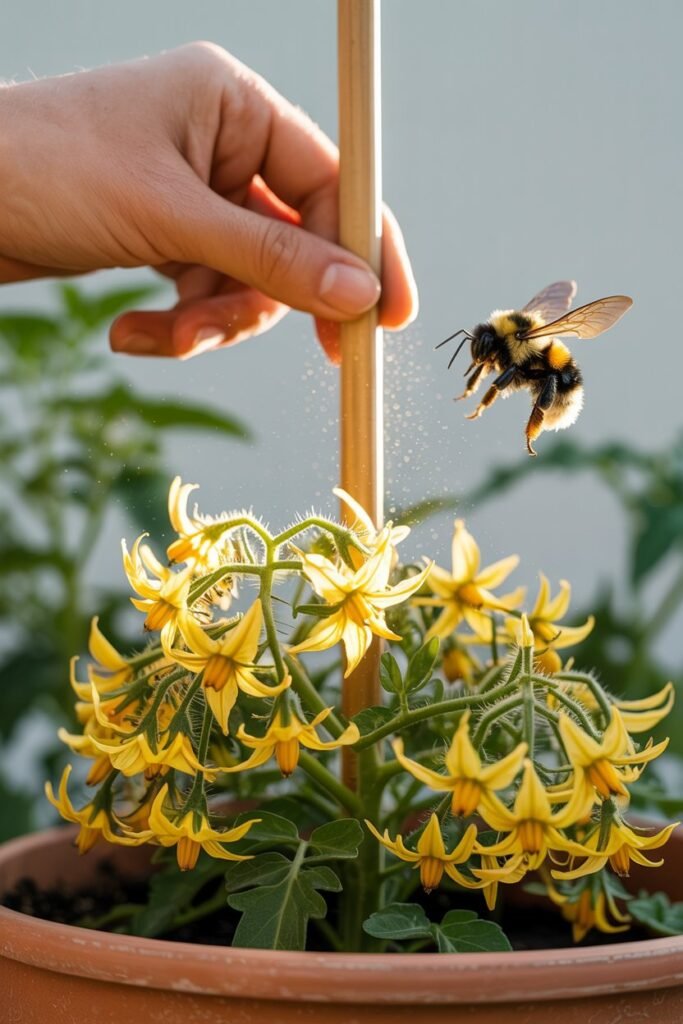
Tomatoes may self-pollinate, but in containers, pollination is often less reliable.
Potted tomato flowers sit away from the ground and natural air movement, so they need extra help.
Incomplete pollination causes:
- Flower drop
- Small fruits
- Misshapen tomatoes
- Low yields
This tactic helps you create the perfect environment for strong, consistent pollination.
Understand How Tomato Flowers Pollinate
Tomatoes are “self-fertile.”
This means each flower contains both male and female parts.
But pollination requires:
- Vibrations
- Air movement
- Warm, dry conditions
In containers, these conditions may not occur naturally, so you must assist.
Create Natural Airflow
Place your tomato pot where:
- The wind gently moves the branches
- There is good ventilation
- Air can pass from all sides
Avoid corners or cramped balconies where air stagnates.
Help Pollination by Hand (60-second technique)
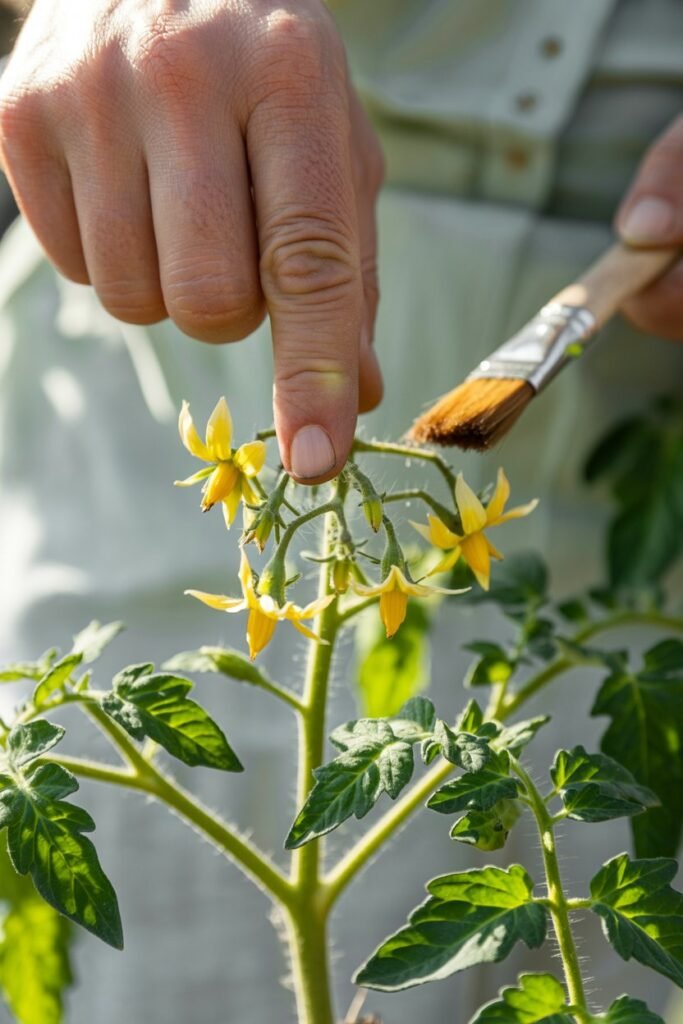
Method 1: Tap the Stem
Every morning, gently tap the main stem or cages.
This shakes pollen loose.
Method 2: Use a Paintbrush
Swipe the brush gently inside each flower.
This imitates bees.
Method 3: Use a Vibration Tool
An electric toothbrush works perfectly.
Touch it to the stem — vibration spreads pollen effortlessly.
Temperature Matters for Pollination
Tomato flowers won’t pollinate well when:
- Temps exceed 90°F (32°C)
- Temps drop below 55°F (13°C)
- Humidity is extremely high or low
In heat waves:
- Water early
- Add 30% shade cloth
- Mist the air (not the flowers) lightly
In cool weather:
- Move pot to warmest spot
- Increase sunlight exposure
Bring Beneficial Pollinators
Invite pollinators by placing:
- Marigolds
- Basil
- Lavender
- Calendula
These attract bees that help pollinate your tomatoes.
Proper pollination dramatically increases tomato quantity, size, and consistency — especially in containers where airflow is limited.
Tactic 9: Harvest Correctly & Extend Production (How to Keep Tomatoes Fruiting Longer)
Growing tomatoes in pots is not the same as harvesting field tomatoes.
Because containers restrict root growth and nutrient access, you must harvest strategically to keep the plant producing.
This tactic teaches you how to:
1. Pick fruit at the perfect time
2. Prevent plant exhaustion
3. Extend your harvest window
4. Encourage continuous fruiting
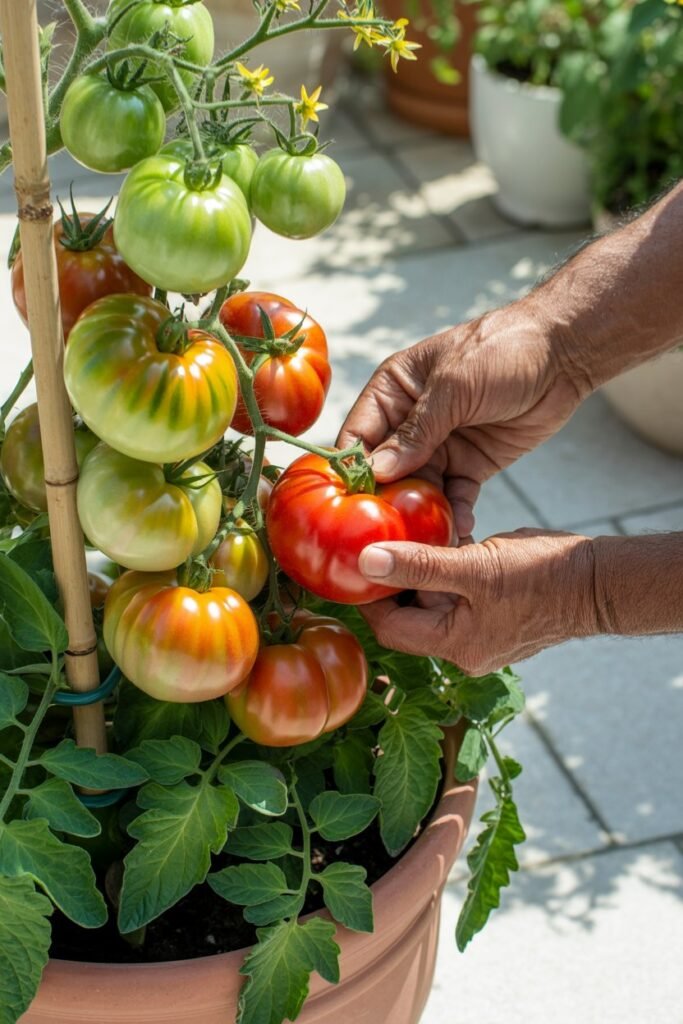
When to Harvest
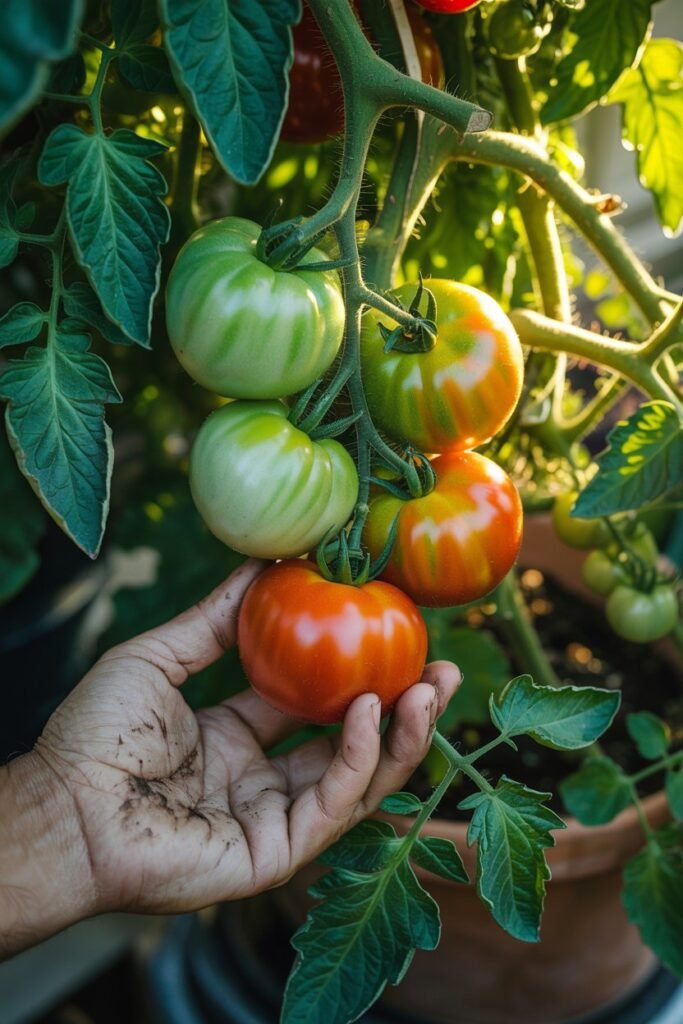
Tomatoes are ready to harvest when:
- They turn their full variety color
- They feel slightly soft when squeezed
- The skin is smooth and glossy
Never wait until they fall off — container plants weaken faster when fruit is left hanging too long.
Why You Should Harvest Slightly Early
Tomatoes continue ripening after picking.
If you harvest when:
- The bottom has fully changed color
- The top is starting to blush
You reduce:
- Sunscald
- Pest attacks
- Bird damage
And the plant redirects energy into developing new fruits.
How to Harvest Properly
Use clean scissors or pruners.
Snip the fruit off with:
- A small piece of vine attached
This prevents the skin from tearing and harming the plant.
Encourage Continuous Fruiting
Your tomato plant keeps producing if you:
✔️ Remove overripe fruits
They drain energy.
✔️ Prune the plant lightly
Improves airflow and sun penetration.
✔️ Feed with potassium
Potassium boosts fruit swelling.
✔️ Water consistently
Even moisture prevents blossom drop.
End-of-Season Extension Tricks
Container tomatoes give you an advantage — mobility.
When temperatures drop:
- Move the pot against a warm wall
- Bring indoors near a sunny window
- Use a small grow light if needed
You can easily extend your harvest by 2–4 additional weeks with this method.
Expert Tip: Overwinter Your Tomato for Next Season
If you grow a favorite variety, you can overwinter the plant.
Steps:
- Cut plant back to 6–8 inches
- Move indoors before frost
- Place under grow light
- Water lightly every 3–4 weeks
- Replant in spring
This gives you a massive head start next season.
Conclusion: Container Tomatoes Can Outperform Garden Tomatoes — When You Use the Right Tactics
Growing tomatoes in pots may seem challenging, but with expert-level techniques, your container tomatoes can become healthier, easier to manage, and even more productive than in-ground plants.
Here’s what truly makes the difference:
- The right pot size gives the roots space they need.
- Premium soil fuels growth and prevents disease.
- Strong sunlight powers fruit production.
- Proper watering prevents blossom end rot, stress, and wilt.
- Strategic feeding delivers nutrients exactly when they’re needed most.
- Pruning and support structure the plant for airflow and maximum yield.
- Pest prevention protects the limited soil environment of containers.
- Pollination assistance ensures every flower becomes a fruit.
- Smart harvesting keeps the plant productive long into the season.
Each tactic builds on the next and together, they transform a single tomato plant in a pot into a thriving, constantly-fruiting powerhouse.
With these 9 tactics mastered, you’ll confidently grow:
- bigger tomatoes
- earlier tomatoes
- sweeter tomatoes
- and more tomatoes
Right from your patio, balcony, or small garden corner.
