
One of my favorite weekend projects started with a half-empty bag of cement sitting in the corner of the garage.
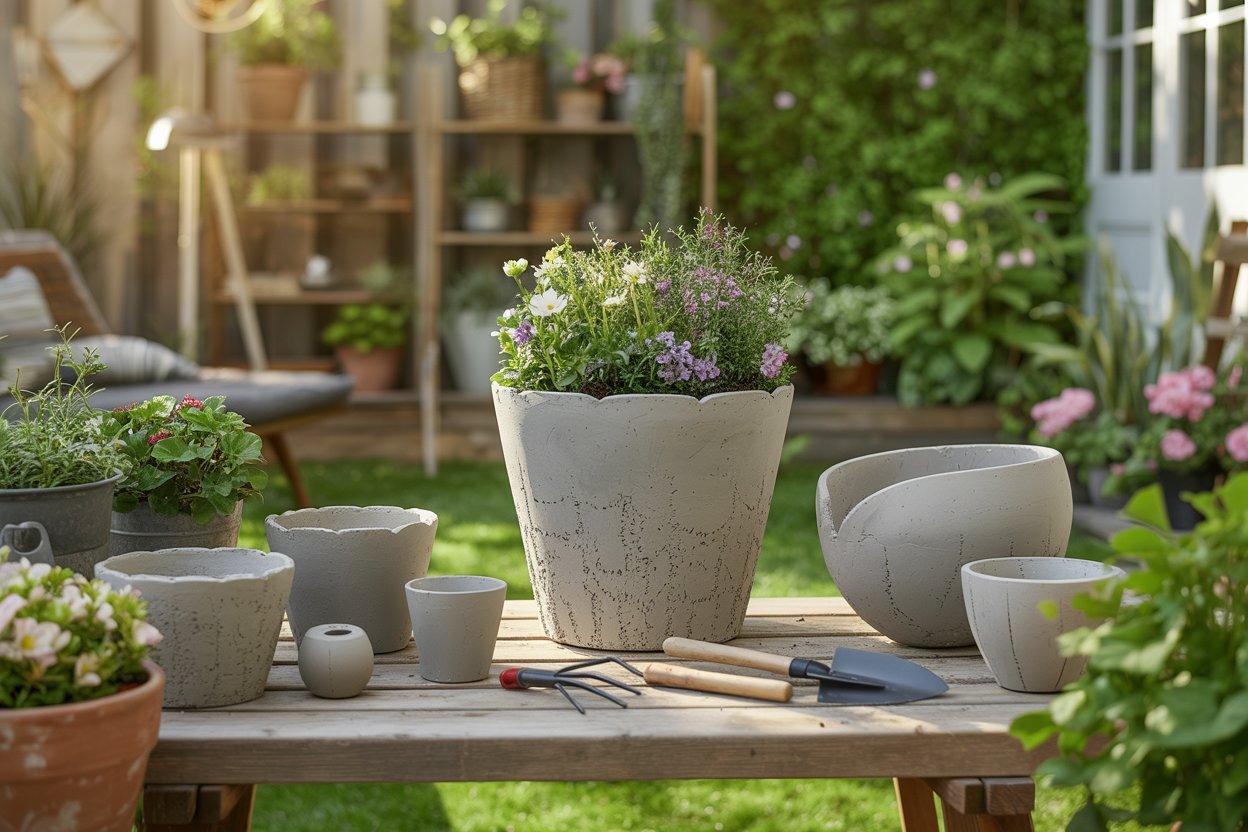
I wanted beautiful planters for my patio, but every pot I loved at the garden center seemed far too expensive for the number I needed.
Instead of buying them, I decided to make my own. What began as a simple experiment quickly turned into an enjoyable hobby that transformed my outdoor space.
DIY cement pots are surprisingly easy to create, budget-friendly, and completely customizable.
Whether you love modern minimalism, rustic garden charm, or elegant decorative pieces, this guide will walk you through everything you need to know to create impressive cement planters from start to finish.
Lets dive into this DIY Cement Pots.
This post contains affiliate links. As an Amazon Associate, I earn from qualifying purchases. If you shop through my links, you help support The Tidy Root at no additional cost to you. Thank you!
Shop my amazon essentials
- Concrete mix (or hypertufa mix)
- Water
- Mixing bucket and a stir stick or trowel
- Rubber gloves, a dust mask, and eye protection
- Molds (one larger, one smaller to nest inside)
- Petroleum jelly (to help release the mold)
- Something to poke drainage holes (straws, dowels, or small PVC pieces)
- Sandpaper for smoothing rough edges
- Plastic sheeting or drop cloths to protect your work surface
- Acrylic paint or sealant for decorating and finishing (optional but nice to have)
Why DIY Cement Pots Are Worth Making

Cement pots have become increasingly popular among gardeners and home decorators, and it’s easy to see why. They offer a timeless appearance that works beautifully in nearly any setting.
Benefits of DIY cement pots include:
- Affordable compared to store-bought decorative planters
- Extremely durable and weather-resistant
- Fully customizable in size and shape
- Perfect for indoor and outdoor plants
- Can be painted, stained, or left natural
- Excellent for modern, rustic, and minimalist designs
- Great weekend DIY project for beginners
Unlike plastic containers that can fade or crack over time, properly made cement pots can last for years with minimal maintenance.
Understanding Cement vs. Concrete

Many people use the words cement and concrete interchangeably, but they are not exactly the same thing.
Cement
Cement is a fine powder that acts as a binding agent when mixed with water.
Concrete
Concrete is made by combining cement, sand, gravel, and water.
For DIY planters, many crafters use:
- Cement mix
- Concrete mix
- Hypertufa mix
Any of these options can work successfully. Beginners often find premixed concrete easiest because the ingredients are already proportioned.
Planning Your DIY Cement Pot Project
Before mixing your first batch, spend a few minutes planning your design.
Ask yourself:
- Where will the planter be placed?
- Will it be used indoors or outdoors?
- What type of plant will grow inside?
- How large should the finished pot be?
- Do you want a modern, rustic, or decorative look?
A little planning prevents wasted materials and ensures your finished planter suits its intended purpose.
Materials You’ll Need
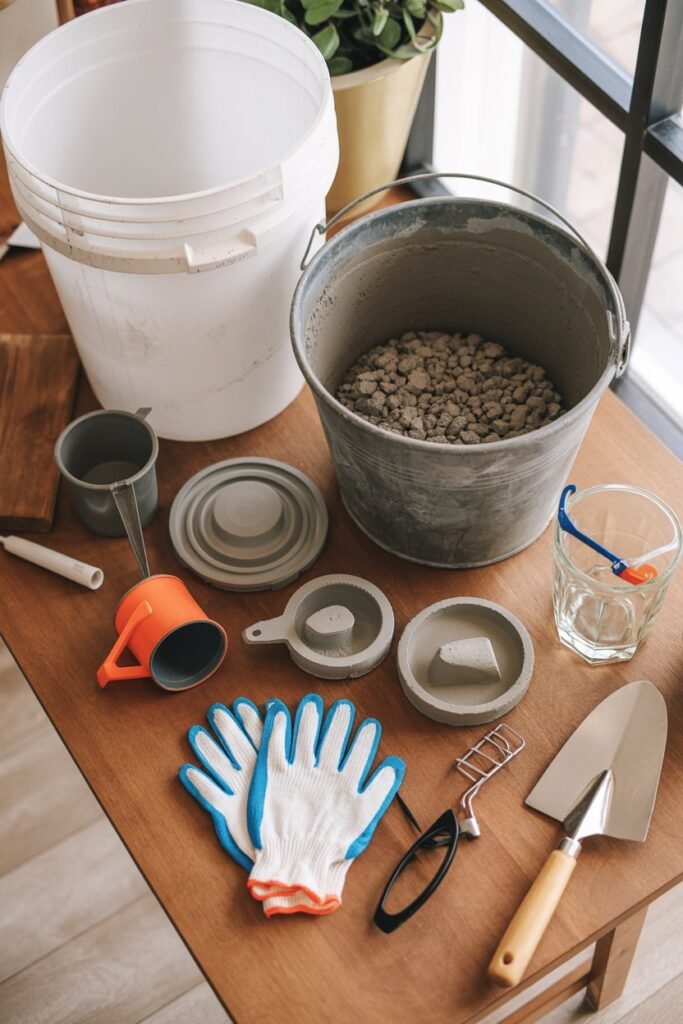
Gathering supplies beforehand makes the entire project smoother.
Essential Materials
- Cement or concrete mix
- Water
- Mixing bucket
- Stir stick or trowel
- Measuring cup
- Rubber gloves
- Dust mask
- Protective eyewear
For Creating Molds
- Plastic containers
- Food storage containers
- Buckets
- Cardboard boxes
- Silicone molds
- Plastic cups
- Yogurt containers
Optional Supplies
- Cooking spray
- Petroleum jelly
- Sandpaper
- Acrylic paint
- Sealant
- Decorative stones
- Mosaic tiles
- Rope
- Stencils
Choosing the Right Mold

The mold determines the final shape of your planter.
Plastic Containers
Perfect for beginners because they are flexible and easy to remove.
Cardboard Boxes
Ideal for creating square or rectangular planters.
Silicone Molds
Excellent for detailed decorative designs.
Household Containers
Many common items work surprisingly well, including:
- Ice cream tubs
- Yogurt cups
- Food containers
- Mixing bowls
- Storage bins
The key is using one larger container for the outside shape and one smaller container to create the planting cavity.
Read 15 Budget-Friendly Backyard Landscaping Ideas That Look Expensive Without Breaking the Bank
Safety Tips Before You Begin
Cement is safe to use when handled properly.
Always remember to:
- Wear gloves
- Use a dust mask while mixing
- Work in a well-ventilated area
- Avoid direct skin contact with wet cement
- Wear protective eyewear
Safety should never be skipped, even for small projects.
Step-by-Step Guide to Making DIY Cement Pots
Step 1: Prepare Your Workspace
Cover your work surface with:
- Plastic sheeting
- Drop cloths
- Old cardboard
Cement can be messy, and preparation makes cleanup much easier.
Step 2: Prepare Your Molds
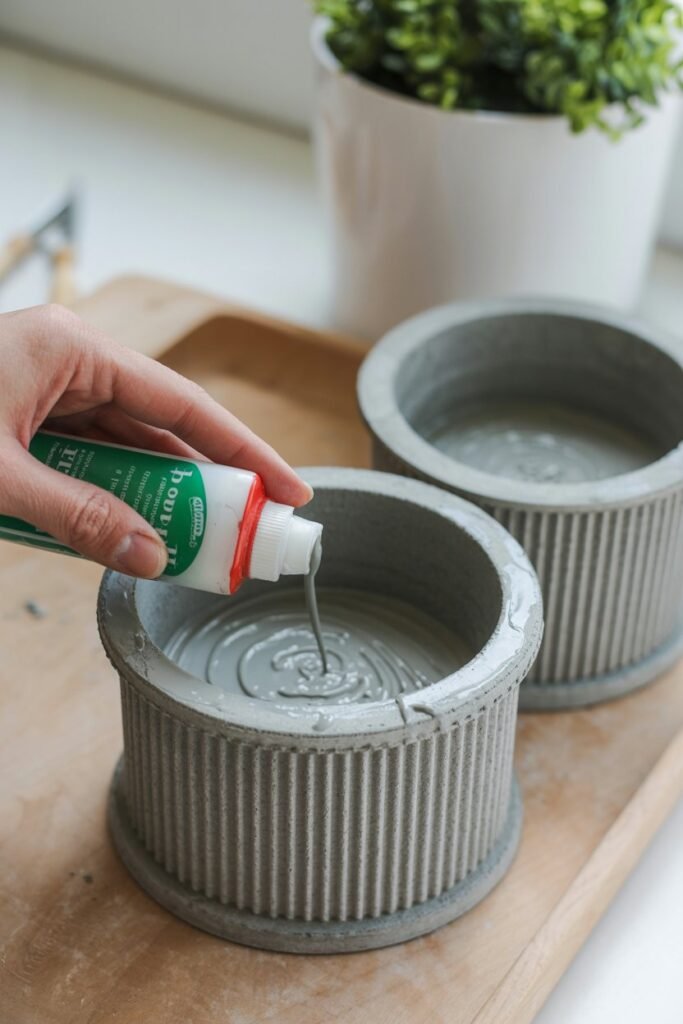
Select two containers:
- One large container
- One smaller container
The smaller container should fit inside the larger one while leaving at least one inch of space around all sides.
Apply:
- Cooking spray
- Petroleum jelly
- Mold release spray
This helps prevent sticking when removing the finished pot.
Step 3: Mix the Cement
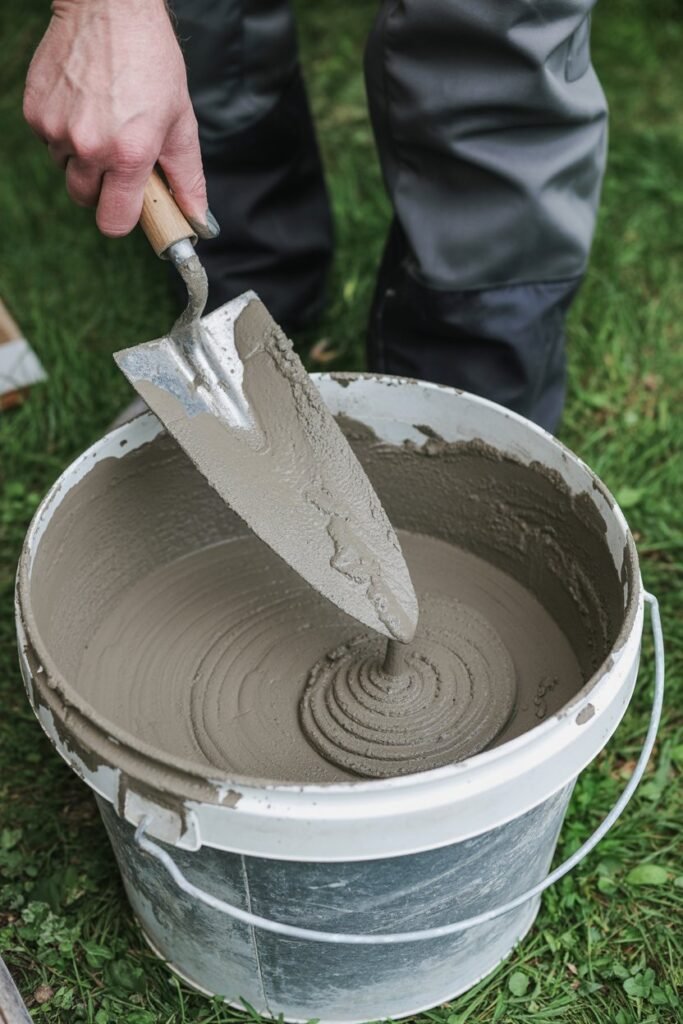
Follow the instructions on your cement or concrete mix package.
Generally:
- Add dry mix to a bucket.
- Slowly add water.
- Stir continuously.
The consistency should resemble thick cake batter.
Avoid:
- Mixture that is too runny
- Mixture that is too dry
A balanced mix creates stronger, smoother pots.
Step 4: Pour the Base Layer
Pour approximately 1 to 2 inches of cement into the bottom of the larger mold.
Tap the mold gently to release trapped air bubbles.
This forms the base of your planter.
Step 5: Insert the Inner Mold
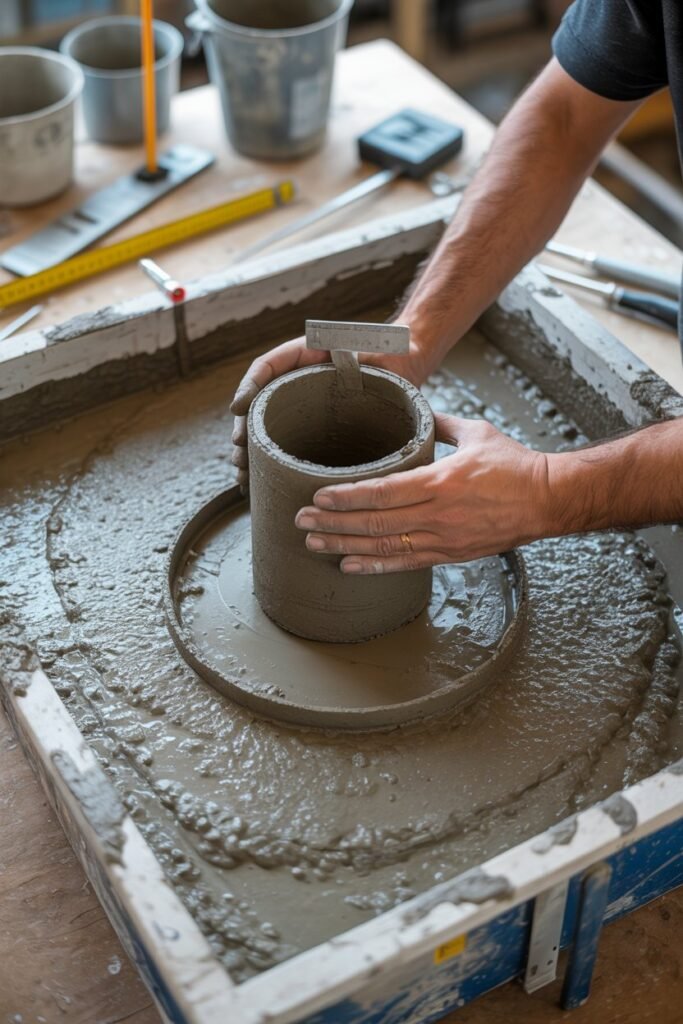
Carefully press the smaller container into the center.
The cement should rise around the sides.
Keep the inner mold centered to create even wall thickness.
You can place:
- Stones
- Sand
- Water
inside the smaller mold to prevent it from floating.
Step 6: Fill the Side Walls
Add additional cement around the gap between the molds.
Use a stick or spatula to push the mixture into corners.
Continue tapping the sides to remove air pockets.
This step helps create a stronger and more professional-looking planter.
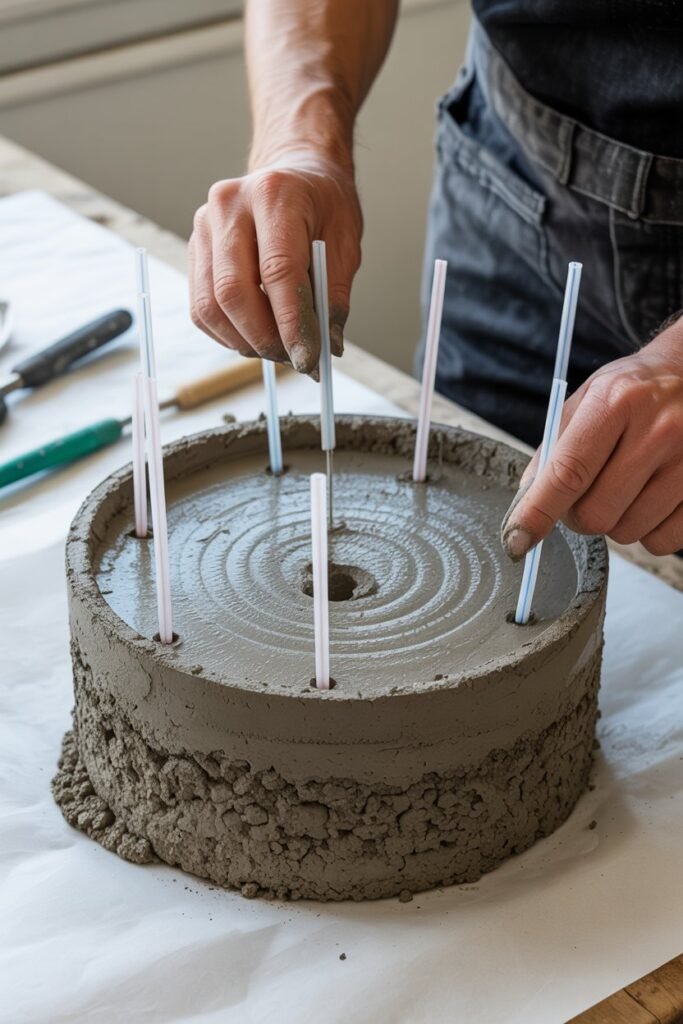
Step 7: Create Drainage Holes
Drainage is essential for healthy plants.
Before the cement fully cures, insert:
- Drinking straws
- Wooden dowels
- Small PVC pieces
through the base.
Once cured, remove them to leave drainage holes behind.
Step 8: Allow the Cement to Cure
Patience is important here.
Allow the planter to sit undisturbed for:
- 24 to 48 hours initially
- Up to 7 days for full strength
Avoid rushing this stage.
Proper curing results in a much stronger planter.
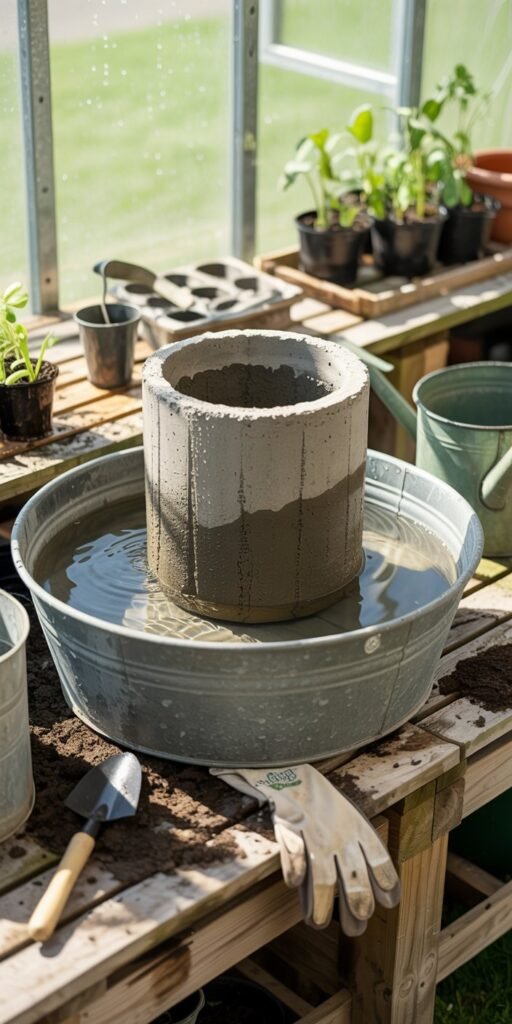
Step 9: Remove the Mold
Carefully separate the molds.
If the outer mold is stubborn:
- Gently squeeze plastic containers
- Cut disposable molds
- Tap lightly around edges
Never force removal, as this can crack the planter.
Step 10: Smooth Rough Edges
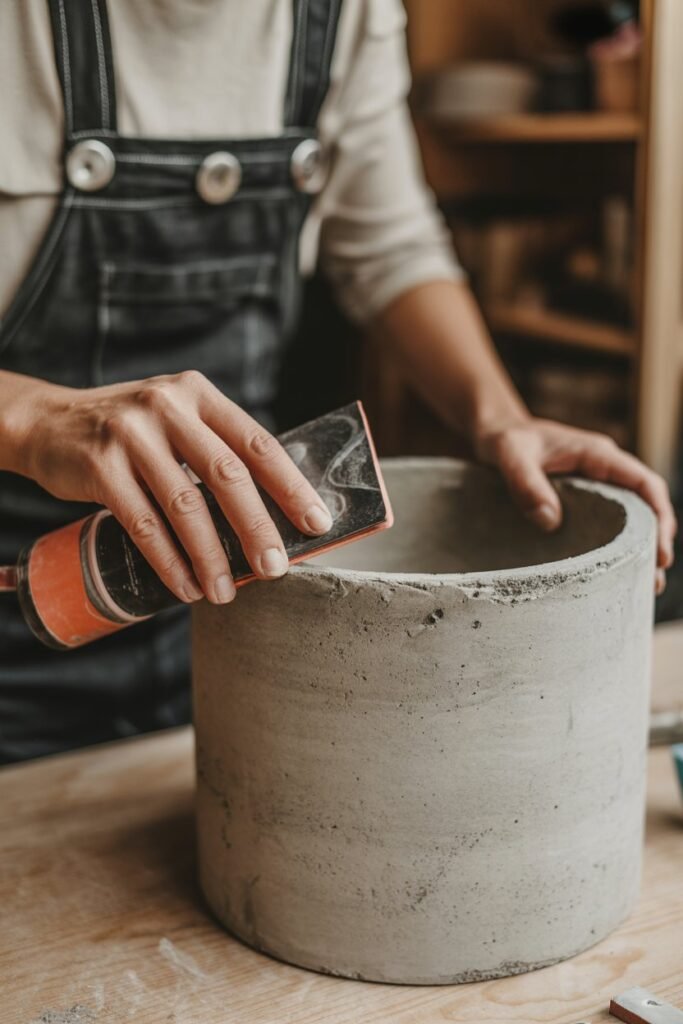
Use medium-grit sandpaper to smooth:
- Sharp corners
- Uneven surfaces
- Rough edges
This step dramatically improves the appearance of the finished piece.
How to Cure Cement Pots Properly
Many beginners overlook curing, but it greatly impacts durability.
After demolding:
- Mist the planter with water.
- Cover with plastic.
- Store in a shaded area.
Repeat daily for several days.
Slow curing creates stronger cement.
Removing Cement Alkalinity Before Planting
Fresh cement contains lime that can raise soil pH.
To make the pot plant-safe:
Water Soaking Method
Fill the planter with water.
Let it sit for 24 hours.
Repeat several times over one to two weeks.
Vinegar Rinse Method
Use a diluted vinegar solution occasionally to help neutralize excess alkalinity.
This preparation helps protect sensitive plants.
Creative DIY Cement Pot Design Ideas
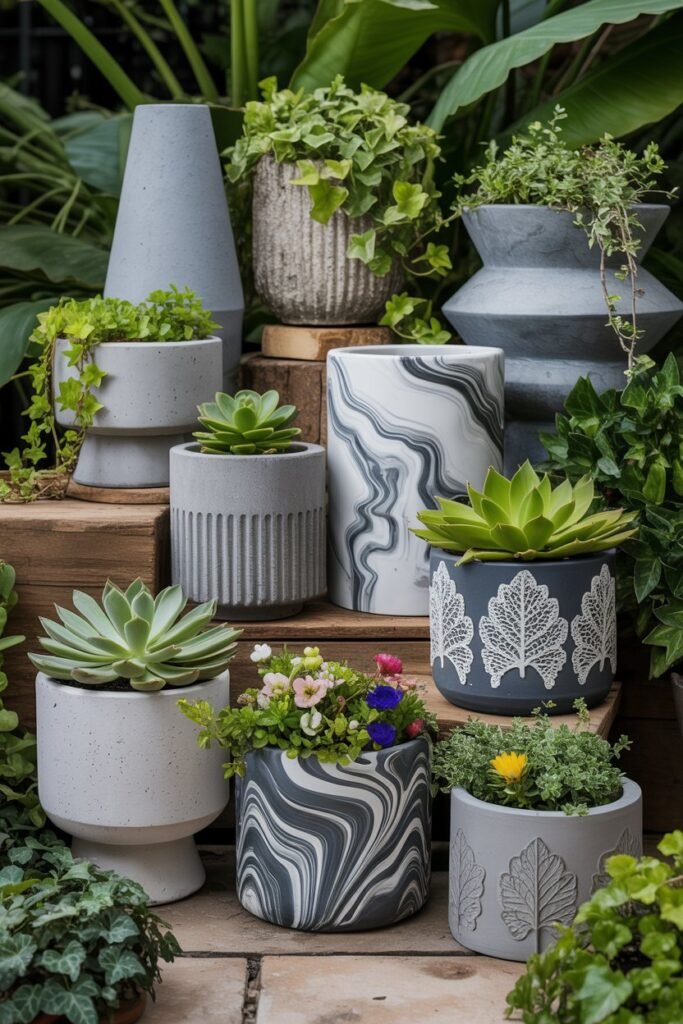
One of the best parts of this project is customizing your planters.
Modern Minimalist Pots
Features:
- Clean lines
- Smooth surfaces
- Neutral colors
Perfect for contemporary homes.
Rustic Garden Pots
Create texture using:
- Rough molds
- Natural impressions
- Weathered finishes
These complement cottage-style gardens beautifully.
Geometric Planters
Use square and angular molds for:
- Modern patios
- Indoor décor
- Succulent displays
Geometric designs remain extremely popular.
Marbled Cement Pots
Mix small amounts of colored pigment into the cement.
Gently swirl for a marble effect.
Each planter becomes unique.
Textured Decorative Pots
Press objects into wet cement:
- Leaves
- Lace
- Fabric
- Shells
- Rope
The impressions create stunning artistic details.
Best Plants for Cement Pots

Many plants thrive in cement containers.
Excellent choices include:
Succulents
- Echeveria
- Jade plant
- Haworthia
Herbs
- Basil
- Rosemary
- Thyme
- Mint
Flowers
- Petunias
- Marigolds
- Pansies
Houseplants
- Snake plant
- ZZ plant
- Pothos
- Peace lily
Choose plants according to the pot size and growing conditions.
Decorating Your Cement Pots

Once cured, your planter becomes a blank canvas.
Painting
Use outdoor acrylic paint for vibrant color.
Popular shades include:
- White
- Black
- Sage green
- Terracotta
- Soft blush
Stenciling
Create patterns using:
- Floral designs
- Geometric shapes
- Botanical illustrations
Mosaic Decoration
Attach:
- Glass pieces
- Decorative stones
- Ceramic fragments
for an elegant finish.
Metallic Accents
Gold or silver highlights can transform a simple planter into a designer-looking piece.
Common Mistakes to Avoid
Adding Too Much Water
Overly wet mixtures weaken the finished pot.
Skipping Drainage Holes
Without drainage, roots can rot quickly.
Demolding Too Soon
Removing molds before curing can lead to cracks.
Thin Walls
Walls thinner than one inch may become fragile.
Ignoring Air Bubbles
Trapped air can create weak spots and imperfections.
How to Repair Minor Cracks
Small cracks do not necessarily ruin a planter.
You can repair them by:
- Mixing a small amount of cement paste.
- Filling the crack.
- Smoothing the surface.
- Allowing it to cure again.
Most repairs become nearly invisible after painting.
Maintaining Your DIY Cement Pots
Fortunately, maintenance is minimal.
Regular Care
- Remove dirt periodically
- Wash with mild soap
- Check for cracks annually
Winter Protection
In freezing climates:
- Elevate pots slightly
- Improve drainage
- Avoid standing water
These simple steps extend the life of your planters.
Budget-Friendly Tips for Making Multiple Cement Pots
If you’re creating a collection of planters:
- Buy cement in larger bags
- Reuse household containers as molds
- Create several molds at once
- Mix larger batches efficiently
Making multiple planters at the same time significantly reduces costs.
Frequently Asked Questions
Are cement pots heavy?
Yes. Cement planters are generally heavier than plastic pots, making them stable in windy conditions.
How long do cement pots last?
Properly made and cured cement pots can last many years, often over a decade.
Can I paint cement pots?
Absolutely. Acrylic and masonry paints work especially well.
Do cement pots need sealing?
Not always, but sealing can help reduce moisture absorption and staining.
Can beginners make cement pots?
Yes. This is one of the easiest DIY garden projects for beginners.
Final Thoughts
Creating your own DIY cement pots is one of the most rewarding garden projects you can tackle.
With just a few affordable materials, you can design custom planters that reflect your personal style while adding character to your home and garden.
Whether you prefer sleek modern containers, rustic textured designs, or colorful decorative creations, the possibilities are nearly endless. Take your time, enjoy the process, and don’t be afraid to experiment.
Every planter teaches a new skill, and before long you’ll have a beautiful collection of handmade pieces that look far more expensive than they actually are.
