
I didn’t decide to grow vanilla beans because it was trendy or impressive. I decided to grow them because I wanted to understand patience on a deeper level.
Vanilla doesn’t bend to urgency. It doesn’t reward rushing. It asks you to slow down, observe, and learn how to create the kind of environment where something precious can unfold in its own time.
When I first brought my vanilla cutting home, I had no idea just how much it would teach me not only about tropical plants, but about consistency, restraint, and trust.
Vanilla is not forgiving when its needs are ignored, but it is incredibly generous when they are met.
This guide is built from that experience, and every part of it is meant to help you grow vanilla beans successfully from planting all the way to harvest, with fewer mistakes and far more confidence.
Understanding the Vanilla Plant Before You Ever Plant It
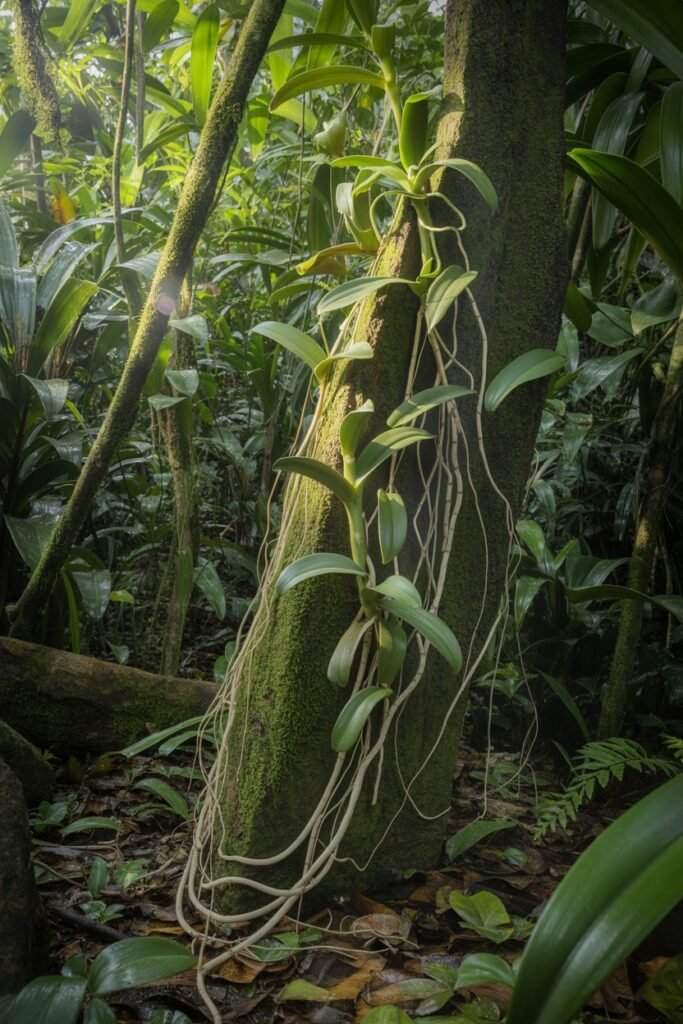
Vanilla comes from Vanilla planifolia, which is a tropical orchid vine, and understanding this single fact changes everything about how you should grow it.
most food-producing plants, vanilla is not rooted in soil in the traditional sense.
In nature, it grows in the understory of tropical forests, climbing tree trunks and anchoring itself with aerial roots that cling to bark rather than digging deep into the ground.
This means vanilla evolved to breathe through its roots, absorb moisture from humid air, and receive light that is filtered through layers of foliage above it.
Vanilla (Vanilla planifolia) is not a typical houseplant. It is:
- A tropical climbing orchid
- A vine that roots as it climbs
- A plant that grows in layers, not straight lines
- Highly sensitive to environmental stress
Most failures happen because people treat vanilla like a vegetable or a decorative orchid. It’s neither.
Vanilla evolved in warm jungle understories where:
- Light is filtered through trees
- Roots cling to bark, not soil
- Moisture is constant but never stagnant
- Growth is slow and intentional
Once you understand this, everything else makes sense.
Choosing the Right Vanilla Cutting and Why It Matters So Much
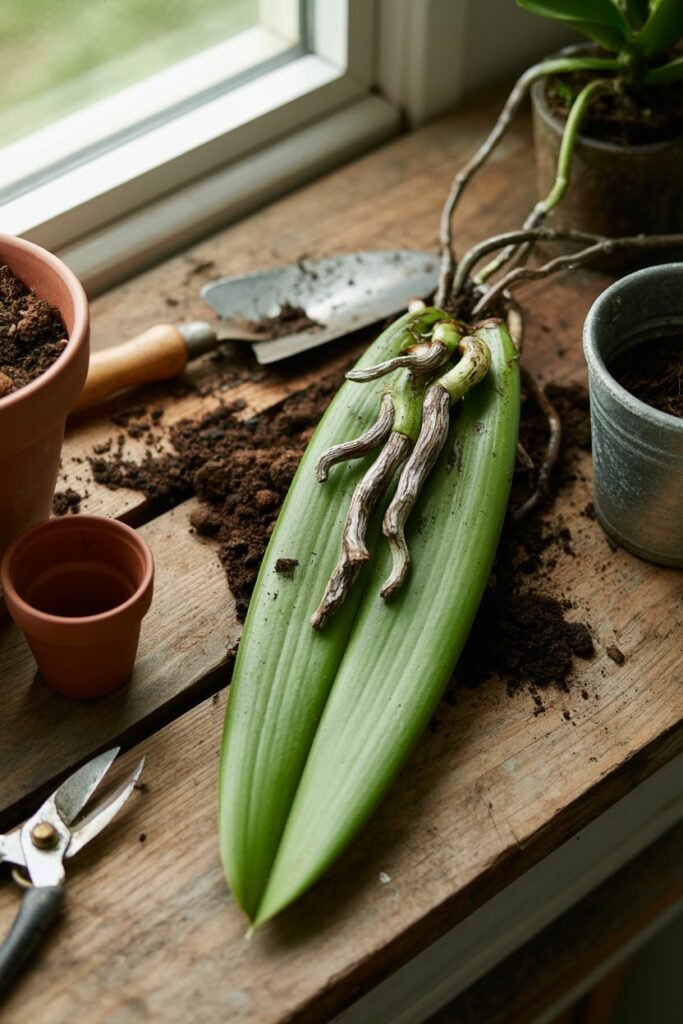
The quality of your vanilla cutting determines not only whether the plant survives, but how long it will take to mature and flower.
A healthy cutting already contains stored carbohydrates and hormones that support new root formation, vine thickening, and eventual flowering.
Short or weak cuttings lack this internal reserve, which means the plant spends years simply trying to survive instead of preparing to reproduce.
A well-chosen cutting is long enough to contain multiple healthy nodes, which are the points along the stem where roots and leaves can emerge.
Each node represents potential growth, and the more nodes your cutting has, the more opportunities the plant has to establish itself quickly.
When I switched from a short cutting to a longer one, I noticed stronger vine growth within months instead of years. That experience taught me that patience starts with choosing the right beginning.
Never start vanilla from seed. Even professionals avoid it.
What Makes a High-Quality Cutting
- Length: 18–36 inches (longer = faster maturity)
- Nodes: At least 6–10 healthy nodes
- Texture: Flexible, green, and firm
- Age: Semi-mature (not woody, not baby soft)
Experience tip: A longer cutting can shave a full year off flowering time because it already contains stored energy.
Why Letting the Cutting Heal Is Essential for Survival
Freshly cut vanilla vines are extremely vulnerable to fungal infections if planted immediately.
The open wound at the base of the cutting can easily absorb excess moisture, which creates the perfect conditions for rot to set in before roots ever have a chance to form.
Allowing the cut end to dry and callous over is not optional it is a protective step that seals the plant’s tissue and dramatically increases its chances of survival.
When I skipped this step early on, I lost an entire cutting within weeks.
When I respected it, my success rate changed completely. That single day of waiting prevents weeks of heartbreak.
Before planting, the cutting must callous.
- Lay it in shade for 24–48 hours
- This seals the cut and prevents rot
- Skipping this often leads to fungal loss
I learned this the hard way.
Creating a Growing Medium That Mimics the Jungle Floor
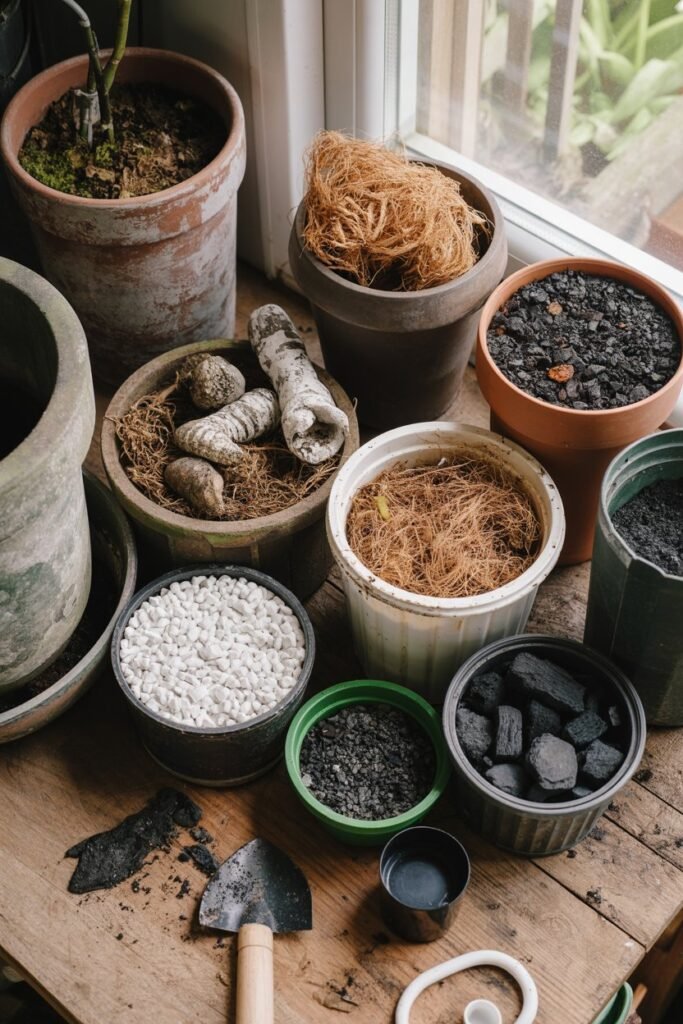
Vanilla roots are not designed to sit in compacted soil. In the wild, they cling to decomposing bark, fallen leaves, and loose organic debris that allows air and moisture to flow freely.
This is why a loose, airy growing medium is so critical.
The purpose of the medium is not to “hold” the plant upright like soil does for vegetables, but to support roots while allowing them to breathe.
Orchid bark provides structure and airflow, coco coir or peat moss holds gentle moisture, perlite prevents compaction, and organic matter supplies slow, steady nutrients.
When these components are combined correctly, they create an environment where roots grow outward instead of suffocating inward.
Every time I’ve adjusted my mix to be lighter and more breathable, the plant has responded with stronger aerial roots and thicker vines.
Vanilla roots need:
- Air
- Moisture
- Grip
They do not want compact soil.
My Proven Vanilla Medium
- 40% orchid bark (medium grade)
- 30% coco coir or peat moss
- 20% perlite or pumice
- 10% worm castings or aged compost
Optional but powerful additions:
- A handful of charcoal (prevents souring)
- Mycorrhizal fungi at planting
🚫 Never use plain potting soil or garden soil.
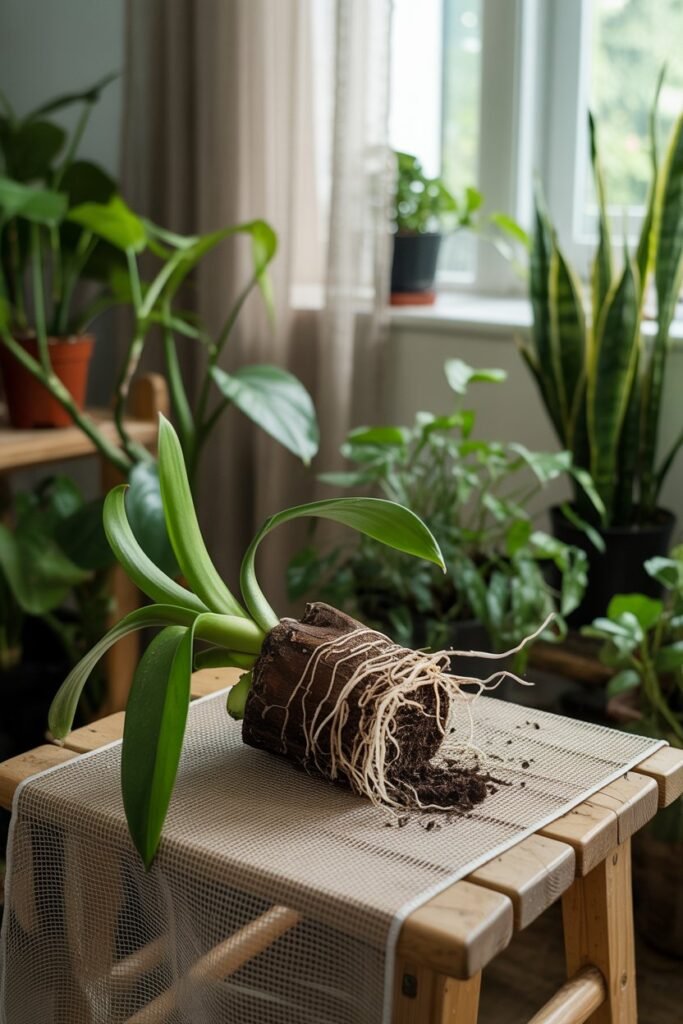
Planting the Vanilla Cutting With Intention
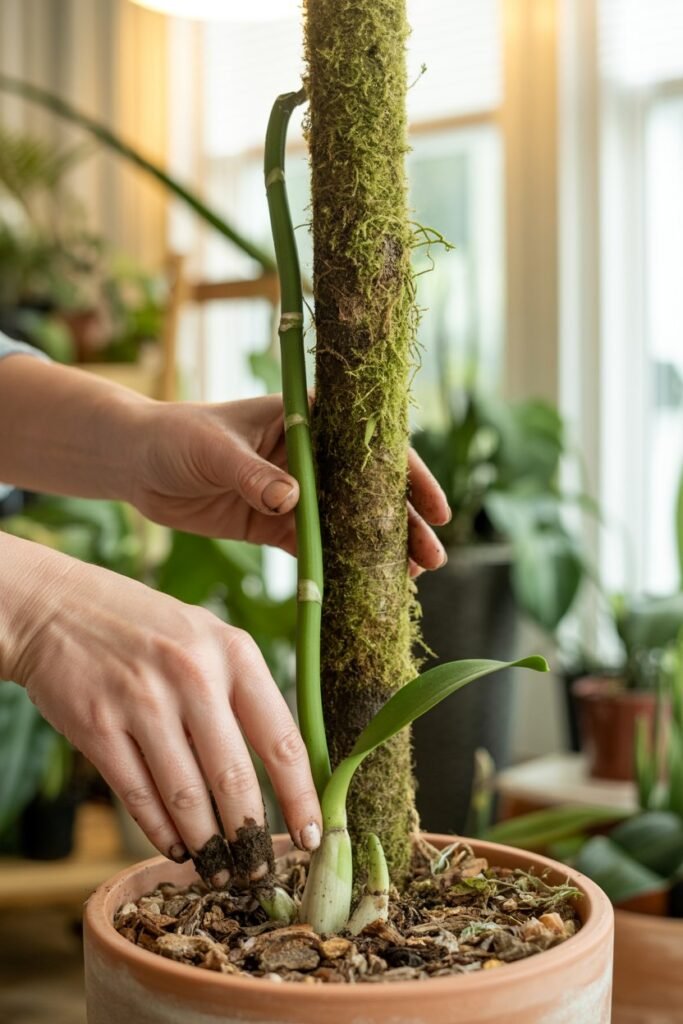
Planting vanilla is less about burying it and more about positioning it thoughtfully. Only a few nodes should be placed into the growing medium, because those nodes will develop terrestrial roots.
The remaining nodes must stay above the surface so they can form aerial roots, which are just as important for stability and nutrient absorption.
Pressing the medium gently around the nodes provides contact without compaction, allowing roots to anchor naturally.
Orientation matters too. The vine should be angled toward its future support so it doesn’t need to be forced or bent later.
Vanilla does not like abrupt changes, and gentle guidance from the start leads to smoother growth later on.
- Bury 2–3 nodes horizontally in the medium
- Keep remaining nodes above the surface
- Angle the vine toward its support
- Firm gently never compact
Water lightly and place in warm shade.
Rooting accelerator: I mist the exposed nodes daily for 10–14 days. This mimics jungle humidity and encourages aerial root formation.
Why Support Structures Are Not Optional for Vanilla
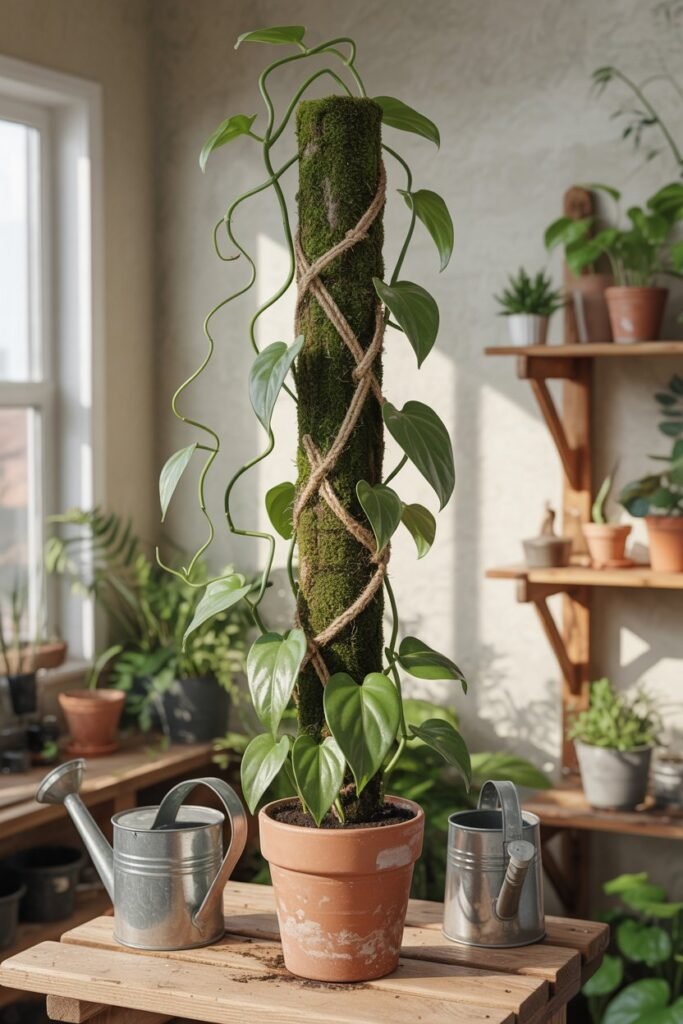
Vanilla is biologically programmed to climb. When it cannot climb, it becomes stressed, leggy, and unproductive.
A proper support structure gives the plant a sense of direction and stability, encouraging it to grow thicker stems and stronger leaves instead of stretching weakly toward light.
Supports wrapped in moss or fiber also serve another important purpose: they allow aerial roots to attach and absorb moisture from the air.
When I switched from a bare stake to a moss-covered pole, the difference was immediate. The vine anchored itself more confidently, and growth became steadier and more balanced.
Best Support Options
- Moss poles (best overall)
- Wooden trellis wrapped in coco fiber
- Rough bark logs (excellent outdoors)
The vine should be tied loosely. Never constrict it.
Flowering trick: Once the vine reaches 6–8 feet, gently loop it downward. This signals maturity and encourages flower production later.
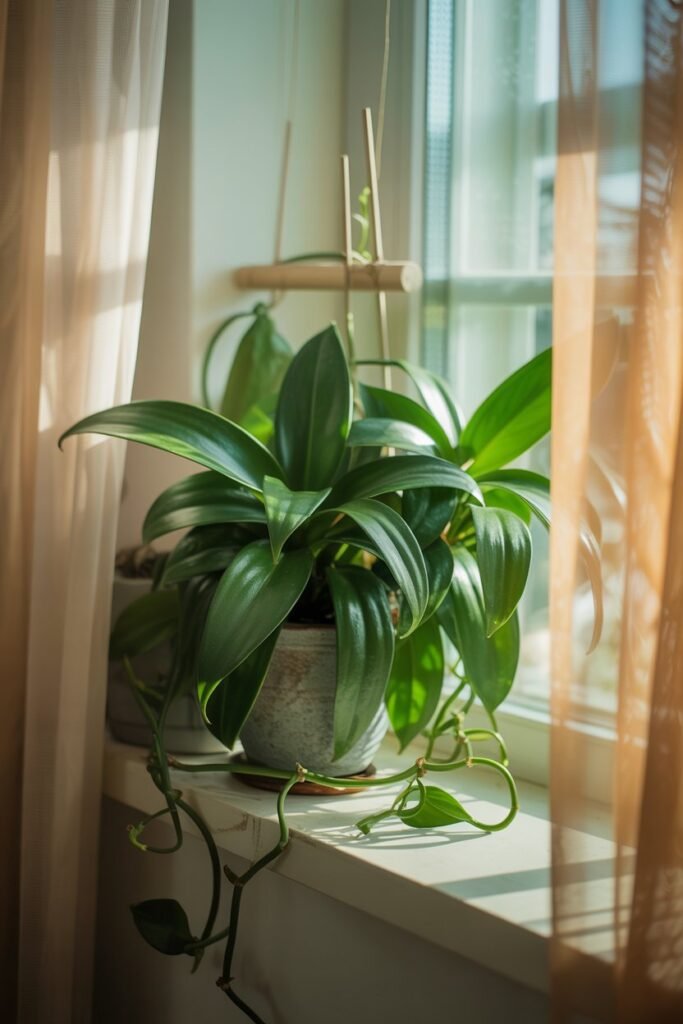
Understanding Light as a Growth Regulator, Not Just Energy
Light does more than fuel photosynthesis for vanilla it regulates growth speed, leaf thickness, and eventual flowering.
Bright, indirect light tells the plant that it is in a protected canopy environment, which encourages healthy growth without triggering stress responses.
Too much direct sun scorches leaves and forces the plant into survival mode, while insufficient light causes slow, thin growth that may never reach flowering maturity.
By observing leaf color and texture, you can adjust light before problems become severe. Deep green, firm leaves indicate balance, while pale or floppy leaves suggest an imbalance that needs correcting.
Vanilla does best in:
- Bright, indirect light
- Gentle morning sun only
- Filtered shade outdoors
Signs of incorrect light:
- Yellowing = too much sun
- Thin, slow growth = too little light
Growth hack: I rotate the plant weekly and clean leaves monthly. Clean leaves photosynthesize better this alone increased my growth rate noticeably.
Temperature and Humidity as the Foundation of Success
Vanilla’s metabolism is closely tied to warmth and moisture. Consistent warmth keeps cellular processes active, while high humidity allows aerial roots to absorb water directly from the air.
When either factor drops too low, growth slows dramatically, sometimes for months at a time.
Maintaining humidity is often more important than watering frequency.
I learned that increasing humidity allowed me to water less often without sacrificing growth, which reduced root rot and improved overall plant health.
Ideal Conditions
- Day: 75–90°F (24–32°C)
- Night: Above 65°F (18°C)
- Humidity: 60–80%
Ways I maintain humidity:
- Pebble trays
- Grouping plants
- Regular misting (morning only)
- Humidifier during dry seasons
🚫 Cold drafts or dry air can stall growth for months.
Watering Vanilla With Awareness Instead of Routine
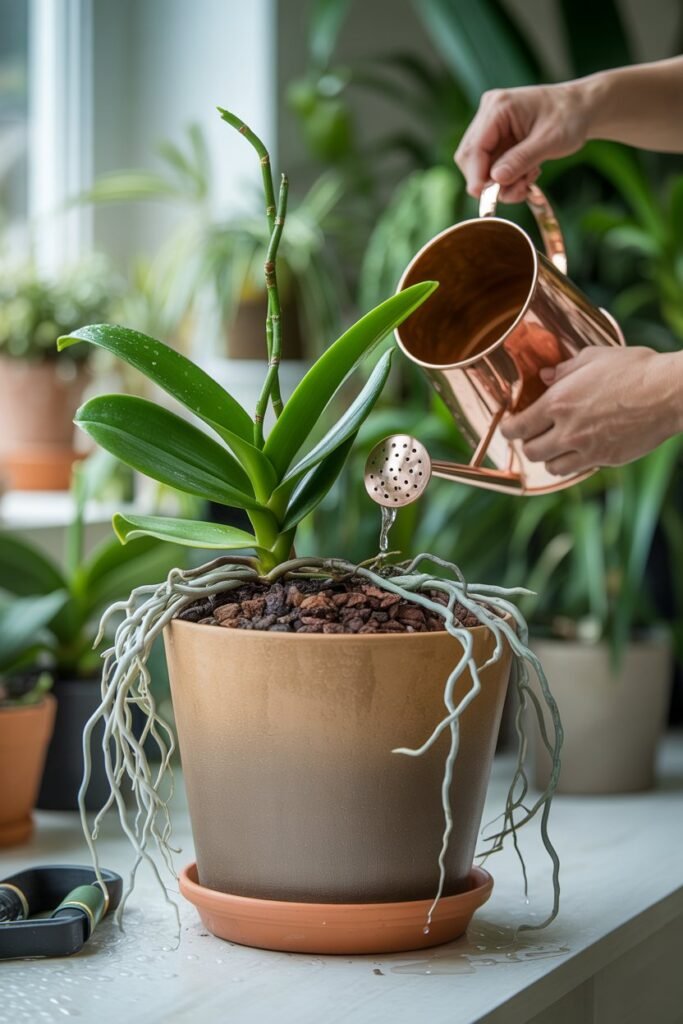
Vanilla does not respond well to rigid watering schedules. Instead, it thrives when watering is guided by observation.
The growing medium should never be bone dry, but it should also never remain soggy. Allowing the surface to dry slightly between waterings encourages roots to grow deeper and stronger.
Using rainwater or filtered water minimizes salt buildup, which can damage sensitive orchid roots over time. This small change had a noticeable effect on leaf clarity and vine resilience in my own plants.
Feeding Vanilla for Strength, Not Speed Alone
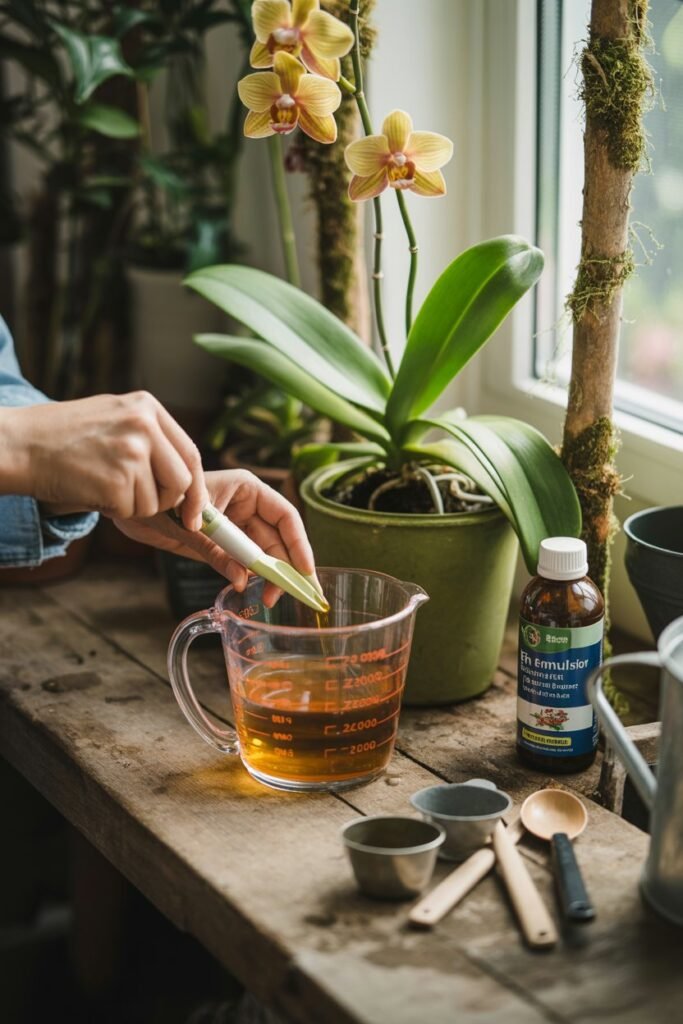
While it’s tempting to overfeed vanilla in hopes of faster growth, excessive fertilizer often does more harm than good.
Vanilla prefers gentle, consistent nutrition that mirrors the slow decomposition of organic matter in its native environment.
Diluted fertilizers and natural amendments support steady growth without overwhelming the plant’s delicate root system.
When I focused on soil health rather than aggressive feeding, the plant responded with thicker vines and shorter internodes, which are signs of true strength rather than forced growth.
Feeding Schedule
- Every 2 weeks during active growth
- Monthly during slower seasons
Best Nutrients
- Orchid fertilizer (¼ strength)
- Fish emulsion
- Seaweed extract
My strongest growth secret: Monthly worm casting tea. The vines thicken, internodes shorten, and leaf color deepens.
Training and Pruning as Signals for Maturity
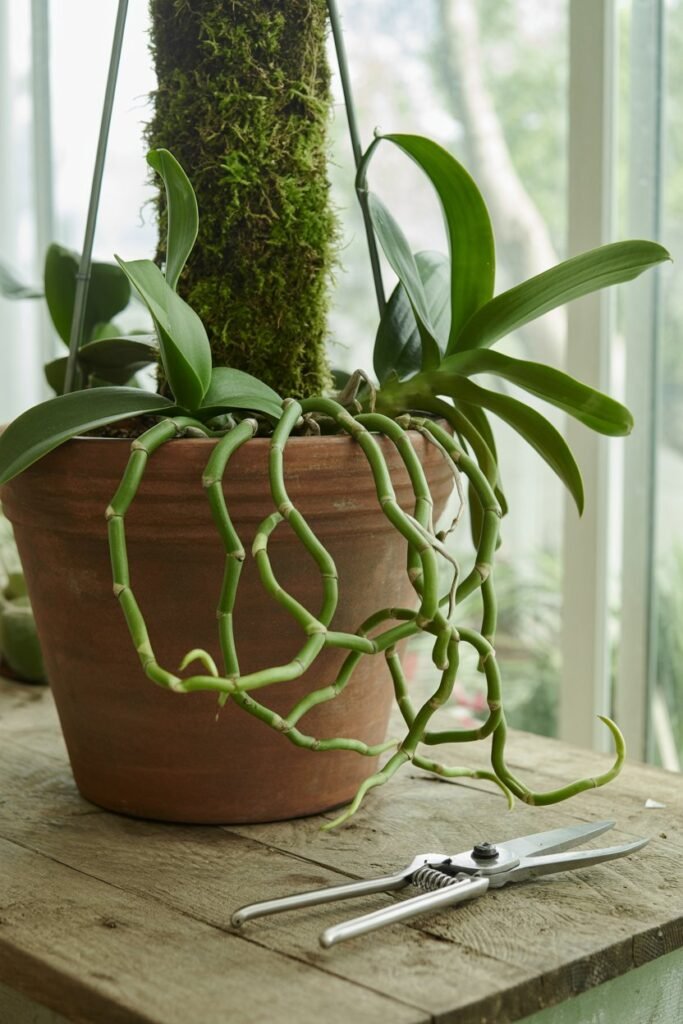
Vanilla does not flower simply because it reaches a certain age. It flowers when it senses that it has climbed, anchored, and matured enough to support reproduction.
Training the vine upward and then allowing it to loop downward mimics the natural growth pattern it would follow in the wild, signaling that it has reached a stable position.
Light pruning reinforces this signal by redirecting energy away from endless vertical growth and toward flower production. Done gently and at the right time, pruning becomes a conversation with the plant rather than a disruption.
Training Tips
- Guide vines gently
- Encourage aerial roots to attach
- Loop vines downward after 6–10 feet
Strategic Pruning
- Light tip pruning after maturity
- Never prune young vines aggressively
Pruning redirects energy into flowering.
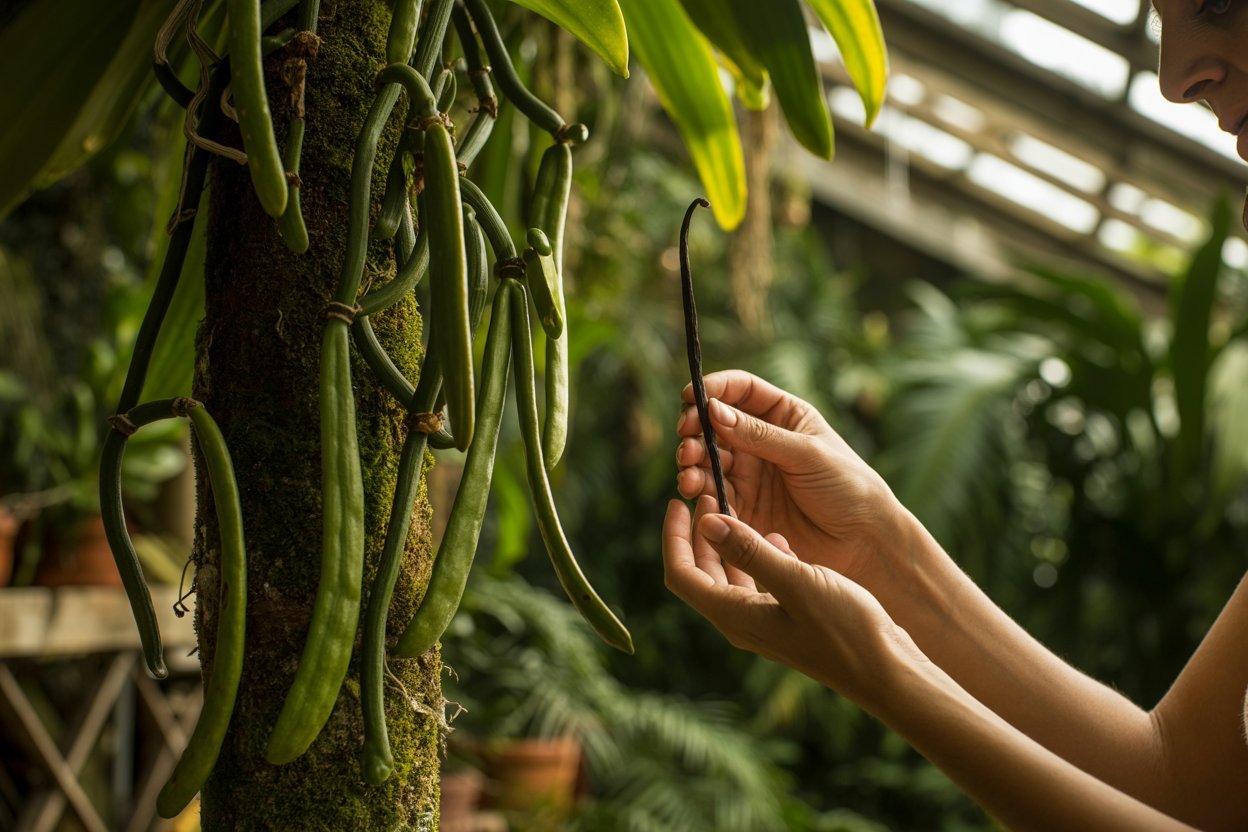
Flowering, Pollination, and the Fragility of the Moment
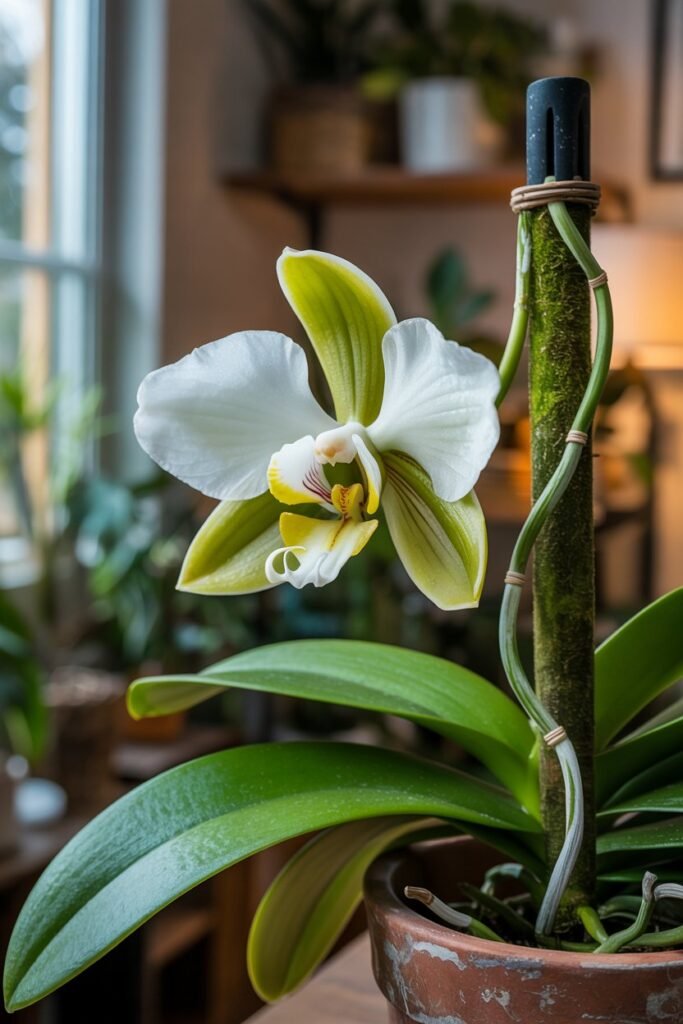
Vanilla flowers are fleeting by design. They open briefly, offer their opportunity, and then close forever.
This makes pollination a precise and intentional act. Hand pollination replaces the role of native pollinators and requires attentiveness rather than force.
Once pollinated successfully, the plant commits months of energy to developing each bean. This is why over-pollinating too many flowers can weaken the vine. Moderation protects both plant and harvest.
Hand Pollination (The Moment That Matters)
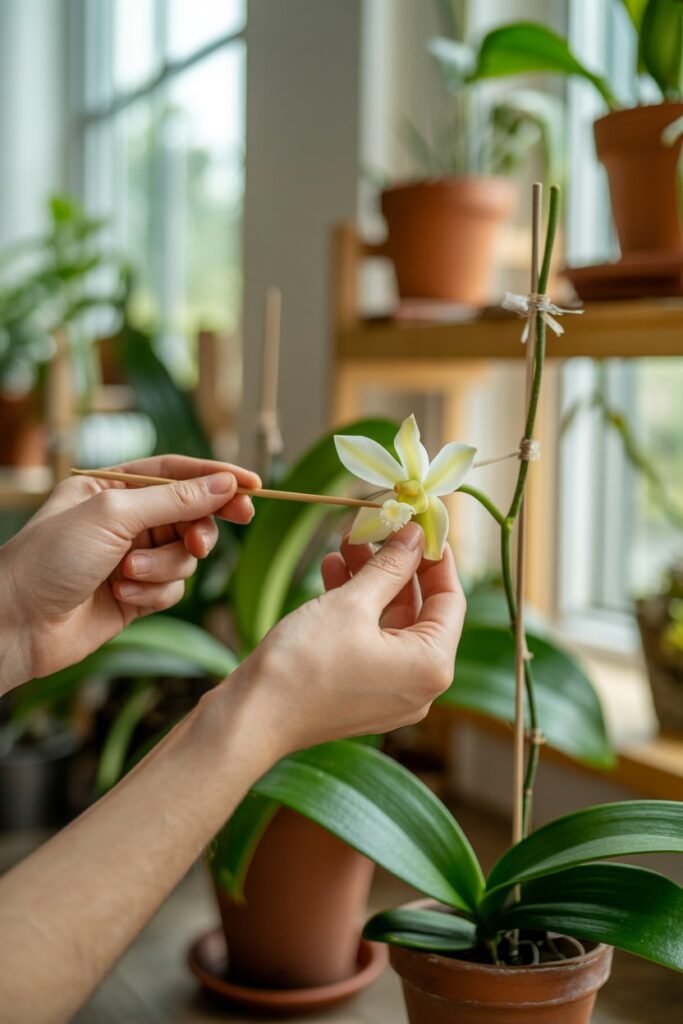
Outside of Mexico, vanilla requires manual pollination.
How I Do It
- Use a toothpick or bamboo skewer
- Lift the rostellum
- Press pollen onto stigma
- Do this within 6–8 hours of opening
If successful, the flower wilts by evening and a pod begins forming within days.
Confidence boost: Your first successful pollination is unforgettable. It feels like magic — but it’s skill.
Growing, Harvesting, and Curing With Patience
The long maturation period of vanilla beans allows flavor compounds to develop slowly within the pod.
Harvesting too early results in inferior beans, while proper timing ensures full aromatic potential.
Curing then transforms these green pods into the dark, fragrant vanilla we recognize, through controlled fermentation and drying.
This stage rewards patience more than any other. Rushing curing ruins months of work, while careful handling creates beans that rival or surpass store-bought vanilla.
Growing the Beans (The Long Middle)
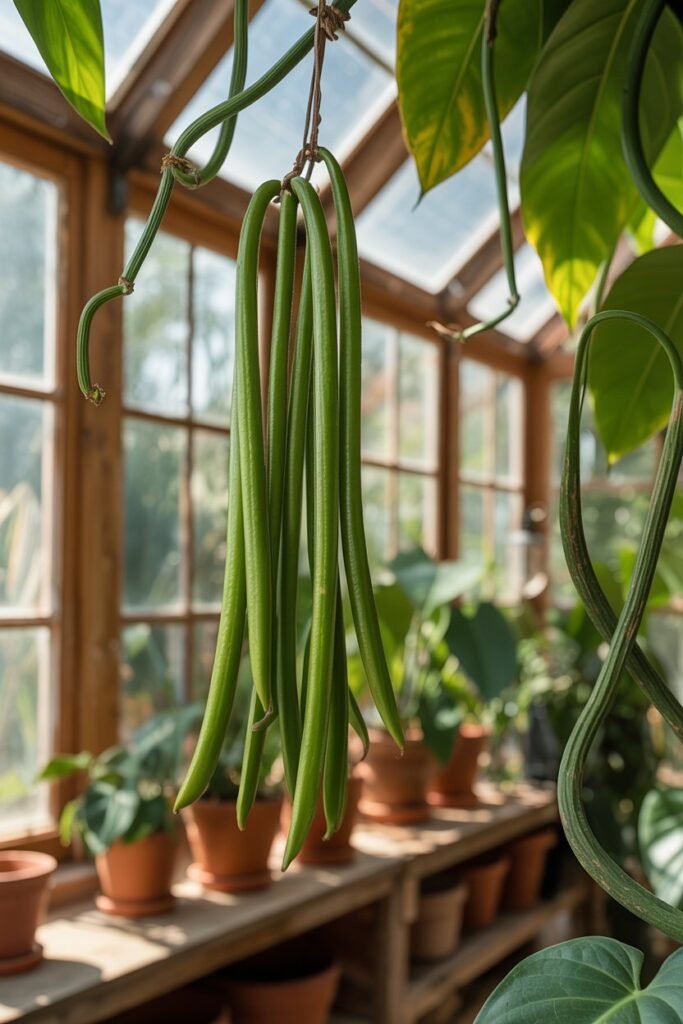
After pollination:
- Beans grow for 8–9 months
- Require steady moisture and feeding
- Should not be disturbed
Avoid:
- Stress
- Temperature swings
- Overfeeding
Healthy beans are firm, glossy, and deep green.
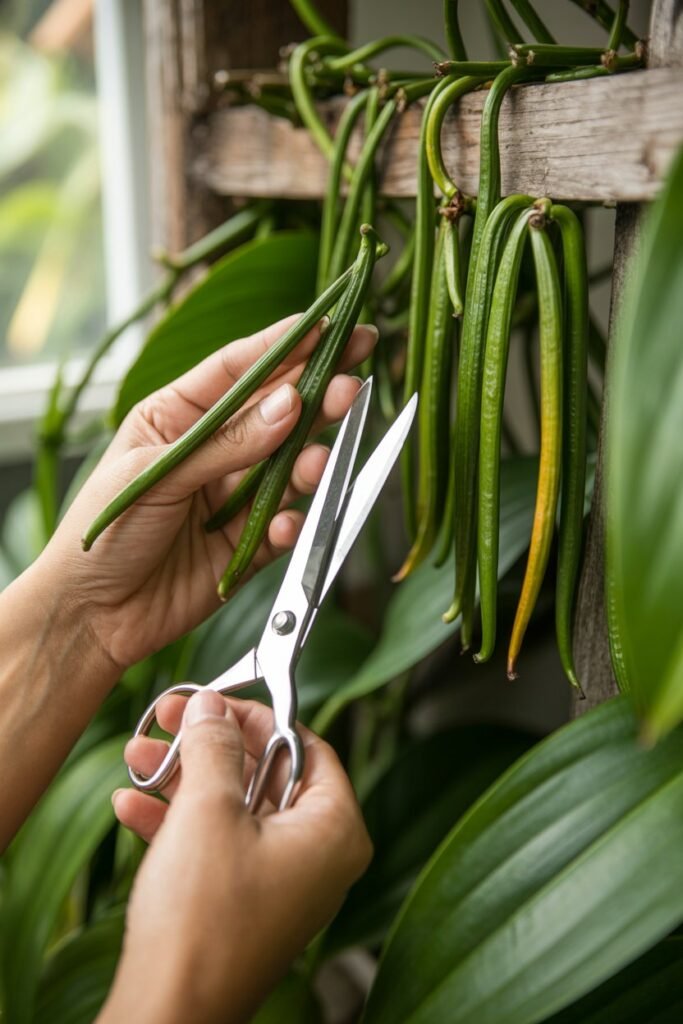
Harvesting at the Right Moment

Harvest when:
- Bean tips turn yellow
- Pods feel plump and heavy
Use clean scissors. Handle gently.
Fresh beans are not fragrant yet that comes later.
Curing Vanilla Beans (Patience Pays Here)
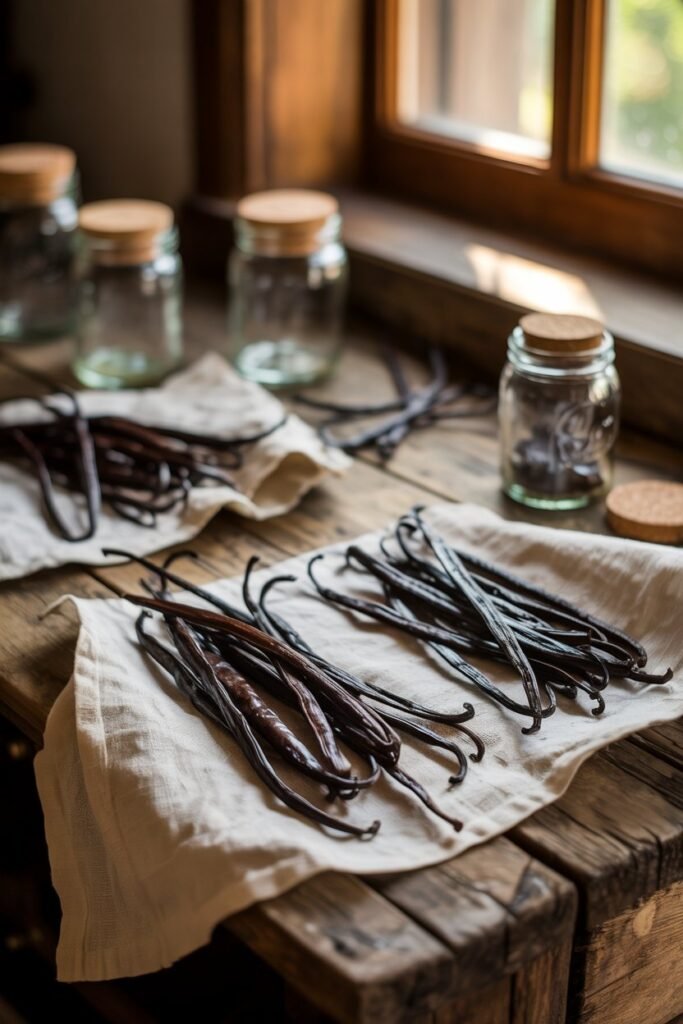
Curing develops flavor and aroma.
Basic Curing Phases
- Blanching (short heat exposure)
- Sweating (wrapped and warm)
- Drying (slow, shaded)
- Conditioning (airtight jars)
This takes 3–6 months.
Flavor tip: Slower curing equals richer vanilla.
Common Problems & Real Fixes
- No flowers: Increase light, prune tips
- Root rot: Improve drainage immediately
- Thin vines: Increase feeding + humidity
- Yellow leaves: Reduce sun or water
Vanilla is honest. It shows stress quickly.
Final Thoughts From My Garden
Growing vanilla beans is not about efficiency. It’s about relationship. When you learn to listen to the plant, respond to subtle changes, and honor its pace, vanilla gives back something truly extraordinary.
It becomes more than a crop it becomes a living lesson in slow abundance.
